Skoda Workshop Service and Repair Manuals
HOME
FEATURES
MENU
INDEX
ABOUT US
Testing oil pressure and oil pressure switch >
< Oil filter holder - Summary of components for engines with identification characters AVU, BFQ
Octavia Mk1
Power unit
1,6/74; 75 kW MPI engine
Engine lubrication
Removing and installing oil pan
Removing and installing oil pan
Removing and installing oil pan
Special tools and workshop equipment required
t
Flexible-head wrench SW 10 -3185-
t
Socket insert -3249-
t
Silicone sealant -D 176 404 A2-
t
Sealant remover gasket stripper (bearing code GST, bearing article no. R 34402), manufacturer Retech s.r.o.
t
Cleaning and degreasing agent, e.g. -D 009 401 04-
t
Protective goggles and gloves
Removing
–
Remove noise insulation in middle as well as on left and right
-arrows-
, first of all remove air guide if present.
–
Drain engine oil.
–
Disconnect the 3-pin plug from the oil level and oil temperature sender -G266-, if present.
–
Release the oil pan's fixing screws.
Note
Use hinged wrench -3185- to slacken oil pan bolts at flywheel side and unscrew with socket insert -3249-.
–
Separate oil pan, if necessary loosen the oil pan by applying slight blows with a rubber-headed hammer.
–
Remove residual sealant from the sealing surfaces on the cylinder block and on the oil pan with chemical sealant remover.
–
Degrease the sealing surfaces.
Install
Note
t
Pay attention to the use by date on sealant.
t
The oil pan must be installed within 5 minutes after applying the silicone sealant.
t
Use wrench socket -3249- to insert the oil pan bolts at flywheel side and tighten with hinged wrench -3185-.
–
Cut off nozzle tube of silicone sealant -D 176 404 A2- at the front marking (Ø of nozzle approx. 3 mm).
t
Thickness of sealant bead: 2…3 mm
t
The sealant must be run past on the inside in the area of the bolt holes
-arrows-
.
Note
The sealant bead must not be thicker than 3 mm otherwise excess sealant may get into the oil pan and clogg the strainer in the oil suction pipe.
–
Apply silicone sealant to the clean sealing surface of the oil pan, as shown in the illustration.
Note
Take particular care when applying sealant bead in the area of the sealing flange at the rear
-arrows-
.
–
Fit on oil pan immediately and tighten the bolts as follows:
1 -
Tighten all the bolts of oil pan/cylinder block slightly diagonally across.
2 -
Tighten the three bolts of oil pan/cylinder block slightly.
3 -
Tighten all the bolts of oil pan/cylinder block slightly diagonally across.
4 -
Tighten the three bolts of oil pan/gearbox to 25 Nm.
5 -
Tighten all the bolts of oil pan/cylinder block diagonally across to 15 Nm.
Note
t
When installing the oil pan with the engine removed, ensure that the oil pan is flush with the cylinder block at the flywheel side.
t
After installing the oil pan, allow the sealant to dry for about 30 minutes. Only then may engine oil be filled in.
The further assembly is carried out in reverse order to disassembly.
Power unit
1,6/74; 75 kW MPI engine
Engine lubrication
Removing and installing oil pan
Testing oil pressure and oil pressure switch >
< Oil filter holder - Summary of components for engines with identification characters AVU, BFQ
 Note
Note
Note
Note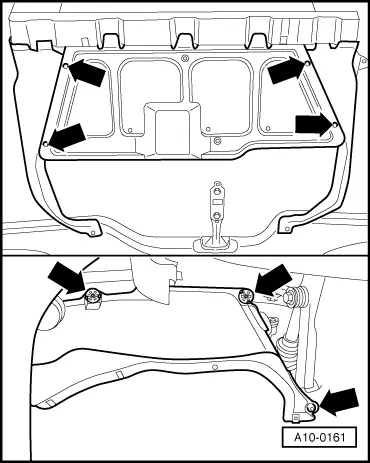 Note
Note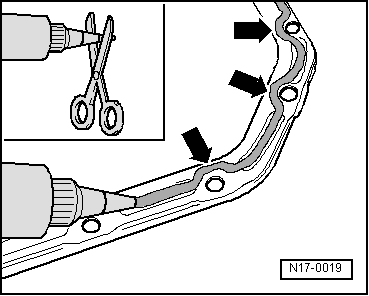 Note
Note
Note
Note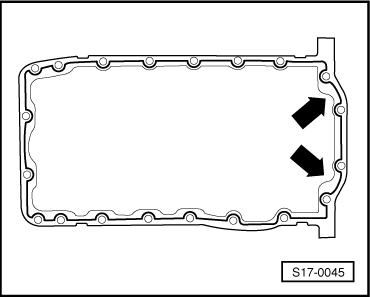
 Note
Note
Note
Note
Note
Note
Note
Note
Note
Note