skoda Workshop Repair Guides

Skoda Workshop Service and Repair Manuals

Lower the assembly carrier in the service position - aluminium assembly carrier > < Summary of components: aluminium assembly carrier, anti-roll bar, track control arm
Fixing the assembly carrier and the console - aluminium assembly carrier
Special tools and workshop equipment required
t  Fixing device -T10096 -
t  Engine/gearbox jack, e.g. -V.A.G 1383/A -
Removing:
   
In order to fix the assembly carrier with the consoles, the fixing devices -T10096- must be successively screwed into the positions -1-, -2-, -3- and -4-.
  Note
The fixing devices -T10096 - must only be tightened to maximum 20 Nm as otherwise the fixing bolt thread becomes damaged.
  N40-10287
Fix the brackets
–  Successively replace the fixing bolts of the brackets/body with fixing devices -T10096- and tighten to 20 Nm.
  S40-0272
Fix the consoles
–  Successively replace the fixing screws on the consoles with fixing devices -T10096- and tighten to 20 Nm.
The position of the front axle is now fixed.
Installing:
Installation is carried out in the reverse order. Make sure that the fixing devices -T10096- are replaced successively with new screws.
  Note
It is necessary to perform a vehicle alignment in the event of: → Chapter
–  Perform a test drive.
–  Check the steering wheel position during the test drive.
  Note
If after the test drive and with the wheels pointing straight ahead the steering wheel is off straight, perform a chassis alignment → Chapter.
  S40-0269
Tightening torques:
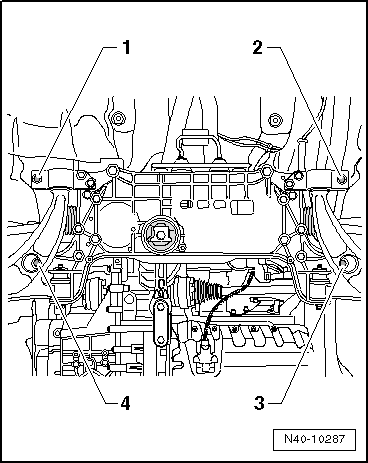
Assembly carrier to body
t  Use new screws!
70 Nm + 90°
Wheel bolts120 Nm


Lower the assembly carrier in the service position - aluminium assembly carrier > < Summary of components: aluminium assembly carrier, anti-roll bar, track control arm