
Octavia Mk2

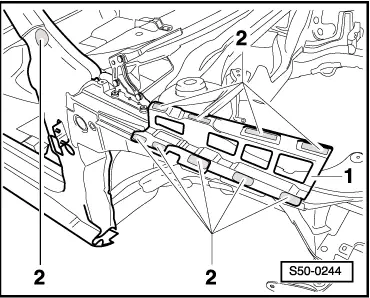
| 1 - | Wing support |
| q | Removing and installing → Body Repairs → Rep. gr.50. |
| 2 - | Nuts, 8 Nm |
| 3 - | Front wing |
| Removing: |
| – | Remove front bumper and guide section → Chapter. |
| – | Remove front wheelhouse liner → Chapter. |
| – | Remove the alarm system with its own power supply (if present) → Electrical System → Rep. gr.94. |
| – | Remove separator panel → Chapter. |
| – | Remove plugs at front suspension strut dome → Chapter. |
| – | Remove noise insulation. |
| – | Remove nuts (Pos. 2). |
| – | Remove screws (Pos. 4). |
| – | Heat the wing at the connecting point with wing support (Pos. 1) using a hot-air blower. |
| – | Cut through adhesive cement (Pos. 5) between wing and support with cutting wire with supports. |
| – | Open front door. |
| – | Heat the wing at the connecting point with bottom part of outer pillar A -arrow-. |
| – | Raise the front part of the wing and carefully pull off the wing at the connecting point with the pillar A to the front and towards the top. |
 Note
Note| Heat the wing only for a short period at an air temperature of 100°C, in order to avoid damage to paintwork, if the wing is reinstalled again. |
| Installing: |
| – | Cut back adhesive cement on the wing, the support and on the pillar A to a thickness of approx. 1 mm. |
| – | Clean contact surfaces of wing, support and pillar A with cleaning solution -D 009 401 04-. |
| – | Apply polyurethane glue sealing mass -AKD 476 KD5 05- to the bottom part of the outer pillar A and to the wing support → Fig. |
Note| The wing must be installed within 30 minutes as otherwise the adhesion of the adhesive may be poor. |
| – | The following installation is carried out in the reverse order, pay attention to the following points: |
| – | Adjust front wing → Body Repairs → Rep. gr.00. |
| 4 - | 8 Nm |
| 5 - | Adhesive cement |
|
|