
Octavia Mk2
| Summary of components of rear bumper (Scout) |
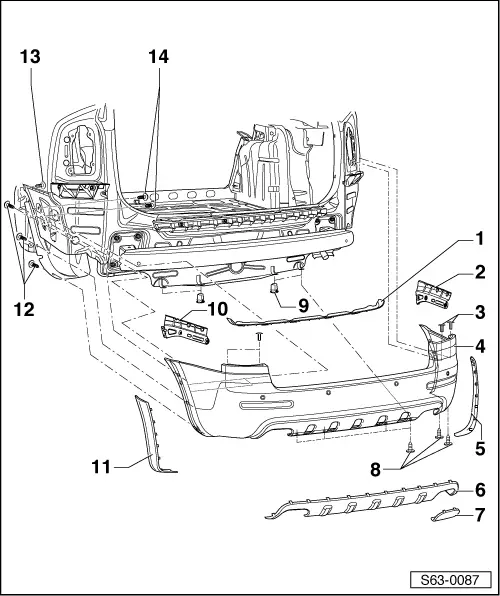
| 1 - | End part |
| 2 - | Right side holder |
| 3 - | Body-bound rivet |
| 4 - | Bumpers |
| Removing: |
| – | Remove trim panel from bottom of pillar D → Chapter. |
| – | Removing rear lights → Electrical System → Rep. gr.94. |
| – | Remove expanding rivets (Pos. 3). |
| – | Remove screws (Pos. 8). |
| – | Remove screws (Pos. 12 and Pos. 13). |
| – | Remove both side trim panels in the luggage compartment and unscrew screws (Pos. 14). |
| – | Push rear bumper (Pos. 4) to the rear |
 Note
Note| Before removing the bumper it is necessary to disconnect plug of park sensors (if present). |
| Installing: |
| – | Installation is performed in the reverse order, pay attention to the following points: |
Note| Screws (Pos. 8) must be mounted successively from the centre of the bumper to the sides. |
| 5 - | Right wing strip |
| q | Clipped in the bumper as of MY 10 |
| 6 - | Shock absorber cover |
| Removing: |
| – | Remove bumper (Pos. 4). |
| – | Unclip clips from the bumper. |
| – | Push the cover out of the bumper. |
| Installing: |
| – | Installation is carried out in the reverse order. |
| 7 - | Cover for towing lug |
| 8 - | 1.5 Nm |
| 9 - | Adjusting nut |
| 10 - | Left side holder |
| 11 - | Left wing strip |
| q | Clipped in the bumper as of MY 10 |
| 12 - | 1 Nm |
| 13 - | 1.5 Nm |
| 14 - | 10 Nm |