skoda Workshop Repair Guides

Skoda Workshop Service and Repair Manuals

Repairing rear axle brake CI 38 (vehicles with front-wheel drive) > < Removing and installing brake pads CII 41
Removing and installing brake caliper CII 41
Special tools and workshop equipment required
t  Brake pedal load, e.g. -V.A.G 1869/2-
Removing:
The procedure applies only for the replacement or for the following repair work on the brake caliper.
–  Remove wheels.
–  Detach the hand brake cable from the lever on the brake caliper.
–  If necessary, remove spring clip and pull hand brake cable out of the brake caliper holder.
–  Fit the bleeder hose of the bleeding bottle onto the bleeder screw of the brake caliper and open the bleeder screw.
–  Position brake pedal load e.g. -V.A.G 1869/2-.
–  Close the bleeder screw and remove the bleeding bottle.
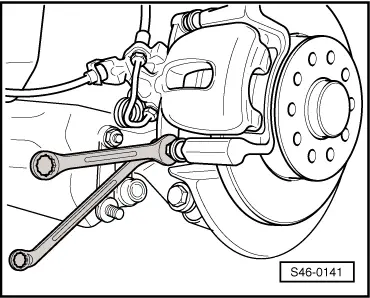
–  Unscrew the brake line.
   
–  Unscrew both fixing screws from the brake caliper while counterholding the guide bolt.
–  Remove brake caliper from brake carrier
Installing:
l  The piston is pushed back.
l  The brake pads are fitted in the retaining springs on the brake caliper.
–  Secure the brake caliper to the brake carrier using new self-locking screws.
–  Screw the brake line onto the brake caliper.
–  Bleeding brake system → Chapter.
–  Install the hand brake cable and attach with spring clips to the support.
–  Setting the hand-brake → Chapter.
–  Attach the wheels.
  Note
t  Observe the instructions for changing the pad → Chapter
t  Forcefully apply the brake pedal repeatedly to ensure the brake pads go into their normal operating position.
t  Inspecting the brake fluid level.
  S46-0141
Tightening torques:
Brake caliper to brake carrier
t  Use new self-locking screws!
35 Nm
Brake line to brake caliper12 Nm
Wheel bolts120 Nm


Repairing rear axle brake CI 38 (vehicles with front-wheel drive) > < Removing and installing brake pads CII 41