skoda Workshop Repair Guides

Skoda Workshop Service and Repair Manuals

Removing and installing master brake cylinder - Vehicles with right-hand drive > < Master brake cylinder
Removing and installing master brake cylinder - Vehicles with left-hand drive
Special tools and workshop equipment required
t  Repair kit -1H0 698 311 A-
t  Brake filling and bleeding device, e. g. -VAS 5234-
Removing:
–  On models fitted with a coded radio set, pay attention to the coding; determine if necessary.
–  Remove battery → Electrical System; Rep. gr.27.
–  Remove induction pipe and air filter → Engine; Rep. gr.23 or → Engine; Rep. gr.24.
–  Remove battery tray → Electrical System; Rep. gr.27.
Vehicles with turbocharger engines
–  Disconnect the plug of the air mass meter G70.
–  Remove suction hose between air filter and exhaust gas turbocharger → Engine; Rep. gr.23 or → Engine; Rep. gr.21.
–  Remove the connecting hose between the filler tube and the exhaust gas turbocharger (if necessary remove the whole filler tube) → Engine; Rep. gr.21.
Continued for all vehicles
–  Lay sufficient non-fluffing cloths around the engine and gearbox.
–  Extract as much brake fluid as possible from the brake fluid reservoir.
For vehicles with a manual gearbox:
   
–  Detach the return hose -B- of the clutch master cylinder from the brake fluid reservoir and attach it slightly higher.
Continued for all vehicles:
–  Disconnect plug connection -A- from brake fluid level warning contact.
–  Remove the brake fluid reservoir, to this end press the latches at the reservoir outwards and at the same time pull the brake fluid reservoir out of the sealing plugs.
On vehicles as of 11.05
–  Disconnect plug connection -C- from brake light switch -F- (on vehicles with the brake light switch -F - on the master brake cylinder).
Continued for all vehicles:
  S47-0120
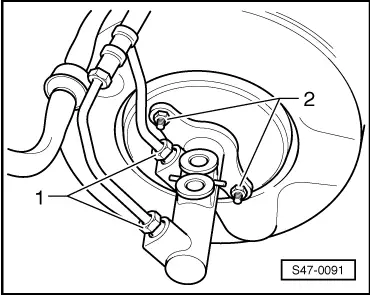
–  Unscrew the brake lines -1- at the master brake cylinder, close the brake lines with the screw plugs from the repair kit -1H0 698 311 A-.
–  Release the nuts -2- of the master brake cylinder.
–  If present, remove the protection plate.
–  Carefully take the master brake cylinder out of the brake servo unit.
Installing:
–  Installation is carried out in the reverse order.
When installing, pay particular attention to the following points:
  Note
If the battery earth strap is disconnected and connected, carry out certain additional operations → Electrical System; Rep. gr.27.
–  When installing the master brake cylinder with the brake servo unit pay attention to the correct positioning of the pressure rod in the master brake cylinder.
After installing, it is necessary to:
–  Bleeding brake system → Chapter.
–  Bleed clutch → Gearbox; Rep. gr.30.
  S47-0091
Tightening torques:
Master brake cylinder to brake servo unit
t  Use new nuts!
25 Nm
Brake lines to master brake cylinder14 Nm


Removing and installing master brake cylinder - Vehicles with right-hand drive > < Master brake cylinder