Octavia Mk2
| Disassembling and assembling oil filter holder |

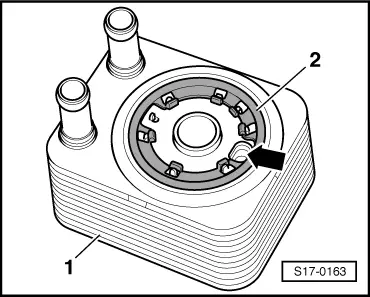
| 1 - | Screw plug - 25 Nm |
| 2 - | Gasket |
| q | replace |
| 3 - | Oil cooler |
| q | pay attention to the information regarding a necessary replacement |
| q | connection diagram for coolant hoses → Chapter |
| 4 - | Gasket |
| q | replace |
| q | Fitting position → Fig. |
| 5 - | 15 Nm + torque a further 90° (1/4 turn) |
| q | replace |
| q | tighten crosswise |
| 6 - | Oil filter holder |
| q | with oil retaining valve |
| q | the oil retaining valve cannot be replaced individually |
| 7 - | Gasket ring |
| q | replace |
| 8 - | Oil pressure switch -F1- - 20 Nm |
| q | 0.07 MPa (0.7 bar) switch |
| q | check → Chapter |
| 9 - | Screw cap - 25 Nm |
| q | loosen and tighten up with the oil filter spanner, e.g. -3417- |
| 10 - | O-ring |
| q | replace |
| 11 - | Oil filter element |
| q | pull off from cap (Position 9) |
| q | replace O-rings if oil filter element is changed (Position 10) |
| q | Check fitting position |
| q | pay attention to change intervals → Octavia II |
| 12 - | Oil feed line |
| q | to exhaust gas turbocharger |
| q | Observe the mounting sequence: |
| – | Screw on the union nuts first of all by hand. |
| – | Then tighten the union nuts to 22 Nm. |
| – | Subsequently secure the oil feed line in the brackets. |
| 13 - | Connection fittings - 35 Nm |