skoda Workshop Repair Guides

Skoda Workshop Service and Repair Manuals

Complaints > < Principle circuit diagrams for different rinsing cycles
Adapter for setting up the rinsing cycles
t  The table below lists various adapters which are necessary for connecting the A/C service station to the refrigerant circuit, flushing and bridging the removed fluid reservoir or catch pan and the expansion valve (specifically designed for vehicles).
t  If a flushed refrigerant circuit is not reassembled immediately after flushing, leave the adapters on the connections and close the connections on the adapters with the screw caps (from the adapter case of the motor car set -VAS 6338/1-).
  Note
The work procedures of the installation work for condensers, dessicators, strainers, expansion valves etc. are described in the Workshop Manual → Heating, Air Conditioning → Heating, Air Conditioning; Rep. gr.87.
   
Fabia, Fabia II, Roomster
VehicleAdapters for the connections to the AC compressorCondensor with integrated reservoir with dessicatorMiscellaneous
‎Fabia, Fabia II, Roomster
t  Adapter -VAS6338/3- high-pressure side
t  Adapter -VAS6338/12- low-pressure side
–  Before flushing remove the dessicator cartridge, on the condensers „Modine“ also the strainer and the container.
–  After the flushing, install a new dessicator cartridge and a strainer (condensers Modine).
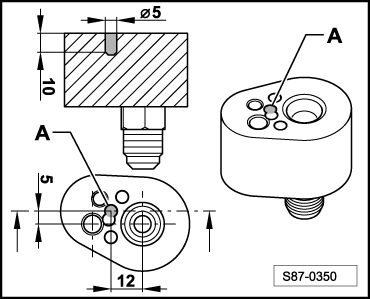
–  Replace expansion valve with adapter -VAS6338/34- or a reworked (drilled out) expansion valve, see → Chapter.
–  Check expansion valve after flushing (corrosion, dirt), replace if necessary.

   
Octavia
VehicleAdapters for the connections to the AC compressorAdapter for bridging the reservoir with dessicatorMiscellaneous
Octavia
t  Adapter -VAS6338/2- high-pressure side
t  Adapter -VAS6338/7- low-pressure side
–  Remove reservoir with dessicator.
t  2 times adapter -VAS6338/2-
t  connect with hose -VAS6338/31-
–  Install a new reservoir with dessicator after flushing.
–  Replace expansion valve with adapter -VAS6338/19- or a reworked (drilled out) expansion valve, see → Chapter.
–  Check expansion valve after flushing (corrosion, dirt), replace if necessary.

   
Octavia II
VehicleAdapters for the connections to the AC compressorCondensor with reservoir with dessicatorMiscellaneous
Octavia II
t  Adapter -VAS6338/3- high-pressure side
t  Adapter -VAS6338/12- low-pressure side
–  Condensers „DENSO“ with firmly integrated reservoir with dessicator - two procedures are possible:
t  First procedure - remove condenser and connect the connections with adapter -VAS6338/4-, -VAS6338/3- and connecting hose -VAS6338/31-. The adapter -VAS6338/3- must be reworked by making (milling) an additional hole 1).
t  Second procedure - unscrew screw cap from reservoir with dessicator, carefully remove the dessicator cartridge and then the strainer below the dessicator cartridge using a wire with hook. Screw in the screw cap again and flush the circuit with condensor. Install a new condensor with reservoir with dessicator after flushing.
–  Condensors „SHOWA“ with replaceable reservoir with dessicator:
t  Flush circuit with reservoir with dessicator.
t  Replace reservoir with dessicator after flushing.
–  Condensors „Modine“ with firmly integrated reservoir with dessicator:
t  Remove dessicator bag and strainer from the reservoir. Screw in the screw cap again and flush the circuit with condensor. After the flushing, install a new dessicator cartridge and a strainer.
–  Replace expansion valve with adapter -VAS6338/18- or a reworked (drilled out) expansion valve, see → Chapter.
–  Check expansion valve after flushing (corrosion, dirt), replace if necessary.

1) Rework adapter -VAS6338/3-:
   
–  In order to connect the adapter -VAS6338/3- at the connection to the condensor, it must be reworked by making (milling) an additional hole according to the figure (the dimensions in the figure are given in mm).
  Note
t  Use an upright drilling machine for drilling, if necessary use a hand-held power drill in a stand and tension the adapter in a vice.
t  For better guidance of the drill, predrill the bore with a smaller drill Ø3 mm.
  S87-0350
Superb
VehicleAdapters for the connections to the AC compressorAdapter for bridging the reservoir with dessicatorMiscellaneous
Superb
t  Adapter -VAS6338/2- high-pressure side
t  Adapter -VAS6338/12- low-pressure side
–  Remove reservoir with dessicator.
t  2 times adapter -VAS6338/10-
t  connect with hose -VAS6338/31-
–  Install a new reservoir with dessicator after flushing.
–  Remove throttle and reassemble coolant pipe.
–  Install a new throttle after flushing.

   
Superb II, Yeti
VehicleAdapters for the connections to the AC compressorCondensor with reservoir with dessicatorMiscellaneous
Superb II, Yeti
t  Adapter -VAS6338/3- high-pressure side
t  Adapter -VAS6338/12- low-pressure side
–  Condensors „SHOWA“ with replaceable reservoir with dessicator:
t  Flush circuit with reservoir with dessicator.
t  Replace reservoir with dessicator after flushing.
–  Condensors „Modine“ with firmly integrated reservoir with dessicator:
t  Remove dessicator bag and strainer from the reservoir. Screw in the screw cap again and flush the circuit with condensor. After the flushing, install a new dessicator cartridge and a strainer.
–  Replace expansion valve with adapter -VAS6338/18- or a reworked (drilled out) expansion valve, see → Chapter.
–  Check expansion valve after flushing (corrosion, dirt), replace if necessary.


Complaints > < Principle circuit diagrams for different rinsing cycles