
Octavia Mk2
| Removing and installing gearbox housing and shift mechanism |
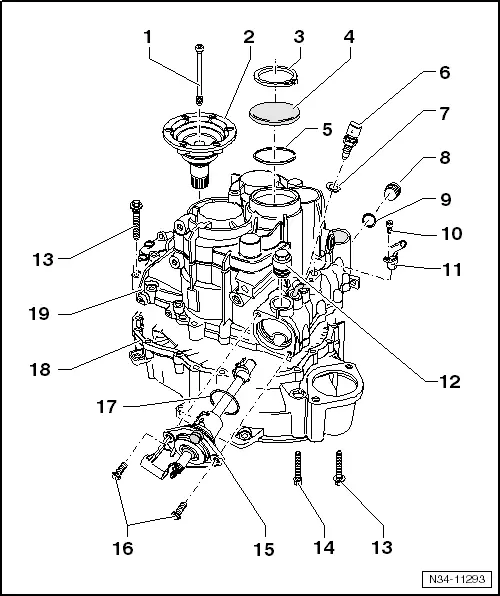
| 1 - | 33 Nm |
| 2 - | Flange shaft with pressure spring |
| t | Mounting sequence up to production date 20.01. 08 (Octavia II) → Chapter |
| t | Mounting sequence as of production date 20.01. 08 → Chapter |
| q | disassembling and assembling → Chapter |
| 3 - | Circlip |
| q | for cap Pos. 4 |
| q | secured with circlip Pos. 3 as of production date 21.01. 08 installed |
| 4 - | Screw cap |
| q | secured with circlip Pos. 3 as of production date 21.01. 08 |
| 5 - | Circlip |
| 6 - | Reversing light switch -F4-, 20 Nm |
| 7 - | Sealing ring |
| q | always replace → Electronic Catalogue of Original Parts |
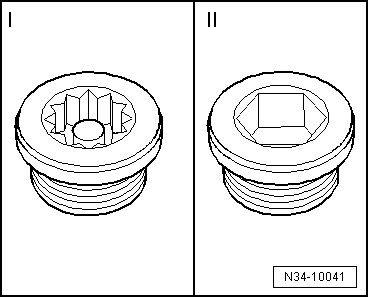
| 8 - | Oil drain plug |
| q | pay attention to different versions → Fig. |
| q | Internal serration screw, 45 Nm |
| q | Allan screw, 30 Nm |
| 9 - | Sealing ring |
| q | if present, always replace → Electronic Catalogue of Original Parts |
| 10 - | Screw, Nm |
| 11 - | Transmission neutral sender -G701- |
| q | for vehicles with start-stop system |
| 12 - | Locking screw, 45 Nm |
| q | for the gearshift shaft |
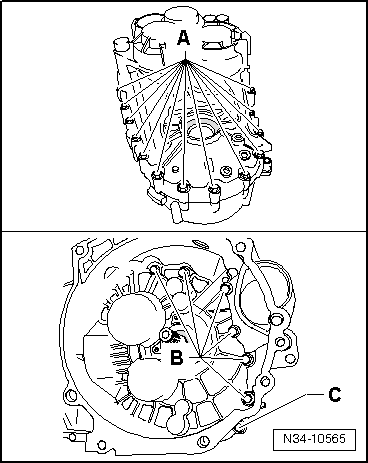
| 13 - | 15 Nm + torque a further 90° |
| q | with captive washer |
| q | always replace → Electronic Catalogue of Original Parts |
| q | Assignment of screws as replacement part → Fig. |
| 14 - | 15 Nm + torque a further 90° |
| q | without washer |
| q | always replace → Electronic Catalogue of Original Parts |
| q | Assignment of screws as replacement part → Fig. |
| 15 - | Gearshift unit |
| q | (gearshift mechanism on the gearbox side) |
| q | repairing |
| t | Repair gearshift unit (Octavia II) → Chapter |
| t | Gearshift unit up to 05.09 (Superb II) → Chapter |
| t | Gearshift unit as of 06.09 (Superb II) → Chapter |
| t | Gearshift unit (Yeti) → Chapter |
| q | as of 06.09, modified on the 5th/6th gear shift rod on gearboxes with bearing of the reverse gear shift fork → Chapter |
| q | Assignment → Electronic Catalogue of Original Parts |
| q | remove with installed gearbox: |
| t | Remove battery and battery tray |
| t | Remove control cables and gearshift lever |
| t | Unscrew locking screw |
| t | Pull out gearshift unit, to do so the locking angle (for setting the gearshift mechanism) must not be inserted |
| 16 - | 20 Nm |
| q | always replace → Electronic Catalogue of Original Parts |
| 17 - | O-ring |
| q | always replace → Electronic Catalogue of Original Parts |
| 18 - | Clutch housing |
| q | repairing → Chapter |
| 19 - | Gearbox housing |
| q | repairing → Chapter |
|
|
|
|