skoda Workshop Repair Guides

Skoda Workshop Service and Repair Manuals

Removing and installing shift mechanism and selector cable (Octavia II) > < Removing
Install
Install
Installation is performed in the reverse order, pay attention to the following points:
The holes in the cable locks have different diameters.
Assign cable locks → Fig..
   
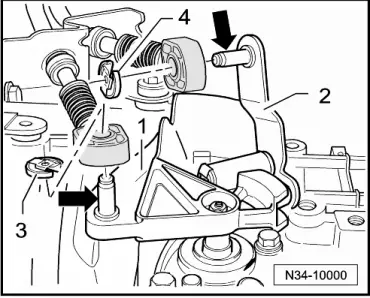
–  Apply a small quantity of grease -G 000 450 02- onto the studs -arrows- of the gearbox shift lever -1- and of the relay lever -2-.
–  Replace circlips -3- and circlip -4- for the metal relay lever after each disassembly.
–  Secure the shift cable with the lock washer -3- and secure the selector cable (for metal relay lever) with the lock washer -4-.
Cable lock with plastic relay lever
–  The relay lever and the cable lock must be mounted together → Chapter.
–  Insert the selector cable into the cable lock.
Continued for all gearshift mechanisms
–  Align shift housing parallel to vehicle body.
l  The distance to the vehicle body must be the same on both sides.
–  Installing ashtray → Body Work; Rep. gr.68.
  N34-10000
–  Replace clamp -arrow-.
For vehicles with four-wheel drive
–  Install propshaft → Chapter.
For all vehicles
–  Assemble exhaust system free of stress and attach tunnel bridges → Engine; Rep. gr.26.
–  Install underbody cover on right and left → Body Work; Rep. gr.50.
–  Install the noise insulation → Body Work; Rep. gr.50.
–  Setting the shift mechanism → Chapter.
–  Install air filter → Engine; Rep. gr.23 or → Engine; Rep. gr.24.
  Note
After the battery earth strap is disconnected and connected, carry out additional operations → Electrical System; Rep. gr.27.
–  Connect earth strap of battery while paying attention to the notes in the → Electrical System; Rep. gr.27.
  N34-1201
Tightening torques
ComponentNm
Shift housing to body → Chapter and → Chapter
Cable support to gearbox → Chapter
Underbody cover → Body Work; Rep. gr.50


Removing and installing shift mechanism and selector cable (Octavia II) > < Removing