skoda Workshop Repair Guides

Skoda Workshop Service and Repair Manuals

Testing the compression > < Removing cylinder head
Installing cylinder head
  Note
t  Observe safety measures and rules for cleanliness when working on vehicles with liquefied petroleum gas system (LPG) → Chapter.
t  Replace cylinder head bolts.
t  Replace the self-locking nuts and screws when undertaking assembly work.
t  Replace screws which have been tightened to a torquing angle as well as gasket rings and seals.
t  When installing an exchange cylinder head with the camshaft installed, it is necessary to oil the contact surfaces between the roller rocker arms and the cam track after installing the head.
t  Remove the new cylinder head gasket from its wrapping immediately before fitting.
t  Treat the new seal with the utmost care. Damage to the silicone layer and in the area of the bead results in leakages.
t  There must not be any oil or coolant present in the holes for the cylinder head bolts.
–  Make sure that when cleaning the cylinder head and cylinder block no foreign bodies can get into the cylinder or into the oil and coolant galleries.
  WARNING
Wear protective googles and gloves when working with sealant and grease remover!
–  When conducting repairs sealant residues should be removed from the contact surface of the cylinder head/cylinder block using a chemical cleaner.
   
–  Bring the marking on the camshaft sprocket in line with the marking on the timing belt guard -arrows-.
  A13-0691
–  Once again check if the crankshaft is on TDC for cylinder 1 -arrows-.
  A13-0154
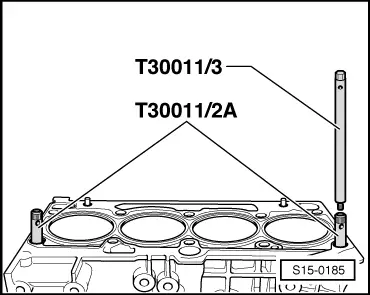
–  To centre the cylinder head gasket and cylinder head, screw in the guide pins -T30011/2A (3450/2A)- into the outer holes on the suction side.
  Note
The tolerance of the centering holes has been constricted in the top area. For this reason, check first of all, before fitting on the cylinder head, whether the guide pins can be removed upward. If necessary, slightly grind off the knurling of the guide pins.
–  Position the new cylinder heads. The legend (part number) must be legible.
  Note
A second mechanic is needed to fit on the cylinder head.
–  Swivel cylinder head into rear toothed belt guard and simultaneously push the tensioning pulley onto the threaded pin.
–  Fit cylinder head onto cylinder block.
–  Insert 8 new cylinder head bolts and tighten by hand.
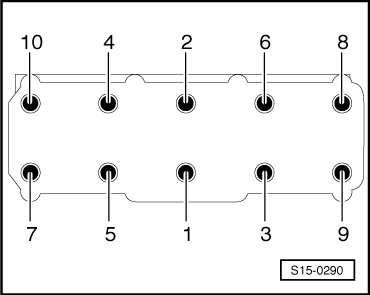
–  Screw out the guide bolts through the bolt holes using the removal tool -T30011/3 (3450/3)- and screw in the remaining cylinder head bolts.
  S15-0185
–  Tighten the cylinder head in 3 stages in the order shown:
  S15-0290
StageTighten
1
–  Pre-tighten with the torque wrench to 40 Nm.
2
–  Using a rigid wrench torque a further 90° (1/4 turn).
3
–  Using a rigid wrench torque a further 90° (1/4 turn).

  Note
Tightening up the cylinder head bolts after doing repair work is not necessary.
–  install (set the timing) → Chapter.
–  Install the V-ribbed belt → Chapter.
–  Installing the intake manifold → Chapter.
–  Checking the oil level → BookletOctavia ll.
  Note
In case of contaminated engine oil, carry out oil change → BookletOctavia ll.
–  Install pre-exhaust pipe → Chapter.
–  Align exhaust system free of stress → Chapter.
–  Connect up the battery. Important instructions → Electrical System; Rep. gr.27.
–  Top up coolant → Chapter.
   

Testing the compression > < Removing cylinder head