skoda Workshop Repair Guides

Skoda Workshop Service and Repair Manuals

Removing and installing the cylinder head|Install > < Removing and installing the cylinder head
Removing
Removing
Requirements
l  Engine temperature should not exceed 35 °C, because the cylinder head could be twisted when slackening the screws.
l  The pistons must not be in TDC.
–  Disconnect the battery-earth strap with the ignition off → Electrical System; Rep. gr.27.
–  Remove engine cover → Chapter.
–  Remove air filter housing with air mass meter -G70- and intake hose → Chapter.
–  Remove battery and battery tray → Electrical System; Rep. gr.27.
–  Remove cylinder head cover → Chapter.
–  Pull toothed belt off camshaft sprocket → Chapter.
   
–  Remove rig tool -T10265-.
–  Unscrew nut -1-.
  N15-10332
–  Unscrew Hall sender -G40--arrow- and place down.
–  Remove camshaft sprocket and pull off hub for camshaft with extractor -T10052- → Chapter.
–  Remove fan shroud with radiator fans → Chapter.
–  Drain coolant → Chapter.
  A23-0257
–  Release screws -arrows-.
–  Expose coolant hose -3-.
–  Loosen hose clamp -2-.
–  Disconnect plug -1- at the charge pressure sender -G31- and remove the right charge air pipe.
  S13-0705
–  Release screws -arrows- and remove heat shield for right drive shaft, if present.
  Caution
Pay attention that the bellows of the connection pipe is not bent or overstretched. There is a risk of crack formation.
  A10-1633
–  Release nuts -2- and screws -3- and remove the connection pipe for exhaust gas recirculation.
  A21-10153
–  Disconnect plug -1- from position sender for charge pressure regulator -G581-.
–  Remove vacuum hose -2- from vacuum setting element of exhaust turbocharger.
–  Disconnect vacuum hose -3-.
  Caution
The exhaust gas temperature sender 1 -G235- (temperature sender upstream turbocharger -G507-) covers the top bolted connection of the support for exhaust turbocharger and must not be bent. For this reason it must be removed.
–  Remove exhaust gas temperature sender 1 -G235- (temperature sender upstream turbocharger -G507-) → Chapter.
On vehicles with four-wheel drive
–  Remove the flange for the right drive shaft from the angle gearbox → Gearbox; Rep. gr.34.
Continued for all vehicles
  A21-10338
–  Release screws -1 and 2- and hollow screw -3-.
–  Remove support for exhaust turbocharger with oil return-flow line.
  A21-10088
–  Slacken screw -2- and remove clamp for diesel particle filter.
  A26-10721
–  Release the screw -2- for attaching the diesel particle filter.
  N26-10335
–  Unscrew the fixing nuts -arrows- from the bracket for diesel particle filter -A- on the cylinder block and tie up the diesel particle filter to the rear.
  N26-10337
–  Disconnect the plug -1- on the exhaust gas recirculation valve -N18- and the plug -3- on the throttle valve control unit -J338-.
–  Release the screw -arrow- on the oil dipstick guide pipe.
–  Release screws -2- on exhaust gas recirculation pipe.
  N15-10409
–  Unscrew screws -2 and 5- as well as screws -arrows-.
–  Release screw clamp -3- and remove left charge air pipe.
  A19-10641
–  Detach the vacuum hose -1- from the vacuum pump.
  A15-10633
–  Disconnect plug -2- at the coolant temperature sender -G62-.
–  Remove the coolant hoses from the connection fittings, to do so slacken the hose clamps -arrows-.
  A19-10642
–  Release nut -1- and screws -2-, remove exhaust gas recirculation pipe.
  Note
The bottom screw on the radiator for exhaust gas recirculation can be unscrewed using the socket insert -T10385-.
  A26-10726
–  Unscrew the oil feed line from the connection on the oil filter holder. To do so, hold the assembly spanner on the hexagon and slacken the union nut -3-.
  A17-10409
–  Release the nut -2- at the retaining clip for the vacuum line.
–  Release screw -1-.
–  Unscrew the oil feed line from the connection on the exhaust gas turbocharger. To do so, hold the assembly spanner on the hexagon and slacken the union nut -3-.
  A15-10634
–  Unscrew screw -arrow- on the timing belt guard at the rear.
  N15-10435
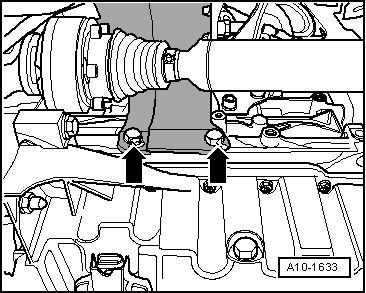
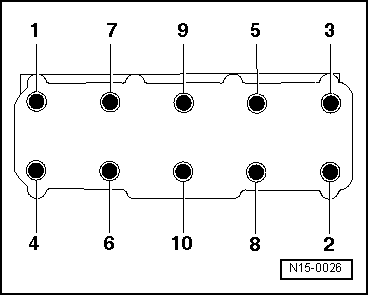
–  Release the cylinder head bolts in the order -1…10-.
  Note
t  The assistance of a 2nd mechanic is required for lifting out the cylinder head.
t  
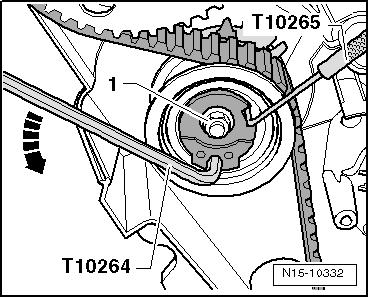
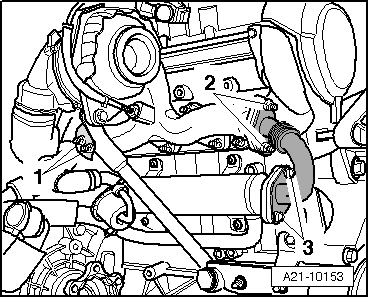
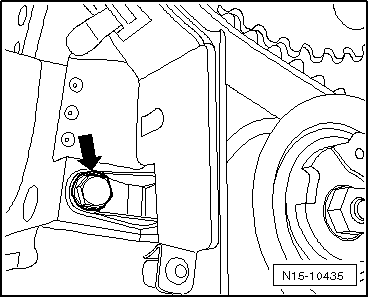
The timing belt tensioning pulley is removed from the pin screw when lifting out the cylinder head.
t  
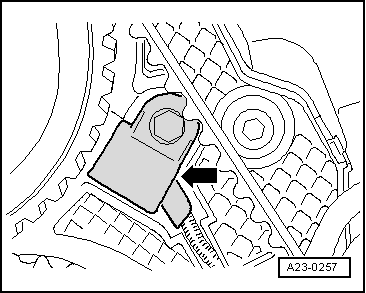
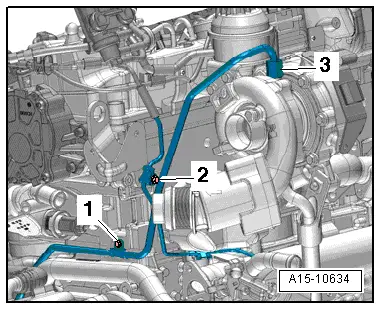
The oil return-flow line for the exhaust gas turbocharger is detached from the support when removing the cylinder head.
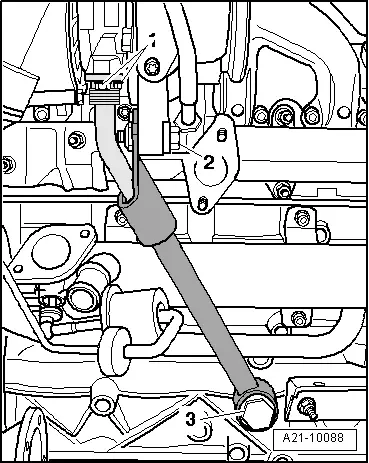
–  First of all raise the cylinder head at the gearbox side and then pull it out of the rear toothed belt guard. Make sure that the timing belt tensioning pulley does not fall down.
  Caution
Risk of damage to the glow plugs when placing down the cylinder head.
If the cylinder head is removed with installed glow plugs, do not place it down on the sealing surface since the glow plugs protrude slightly beyond the sealing surface.
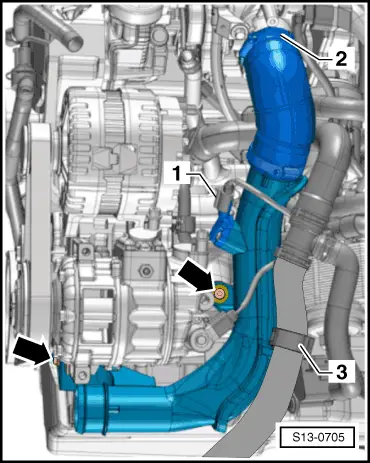
–  Place down the cylinder head in such a way that the oil return flow line does not bend. If necessary, place a piece of wood under the exhaust manifold.
  N15-0026

Removing and installing the cylinder head|Install > < Removing and installing the cylinder head