skoda Workshop Repair Guides

Skoda Workshop Service and Repair Manuals

Testing fuel pump > < Removing and installing fuel tank - Octavia II with front-wheel drive
Removing and installing fuel tank - Superb II, Yeti and vehicles with four-wheel drive Octavia II
Special tools and workshop equipment required
t  
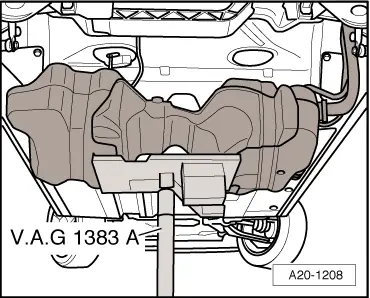
Engine/gearbox jack, e.g. -V.A.G 1383 A-
l  The fuel tank must be empty for weight reasons when removing it.
Removing
  Note
t  Safety precautions when working on the fuel supply system → Chapter.
t  Observe rules for cleanliness → Chapter.
–  Drain the fuel tank → Chapter.
–  Switch off all electrical components and withdraw key from ignition lock.
Vehicles Octavia II and Superb II
–  Removing rear seat bench → Body Work; Rep. gr.72.
Vehicles Yeti
–  Remove rear seat bench with brackets → Body Work; Rep. gr.72.
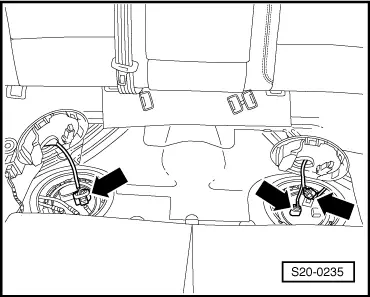
–  Remove floor covering under the rear seat bench.
Continued for all vehicles
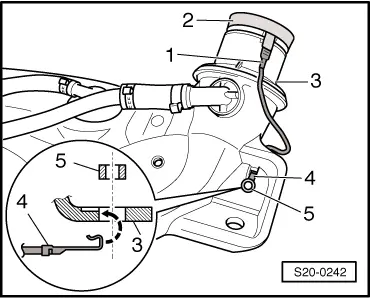
–  Remove the cover from the fuel delivery unit and the cover for the flange with the fuel gauge sender 2 -G169-.
  Note
For vehicles with auxiliary heating, the plug connection for the dosing pump -V54- must also be disconnected.
   
–  Disconnect the plug from the fuel delivery unit and from the flange with the fuel gauge sender 2 -G169--arrow -.
–  Open the fuel tank cap and clean around the fuel filler neck.
–  Unscrew the cap from the fuel filler neck.
–  Close the opening of the fuel filler neck with a clean foam piece, so that no dirt can penetrate.
–  Unscrew right rear wheel → Chassis; Rep. gr.44.
–  Remove the rear right wheelhouse liner → Body Work; Rep. gr.66.
  S20-0235
–  Unscrew screws -1- for filler neck on the body.
–  Unclip the electrical cable from the bracket -2- at the top and bottom of the filler neck.
–  Disconnect the fuel feed line and the fuel return-flow line on the front right of the fuel tank. Unlock the quick coupling and disconnect → Chapter.
  Note
For vehicles with auxiliary heating, the fuel line for the dosing pump -V54- must also be disconnected.
  S20-0245
–  Remove tunnel bridge -arrows-.
–  Remove rear part of exhaust system:
t  Summary of components of rear part of exhaust system → Chapter
t  Summary of components for vehicles Superb ll with engines with identification characters CFFB, CFGB → Chapter
Vehicles with four-wheel drive
–  Remove propshaft → Chassis; Rep. gr.39.
  A10-10248
–  Disconnect plug -arrow- at four-wheel drive control unit -J492-.
Continued for all vehicles
  S20-0236
–  First unscrew screws -2, 5- and -6-.
–  Support the fuel tank using the engine/gearbox jack -V.A.G 1383 A-.
–  Screw out the screws for the tensioning straps -1, 3, 4- and -7-.
  A20-1209
–  Slightly lower the fuel tank using the engine and gearbox jack -V.A.G 1383 A-.
–  Then remove the fuel tank from the engine/gearbox jack -V.A.G 1383 A- and pull through the filler neck between the body and the rear axle with the help of a second mechanic.
Install
Installation occurs in reverse order to removal. Pay attention to the following:
  Note
t  Lay the fuel lines avoiding any kinks.
t  Do not mix-up the fuel feed line (black) and the fuel return-flow line (blue).
t  Make sure the fuel line connections fit tightly.
t  Check feed line and return-flow line at fuel tank for firm seating.
  A20-1208
–  Check earth connection of fuel tank/body at filler neck and if necessary remove corrosion.
l  The plug -1- on the metal plate ring -2- must be pushed on firmly.
l  The contact tab -4- must be hung on the fuel tank -3- and secured with the spacer bush -5-.
–  Pull through the filler neck between the body and the rear axle with the help of a second mechanic. Then position the fuel tank onto the engine/gearbox jack -V.A.G 1383 A-.
Tightening torques: → Chapter
Before starting the engine, the fuel system must be bled as follows:
–  Switch on the ignition and only switch it off once the fuel pump has come to a standstill. Repeat this procedure at least »5 times«.
  S20-0242

Testing fuel pump > < Removing and installing fuel tank - Octavia II with front-wheel drive