| –
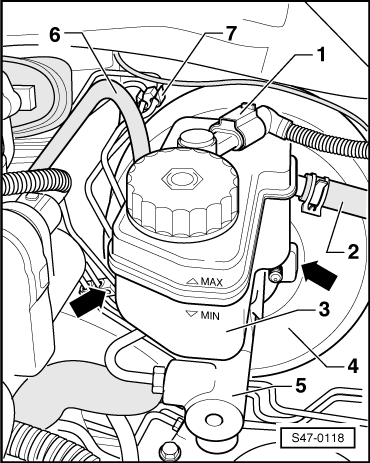
| Disconnect plug -1- from the brake fluid level warning contact -F34-. |
| For vehicles as of MY 2011 |
| –
| Disconnect plug from brake light switch -F- → Chapter. |
| Continued for all vehicles |
| –
| Unclip vacuum hose -6- from the brake fluid reservoir. |
| –
| After opening the breather screws on the front axle brake calipers pump off brake fluid by repeatedly pressing the brake pedal from the brake fluid reservoir. |
| –
| Clamp off the running-on line of the clutch master cylinder -2- with hose clamp -MP7-602 (6340)-. |
| –
| Open spring strap clamps of the running-on line of the clutch master cylinder -2- using assembly pliers. |
| –
| Disconnect the running-on line of the clutch master cylinder -2- from the brake fluid reservoir -3- and tie up. |
| –
| Unclip the brake lines from the holder -7-. |
| –
| Unscrew the brake lines from the master brake cylinder -5- and shut off. |
| –
| Shut-off the connections of the brake lines on the master brake cylinder with screw plugs from the repair kit SP No. 1 H0 698 311 A. |
| –
| Release the nuts of the master brake cylinder -arrows-. |
| –
| Carefully pull off the master brake cylinder -5- from the brake servo unit -4-. |

Note | t
| Install new gasket ring between the master brake cylinder and the brake servo unit. |
| t
| When installing the master brake cylinder with the brake servo unit pay attention to the correct positioning of the pressure rod in the master brake cylinder. |
| t
| Only fill up with new brake fluid. |
| Installation is carried out in the reverse order. |
| –
| Fill up with new brake fluid. |
| Vehicles without ABS and with ABS, ABS/TCS BOSCH 8.0 |
| Vehicles with ABS//TCS/ESP BOSCH 8.0 |
| –
| Perform basic setting of vehicle diagnosis, measurement and information system -VAS- → Chapter. |
| Continued for all vehicles |
| –
| Perform a vehicle system test with vehicle diagnosis, measurement and information system -VAS- → Chapter. |
|
|
|
