Skoda Workshop Service and Repair Manuals
HOME
FEATURES
MENU
INDEX
ABOUT US
Removing and installing 4/2 way valve with coolant regulator >
< Removing and installing coolant pump
Roomster
Power unit
1.6/55; 66; 77 kW TDI CR Engine
Engine cooling
Coolant pump and coolant regulator
Removing and installing coolant regulator
Removing and installing coolant regulator
Removing and installing coolant regulator
(Fabia II up to 05.10, Roomster up to 05.10)
Special tools and workshop equipment required
t
Flexible-head wrench SW 10 -3185-
t
Socket insert -T10058-
t
Catch pan, e.g. -VAS 6208-
t
Pliers for spring strap clamps
Removing
–
Drain coolant
→ Chapter
.
–
Release screws
-arrows-
.
–
Loosen hose clamp
-2-
.
–
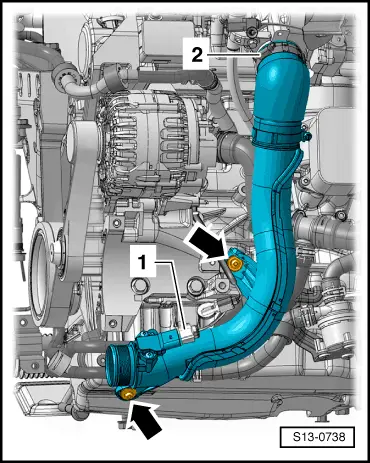
Disconnect the plug
-1-
at the charge pressure sender -G31- with intake air temperature sender -G42- and remove the right charge air pipe.
–
Remove the coolant hose from the connection fitting, to do so slacken the hose clamp
-1-
.
–
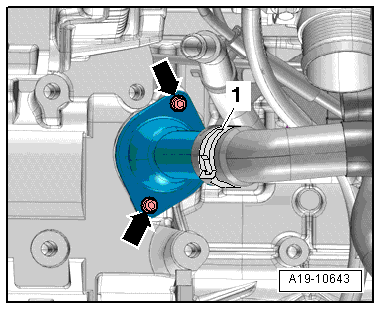
Slacken the screws
-arrows-
using the flexible-head wrench -3185-, screw out with socket insert -T10058 - and remove the connection fitting.
–
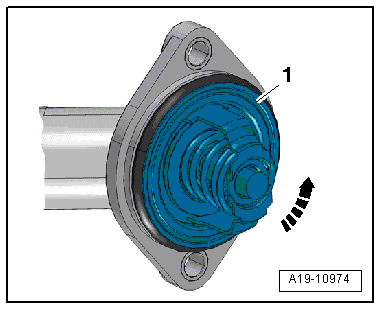
Turn the coolant thermostat
-2-
approx. 15° clockwise
-arrow-
and remove it from the connection fitting.
–
Remove O-ring
-1-
.
Install
Installation is performed in the reverse order, pay attention to the following points:
Note
t
Replace O-ring.
t
Hose connections as well as charge air pipes and charge air hoses must be free of oil and grease before being installed.
t
The hose connections are secured with spring-type clips. In the event of repairs only use spring-type clips.
–
Clean sealing surface for O-ring or smoothen.
–
Moisten O-ring
-2-
with coolant additive.
–
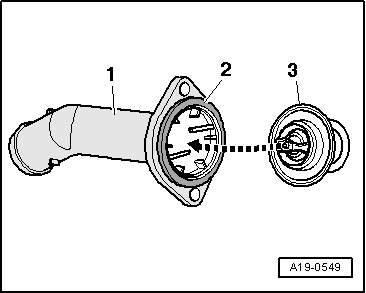
Insert the coolant regulator
-3-
with the O-ring
-2-
.
–
Screw in coolant thermostat
-1-
anti-clockwise as far as the stop
-arrow-
.
–
Position the connection fitting onto cylinder block and tighten the screws
-arrows-
to 15 Nm.
–
Top up coolant
→ Chapter
.
Power unit
1.6/55; 66; 77 kW TDI CR Engine
Engine cooling
Coolant pump and coolant regulator
Removing and installing coolant regulator
Removing and installing 4/2 way valve with coolant regulator >
< Removing and installing coolant pump
 Note
Note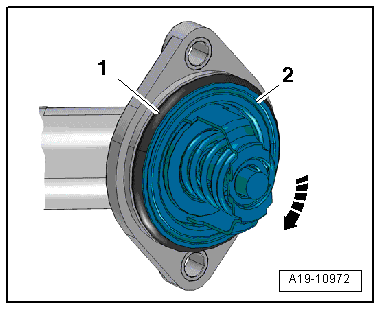
 Note
Note