skoda Workshop Repair Guides

Skoda Workshop Service and Repair Manuals

Testing oil pressure and oil pressure switch > < Disassembling and assembling oil filter holder
Removing and installing oil pan
Special tools and workshop equipment required
t  Supporting device -MP 9-200- with adapter - MP 9-200/3-
t  Workshop crane (e.g. -V.A.G 1202 A-)
t  Torque wrench
t  Plug in unit -T10058- or -3249-
t  Cable strap
t  Sealant remover Gasket Stripper (storage code GST, storage article no. R 34402), manufacturer Retech GmbH
t  Cleaning agent and grease remover -D 000 401 04-
t  Silicone sealant -D 176 600 A1-
Removing
–  Remove the noise insulation in the middle → Body Work; Rep. Gr.50.
–  Put lock carrier in service position → Body Work; Rep. Gr.50.
–  Drain engine oil → Superb.
   
–  Unscrew screws -arrows- from stop -1-
Vehicles with automatic gearbox
  S10-0229
–  Unscrew screws -arrows- from support -1- of ATF line.
Continued for all vehicles
–  Disconnect plug from oil level and oil temperature sender.
  S17-0117
–  Mark the installed position of the screws -1- and the fixing sleeves -2- below on the left and right on the engine bearings.
–  Unscrew both engine bearings.
  S17-0118
–  Place the supporting device -MP 9-200- with adapter -MP 9-200/3- in position as shown in the figure and support the engine in its installed position.
–  Slightly pre-tension the engine using the spindles on the catching device.
  S17-0092
–  Support the assembly carrier with the works crane -V.A.G 1202 A -.
  Note
The assembly carrier must only be loosened at the front side or lowered to avoid having to make an axial measurement.
  S17-0075
–  First screw out the front screws -2- and -3- of the assembly carrier on the left and the right. Then unscrew screws -4-.
Vehicles fitted with a manual gearbox
  S17-0119
–  Loosen the nut -arrow- for the left hand gearbox bearing plate in such a way that it is flush with the lower edge of the screw (screwed in by about four turns).
Vehicles with automatic gearbox
  S17-0120
–  Loosen the rear bolts -2- for the left hand gearbox bearing plate some turns and screw out the front bolt -1- for the left hand gearbox bearing plate.
Continued for all vehicles
  S17-0121
–  Loosen the rear bolts -2- for the right hand gearbox bearing plate some turns and screw out the front bolt -1- for the right hand gearbox bearing plate.
  S17-0122
–  Lower the assembly carrier slowly using the works crane.
–  Move out the works crane and swing the stabiliser downwards.
  Note
Use the locating pin to loosen and tighten up the two rear oil pan bolts -T10058-.
–  Unbolt oil pan.
–  Remove oil pan. If necessary release remove the oil pan by applying slight blows with a rubber-headed hammer.
  WARNING
Wear protective gloves when working with sealant and grease remover!
–  Remove residual sealant from the sealing surface using a chemical sealant remover and thoroughly clean.
–  Degrease the sealing surfaces. They must be free of oil and grease.
Install
Installation is performed in the reverse order. Pay attention to the following points:
  Note
t  Make sure when installing the oil pan on the removed engine that the oil pan is aligned flush with the intermediate plate on the flywheel side, that is that the oil pan must be 0.8 mm above the cylinder block.
t  The oil pan must lie flush with the installed engine at the gearbox flange.
t  Pay attention to the 'use by date' on sealant.
t  The oil pan must be installed within 5 minutes after applying the silicone sealant.
  S17-0075
–  Cut off nozzle tube at the front marking ( Ø of nozzle approx. 3 mm).
Apply silicone sealant to the clean sealing surface of the oil pan, as shown. Sealant bead must:
t  be 2...3 mm thick
t  run past the area around the bolt holes on the inside -arrows-
  Note
The sealant bead must not be thicker otherwise excess sealant may get into the oil pan and block the strainer in the oil pump suction pipe.
  S13-0457
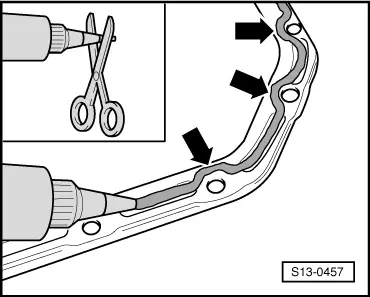
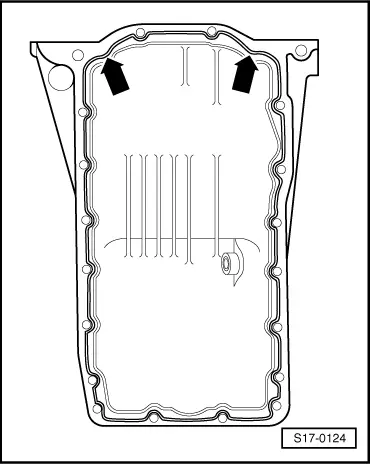
–  Apply silicone sealant to the clean sealing surface of the oil pan, as shown in the illustration.
–  Place the M10 bolts in the oil pan at the cylinder block before assembling on the oil pan.
–  Immediately position the oil pan and slightly tighten all oil pan bolts.
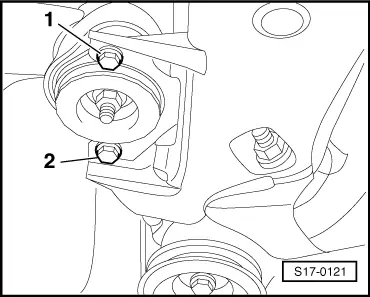
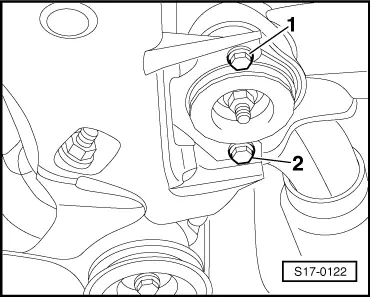
–  Tighten up the M7 oil pan bolts crosswise using a torque of 15 Nm.
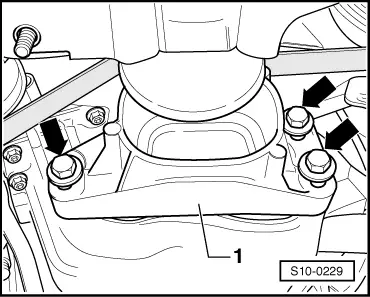
–  Tighten up the M10 bolts on the oil pan/cylinderblock using a torque of 40 Nm.
–  Tighten up the bolts on the oil pan/gearbox to a torque of 45 Nm.
  Note
After installing, allow the sealant to dry for about 30 minutes. Only after this period has elapsed the engine oil can be poured in.
Further installation occurs in reverse order to removal.
  S17-0124

Testing oil pressure and oil pressure switch > < Disassembling and assembling oil filter holder