skoda Workshop Repair Guides

Skoda Workshop Service and Repair Manuals

Inspecting the gearshift mechanism > < Disassembling and assembling clutch ?C?
Disassembling and assembling planetary gear
Special tools and workshop equipment required
t  Supporting bridge -MP3-425 (30-211 A)-
t  Universal dial gauge holder -MP3-447 (VW 387)-
t  Assembly stand -MP9-101-
t  Pull-out handle -T10271-
t  Supporting device -T10282-
t  Supporting device -T10283-
t  Puller for ATF supply -T10286-
t  Lifting device -T10287-
t  Centering tool -T10288-
t  Assembly sleeve -T10290-
t  Gearbox mount -T30105-
t  Catch pan e.g. -VAS 6208-
Disassembling planetary gear
l  Attach gearbox to assembly stand -MP9-101- → Chapter.
–  Remove torque converter.
–  Position drip tray, e.g. -VAS 6208- under the gearbox.
   
–  Release ATF drain plug -1- and drain the ATF.
  Note
t  Observe the disposal instructions.
t  A residue of the ATF remains in the oil pan.
  A37-0305
Release the screws for front final drive cover in the order -14…1- and then release the screws -14…4-.
  Note
Release the screws -1…3- by approx. 5 turns.
–  If necessary, carefully lever off the front final drive cover in the area of the dowel sleeve -arrow A-.
–  Drain the flowing out axle oil in the drip tray, e.g. -VAS 6208-.
–  Release the remaining 3 screws -1…3- and remove the front final drive cover.
  Caution
t  Remove the front final drive cover slowly and carefully from the gearbox housing. Otherwise there is a risk of the spur wheels falling out of the gearbox.
t  Spur wheels that have fallen onto the ground should not be put back into the gearbox. In this case, the gearbox must be replaced.
  N39-0429
–  Mark the fitting position of the intermediate pinion -1- and the pinion gear -3-.
  Caution
t  Intermediate pinion -1- and pinion gear -3- must be inserted again into the same position for maintaining the running direction.
t  Therefore mark the fitting position of the intermediate pinion and the pinion gear.
–  Take off pinion gear together with the intermediate pinion, to do do slightly pull the drive pinion -2- to the rear.
–  Remove drive pinion -2-.
  A37-10369
–  Remove the adjusting washer -1- and the axial needle bearing -2- from the drive shaft.
–  Remove helical spring -3- from the pinion shaft.
  A37-10370
–  Unscrew the screw -arrow- for the right flange shaft, to this end insert two screws in the flange and counterhold the flange shaft using a tyre lever.
–  Position drip tray, e.g. -VAS 6208- under the gearbox.
–  Pull out the right flange shaft.
  A39-0032
–  Slacken screws for the final drive cover in the order -12…1- and then release.
  Caution
t  Remove the final drive cover slowly and carefully from the gearbox housing. Otherwise there is a risk of the differential falling out of the gearbox.
t  Differential that has fallen onto the ground should not be put back into the gearbox. In this case, the gearbox must be replaced.
–  Remove the final drive cover.
  Caution
t  Make sure that the outer ring for tapered roller bearing and the adjusting washer for differential do not fall out of the final drive cover.
t  The outer ring for tapered roller bearing must be reinstalled at the same point.
t  Adjusting washer is specially fitted and should not be replaced with a washer of different thickness.
  A39-0036
–  Carefully remove the differential gear -arrow-.
  A37-10157
–  Release screws -arrows- and remove the slug flow panel.
  A37-10565
–  Fit the whole serration -arrow- of the left flange with insulating tape crease-free and without jerk, in order to prevent a damage of the double shaft seal of the final drive/gearbox housing when pulling out the flange shaft.
  A39-0042
–  Unscrew the mounting from the left flange shaft -arrows-.
–  Cut through cable straps -A-.
–  Take out the left flange shaft.
  Note
When pulling out, the left flange shaft must be carefully guided by hand, in order to avoid a damage of the double shaft seal of the final drive/gearbox housing.
–  Turn gearbox at assembly stand -MP9-101-.
l  The oil pan points upwards.
  S37-0238
–  Loosen bolts for oil pan -arrow- crosswise and release.
–  Remove oil pan.
  Note
Milky green lining in the oil pan points to a damage in the clutch for torque converter lockup.
  A37-10257
–  Unscrew screws -arrows- for oil filter.
–  Take the oil filter out of the slide valve body.
  N38-0071
–  Lever off the locking clip -arrow- from the wiring loom connector.
–  Press wiring loom connector to the inside in direction of slide valve body.
  N38-0072
–  Pull out the connector -arrow- at the gearbox speed sender -G38-/gearbox output speed sender -G195-.
  N38-0076
–  Removing gearbox speed sender -G38-/gearbox output speed sender -G195--2-, to do so remove the sleeve -1-.
  A38-0019
–  Unhook and disconnect the electrical plug connection for gearbox input speed sender -G182- at slide valve body -arrow-.
  A37-10258
–  Slacken the screws for the slide valve body in the order -16...1- and release.
  Caution
t  Only the marked screws must be released; these screws have a large screw head.
t  When releasing other screws the function of the slide valve body can be impaired or the slide valve body splits.
–  Carefully remove the slide valve body from the gearbox, to do so observe the wiring loom.
  S38-0045
–  Remove gearbox input r.p.m. sender -G182 --A- from gearbox, to do so release screw -B-.
  A38-0086
–  Pull out the sealing sleeves -arrows- in the feed holes to the clutches “C”, “A”, “B”, “E” and clutch for torque converter lockup with the pull-out handle -T10271-.
  A37-10259
–  Remove the 3 circlips -1-.
–  Then remove the helical springs -2-.
–  Then pull out the sealing sleeves -3- with the pull-out handle -T10271-.
–  Turn gearbox at assembly stand -MP9-101-.
l  The ATF supply points upwards.
  A37-10153
–  Slacken the screws for the ATF supply in the order -9 ... 1- and release.
–  Remove screws with seals.
  S37-0239
–  Fasten puller for ATF supply -T10286- to the stator shaft and pull out the ATF supply forcefully to the top.
  A37-10261
If the ATF supply should not be released:
–  On the underside of the gearbox, push a screwdriver between sun gear “I” and leg bowl → Chapter and lever the components above the the sun gear upwards -in direction of arrow-.
  A37-10621
–  Remove the adjusting washer -1- and the axial needle bearing -2-.
  A37-10262
–  Lift tower “II”-pos. 1- out of the gearbox housing.
  A37-10263
–  Turn the tower “II”-pos. 1- 180° and position with the drive shaft to the bottom in the supporting device -T10283-.
  A37-10070
–  Remove sun shaft -1- with intermediate shaft -2- (with inner plate support).
  A37-10264
–  Disconnect the following parts:
1 - Sun shaft
2 - Thrust washer
3 - Axial needle bearing
4 - Angle washer
5 - Intermediate shaft with inner plate support
6 - Thrust washer
7 - Axial needle bearing
8 - Thrust washer
  A37-10071
–  Remove axial needle bearing -1-.
  A37-10265
–  Remove sun gear “I”-pos. 1-.
  A37-10266
–  Remove planetary gear set “I” and “II”-pos. 1-.
  A37-10267
–  Remove the angle washer -4-, the axial needle bearing -3- and the thrust washer -2-.
  A37-10268
–  Remove the shaft with the hollow wheel “I”-pos. 4-, the thrust washer -3-, the axial needle bearing -2- and the angle washer -1-.
  A37-10269
–  Remove link bowl -1-.
  A37-10270
–  Remove circlip -arrow- for tower “I”.
  A37-10271
–  Release the knurled nut -B- of the lifting device -T10287-.
–  Insert the lifting device up to the stop into the tower “I”.
–  Tighten the knurled nut -B- of the lifting device in clockwise direction, to do so counterhold nut -A-.
–  Check the secure position of the lifting device in tower “I”.
–  Lift the tower “I” by hand out of the gearbox housing.
  S37-0240
–  Position the tower “I” in the supporting device -T10282-.
  A37-10073
–  Take sun gear “III”-pos. 1- with bottom angle washer -2-, axial needle bearing -3- and top angle washer -4- out of the gearbox housing.
  Note
The top angle washer -4- sticks under certain circumstances to the bottom side of the tower “I”.
  A37-10272
Assembling planetary gear
–  Check the secure position of the lifting device in tower “I”.
–  Lift the tower “I” by hand out of the supporting device -T10282- and lay onto a work bench.
  A37-10073
–  Fit the following components onto the shaft of the tower “I”-pos. 5-:
4 - Top angle washer - the angled edge points to the tower “I” upwards
3 - Axial needle bearing
2 - Bottom angle washer - the angled edge points to the axial needle bearing
1 - Sun gear “III” - Outer serration of the sun gear must grip into the serration of the clutch “F”
  Note
Do not interchange angle washer -4- (height with collar 5 mm) with angle washer (height with collar 2.5 mm) for the bearing of the link bowl → Chapter.
  S37-0242
–  Secure the sun gear “III”, as shown in the fig., with the assembly sleeve -T10290- clearance free onto the shaft. To do so, screw the grub screw -1- into the hole -arrow A- marked with “A” and tighten by hand.
  Caution
l  The grub screw must on no account be screwed into the hole marked with “B”, otherwise the serration is damaged.
l  The hole “A” points towards the sun gear “III”.
  A37-10319
–  Check if the parallel keys -arrow- are inserted in the middle on both sides of the cylinder “D/G”.
  A37-10274
–  Put tower “I” into the installation position.
l  The oil drillings -arrows- at cylinder “D/G” point towards the gearbox bottom side and must be aligned with the openings in the gearbox housing.
  A37-10275
–  Insert tower “I” fully into the gearbox housing.
l  The tower “I” must be inserted in such a way that the slot for the circlip is free.
–  Release the knurled nut -B- and remove the lifting device -T10287-.
  S37-0240
–  Carefully insert the circlip -arrow- for tower “I” into the gearbox housing.
  Caution
Make sure that the circlip is tightly fitted into the slot of the gearbox housing; if necessary drive circlip with a drift into the slot.
  A37-10271
–  Release the grub screw -arrow- and remove the assembly sleeve -T10290-.
  S37-0243
–  Insert the link bowl -1-.
  A37-10270
–  Fit the angle washer -1- onto the tower “I”.
l  The angled edge of the angle washer points downwards.
  Note
Do not interchange angle washer -1- (height with collar 2.5 mm) with angle washer (height with collar 5 mm) for the bearing of the sun gear “III” → Chapter.
–  Install axial needle bearing -2-.
–  Place the thrust washer -3-.
–  Install shaft with ring gear “I”-pos. 4-.
  A37-10269
–  Insert thrust washer -1- into the ring gear “I”.
–  Place the axial needle bearing -2- on top.
–  Fit angle washer -3-.
l  The angled edge of the angle washer points downwards towards the ring gear “I”.
  A37-10268
–  Insert planetary gear set “I” and “II”-pos. 1-.
  A37-10267
–  Fit sun gear “I”-Pos. 1- into the planetary gear set “I” and “II”.
  A37-10266
–  Insert axial needle bearing -1-.
l  Fitting position: the angled edge points downwards towards the sun gear “I”.
  A37-10265
–  Fit together the following components in a repair group:
1 - Sun shaft
2 - Thrust washer
3 - Axial needle bearing
4 - Angle washer - the angled edge points to the axial needle bearing pos. 3
5 - Intermediate shaft with inner plate support
6 - Thrust washer
7 - Axial needle bearing
8 - Thrust washer
  A37-10071
–  Install sun shaft -1- together with the intermediate shaft -2- (with inner plate support).
  A37-10264
–  Remove the tower “II”-pos. 1- from the supporting device -T10283- and turn to fitting position.
  A37-10070
–  Insert tower “II”-pos. 1- under rotary movements by hand into the gearbox housing.
–  Make sure that the driver serration of the sun gear “I” grips into the outer serration at cylinder “B”. To do so turn drive shaft and sun gear “I”.
  A37-10263
–  Inspect the correct installation of the tower “II”.
–  Measure the distance between the contact surface for adjusting washer at tower “II” and measure the contact surface for ATF pump at gearbox housing.
l  Dimension -a- = minimum 6.0 mm.
l  Adjusting washer must not be fitted on during the measurement.
  A37-10320
–  Fit the previous adjusting washer -1- onto the clutch “B” (is identical for the inner plate support for the clutch “C”).
  A37-10277
–  Replace the 2 rectangular rings on the drive shaft.
–  Before inserting the rectangular rings, thinly coat with vaseline. Only use vaseline, other types of lubricant will cause the gearbox hydraulic control system to malfunction.
–  Make sure that the rectangular rings are fully positioned into the slots of the drive shaft.
  A37-10278
–  Thinly coat the reverse side of the axial needle bearing -2- with vaseline. Only use vaseline, other types of lubricant will cause the gearbox hydraulic control system to malfunction.
–  Adhere the axle needle bearing -2- to the ATF supply -1-.
l  The closed side of the axial needle bearing points to the ATF supply.
–  Replace rectangular rings -3- and -4- on the stator shaft.
–  Before inserting the rectangular rings, thinly coat with vaseline. Only use vaseline, other types of lubricant will cause the gearbox hydraulic control system to malfunction.
–  Make sure that the rectangular rings are fully positioned into the slots of the stator shaft.
  A37-10332
–  Interlock the ends of the installed rectangular rings -arrows-, as shown in the fig.
  N38-0013
–  Replace the O-ring -1- on the ATF supply.
–  Thinly coat the O-ring with Vaseline. Only use vaseline, other types of lubricant will cause the gearbox hydraulic control system to malfunction.
  A37-10279
–  Align the lining plates -3- of the clutch “C” to each other using the centering tool -T10288/1-. To do so, engage the pins -2- and -4- into the serration of all lining plates.
–  Align the lining plates to housing for ATF supply, to do so insert the centering pins -1- and -5- into the suitable holes on the ATF supply.
l  The centering pins only fit in one position.
–  Maintain the centering tool in this position and insert the wedge -T10288/2- laterally between the corrugated spring and piston of the clutch “C”-arrow- by hand up to the stop.
l  The wedge must fix all plates into their current position.
–  Remove the centering tool -T10288/1-; the wedge -T10288/2- remains inserted.
  A37-10333
–  Align the inner plate support for the clutch “C” (component part of the clutch “B”) with the centering tool -T10288/3-, as shown on the figure. To do so, screw the guide pins -T10288/4- into the gearbox housing.
l  The holes of the centering tool and the gearbox housing only fit into one position.
–  Carefully remove the centering tool -T10288/3- upwards; the guide pins -T10288/4- remain in the gearbox housing.
l  The inner plate support for clutch “C” (component part of the clutch “B”) must no longer be turned.
  A37-10280
–  Mount puller for ATF supply -T10286- onto the stator shaft.
–  Put the ATF supply into the installation position.
l  The recess for left flange shaft points to the slide valve body side.
–  Position the ATF supply with the suitable holes onto the guide pins -T10288/4-.
–  Then carefully insert the ATF supply into the gearbox housing and press down forcefully.
–  Afterwards, pull the ATF supply through alternative screwing of 2 opposite fixing screws into the final fitting position.
  A37-10376
–  Then pull out the wedge -10288/2- using a suitable tool, e. g. hook -3438-.
–  Remove puller for ATF supply -T10286-.
–  Release guide pins -T10288/4-.
  A37-10281
–  Screw in screws for ATF supply with new seals into the gearbox housing.
–  Tighten the screws for ATF supply in the order -1 … 9- to tightening torque.
  Note
Check the correct installation of the ATF supply: The drive shaft must turn, otherwise the last plate of the clutch “C” can be caught up and bent when installing. In this case, remove the ATF supply again and check the plates for damage.
  S37-0239
–  Mount dial gauge-A- with the dial gauge extension -B- (30 mm) and the universal dial gauge holder -MP3-447 (VW 387)- at gearbox flange.
–  Position dial gauge-A- with the dial gauge extension -B- onto the drive shaft of the gearbox, as shown in the fig.
–  Position dial gauge to “0”.
–  Fit the drive shaft -C- with insulating tape for protection against damage.
–  Move the drive shaft up and down with pliers, while doing so avoid crosswise movements.
–  Read off the axial play of the drive shaft on the dial gauge.
l  Specified value: 0.10 … 0.30 mm.
  Note
If no axial play can be measured (0 mm), it is possible that the angle washers for the bearing of the sun gear “III” (height with collar 5 mm) and for the bearing of the link bowl (height with collar 2.5 mm) are interchanged → Chapter.
If the specified value is not reached:
–  Remove the ATF supply again.
  S37-0244
–  Determine the correct adjusting washer -2- on tower “II”-pos. 1- according to the following table.
l  Measured axial play too low: Install thinner adjusting washer.
l  Measured axial play too high: Install thicker adjusting washer.
  A37-10283
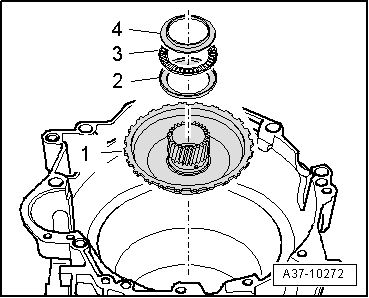
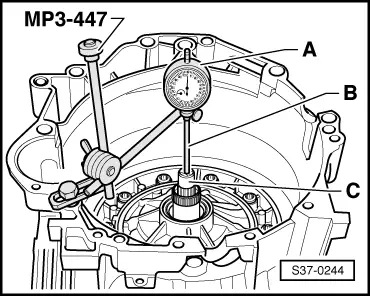
Available adjusting washers - thickness in mm
1,62,02,4
1,82,22,6

–  Reinstall the ATF supply with newly determined adjusting washer, new seals and new O-ring.
–  Once again check the axial play of the drive shaft → Anchor.
If the specified value is again not reached:
–  Repeat setting.
If the specified value is reached:
–  Turn gearbox at assembly stand -MP9-101-.
l  The slide valve body points upwards.
   
–  Press the sealing sleeves -3- up to the stop into the holes of the gearbox housing.
–  Insert helical springs -2- and then install the circlips -1-. While doing so, press the circlip -1- up to the shoulder in the hole downwards.
  A37-10153
–  Press the sealing sleeves -Pfeile- into the feed holes to the clutches “C”, “A”, “B”, “E” and to clutch clutch for torque converter lockup up to the stop.
  S37-0256
–  Insert gearbox input r.p.m sender -G182 --A- into the gearbox housing and tighten the screw -B- to tightening torque.
–  Lay out the connector cable -C- to the gearbox input r.p.m. sender -G182- as shown in the figure, so that the cable will not be caught up when fitting the slide valve body.
–  Apply ATF to the new O-rings of the connector for the wiring loom (slide valve body).
  A38-0086
–  Insert the connector in the gearbox housing with the flat part -arrow A- towards the oil pan.
–  Position the slide valve body with the locating pin -arrow B- at the hole in the gearbox housing -arrow C-.
  N38-0078
–  Place the slide valve body, inserting the bolt of notched disk -1- in the groove in slide switch -2-.
  N38-0079
–  First all tighten the screws for slide valve body in the order -1…16- by hand.
–  Then tighten the screws for slide valve body in the order -1…16- to tightening torque.
  S38-0045
–  Installing gearbox speed sender -G38-/gearbox output speed sender -G195--2- using the distance sleeve -1- (height: 8 mm) and tighten to tightening torque.
  A38-0019
–  Fit on the connector -A- for the gearbox speed sender -G38-/gearbox output speed sender -G195-.
–  Attach the connection -B- for the gearbox input r.p.m. sender -G182-.
  A38-0084
–  Insert the electrical plug connection into the mount on the slide valve body -arrow-.
  A37-10258
–  Press on the locking clip -arrow- for the wiring loom connector, until the tab engages.
–  Apply some ATF to the seal on the intake collar of the new oil filter.
  Note
Always replace oil filter → Electronic Catalogue of Original Parts.
–  Carefully press the intake collar of the oil filter up to the stop in the opening on the slide valve body.
  N38-0072
–  Screw in the oil filter -arrows- and tighten the screws to tightening torque.
  Note
  N38-0071
t  Clean the solenoids (6 pieces) in the oil pan.
t  Take care that the full surface of the magnets rests against the oil pan.
–  Install oil pan -arrow- with a new seal.
–  Tighten the oil pan screws crosswise in several stages to tightening torque.
  A37-10257
–  If necessary, replace the shaft seal for left flange shaft → Chapter.
–  Replace the O-ring -arrow B- in bearing bracket for left flange shaft → Electronic Catalogue of Original Parts.
  Note
Do not observe -arrow A-.
–  If necessary, replace the double shaft seal of the final drive/gearbox housing → Chapter.
  A39-0041
–  Fit the whole serration -arrow- of the left flange with insulating tape crease-free and without jerk, in order to prevent a damage of the double shaft seal of the final drive/geearbox housing when inserting the flange shaft.
–  Insert left flange shaft into the gearbox.
  Note
When inserting, the left flange shaft must be carefully guided by hand, in order to avoid a damage of the double shaft seal of final drive/gearbox housing.
  A39-0042
–  Tighten screws -arrows- for bearing bracket of left flange shaft to tightening torque.
–  Fit new cable strap -A-, as shown in the fig.
  Caution
t  Make sure that the outer ring for tapered roller bearing and the adjusting washer for differential do not fall out of the final drive cover.
t  The outer ring for tapered roller bearing must be reinstalled at the same point.
t  Adjusting washer is specially fitted and should not be replaced with a washer of different thickness.
  S37-0238
–  Clean the baffle plate and tighten it at final drive cover to tightening torque -arrows-.
  A37-10565
–  Replace O-ring -arrow- in the final drive cover → Electronic Catalogue of Original Parts.
–  If necessary, replace the shaft seal for right flange shaft → Chapter.
  A39-0037
–  Insert differential -arrow- into the gearbox housing.
  A37-10157
–  Attach the final drive cover.
Tightening sequence:
l  1st stage: Tighten screws -1-, -2- and -3- by hand.
l  2nd stage: Tighten screws -1- to -12- to tightening torque, in the order indicated.
–  Mount the right flange shaft.
  A39-0036
–  Tighten the screw -arrow- for the right flange shaft to tightening torque, to this end insert two screws in the flange and counterhold the flange shaft using a tyre lever.
–  Turn gearbox at assembly stand -MP9-101-.
l  The ATF supply points downwards.
  A39-0032
–  Position helical spring -3- onto the pinion shaft.
–  Fit the axial needle bearing -2- and the adjusting washer -1- onto the drive shaft.
l  The angled edge of the axial needle bearing -2- points towards adjusting washer -1-.
  A37-10370
–  Position drive pinion -2- up to the stop onto the drive shaft.
  Caution
Intermediate pinion -1- and pinion gear -3- must be inserted again into the same position for maintaining the running direction.
–  Insert the pinion gear -3- together with the intermediate pinion -1- as marked during removal into the gearbox housing, to this end pull back the drive pinion -2- about 20 mm from the drive shaft.
  A37-10369
–  Before installing the cover for front final drive, check that dowel sleeve -arrow A- is correctly positioned.
–  Place the new gasket.
  Note
Before fitting on the gasket, thinly coat the sealing surface with axle oil, in order to prevent an off-center of the gasket.
–  Attach the front final drive cover.
Tightening sequence:
l  1st stage: Tighten screws -1-, -2- and -3- by hand. Ensure that the housing gap between cover for front final drive and gearbox is uniformly decreased.
l  2nd stage: Tighten screws -1- to -14- to tightening torque, in the order indicated.
–  Remove gearbox from assembly stand -MP9-101- and the gearbox mount -T30105-.
  N39-0429
–  Insert the torque converter and secure against dropping out, e.g. with the supporting bridge -MP3-425 (30-211 A)-.
–  Check the fitting dimension of the torque converter → Chapter.
  Caution
The touched up gearbox should be installed and put into operation as fast as possible, in order to prevent corrosion at the newly inserted components.
–  Top up with ATF and inspect ATF level → Chapter.
–  Filling up the axle oil in the final drive and check oil level → Chapter.
  S37-0131
Tightening torques
ComponentNm
ATF supply to gearbox housing → Chapter
Slide valve body to gearbox housing → Chapter
Gearbox speed sender -G38-/Gearbox output r.p.m. sender -G195- to gearbox housing → Chapter
Gearbox input r.p.m. sender -G182 - on the gearbox housing → Chapter
Oil filter to slide valve body → Chapter
Oil pan to gearbox housing → Chapter
Mounting of the left flange shaft to gearbox → Chapter
Final drive cover to gearbox → Chapter
Right flange shaft to gearbox → Chapter
Front final drive cover to gearbox → Chapter


Inspecting the gearshift mechanism > < Disassembling and assembling clutch ?C?