skoda Workshop Repair Guides

Skoda Workshop Service and Repair Manuals

Right-hand drive > < Removing and installing the control motor of temperature flapV68
Left-hand drive
Left-hand drive
Removing
–  Switch off the ignition and all electrical components.
–  Remove lower part of the dash panel insert on the driver's side → Body Work; Rep. gr.70.
–  Remove knee airbag → Body Work; Rep. gr.69 and its bracket → Body Work; Rep. gr.70.
–  Remove left footwell vent.
–  Remove the control unit for data bus diagnostic interface -J533- (attached in the area of the steering column to the bracket) → Electrical System; Rep. gr.97.
   
–  Release screws - 3 - (10 Nm).
The screws -1- are not released.
  N87-10206
–  Press the bracket -1- in the direction of the brake pedal -arrow- and fasten it there with the cable strap.
  N87-10392
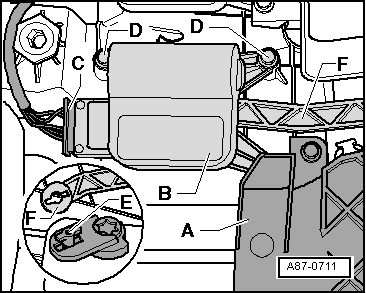
–  Mark the connector -C- (the design is identical to other connectors, danger of mix-ups) and subsequently remove it at the left temperature flap control motor -V158--B-.
–  Removing cover -A-.
–  Release the fixing screws -D- (1.4 Nm) and remove the control motor -B-.
–  Slacken the lever -E- of the control motor from the coupling rod -F-.
Install
Installation is performed in the reverse order, pay attention to the following points:
  Note
t  After installing the control motor, it is necessary to test the operation of the temperature flap.
t  Carry out the function „Initiate basic setting“ with the Vehicle diagnosis, measurement and information system -VAS 5051-.
  A87-0711

Right-hand drive > < Removing and installing the control motor of temperature flapV68