
Yeti
| Summary of components (Yeti) |
 Note
Note| t | During the manufacture, the entire propshaft is balanced, in order to obtain the smoothest running possible. The balancing of the entire propshaft is not possible with workshop tools. Thus in case of damage, the entire propshaft must be replaced → Electronic Catalogue of Original Parts. |
| t | Do not bend the propshaft, only store extended and transport. |
| t | Before the removal, mark the position of all parts to each other. Carry out the installation again in the same position, otherwise the imbalance is too great, damages to the bearing and humming noises could occur. |
| t | The flexible disks on the propshaft and the corresponding fixing screws are not available as a spare part. Thus in case of damage, the entire propshaft must be replaced → Electronic Catalogue of Original Parts. |

| 1 - | Angle gearbox |
| 2 - | 60 Nm |
| q | 3 pieces |
| q | M10 x 30 |
| q | Assignment → Fig. |
| 3 - | Propshaft |
| q | removing and installing → Chapter |
| q | when installing and removing do not damage the centering bushing and gasket ring in the middle of the flange |
| q | Fitting position: the intermediate bearing Pos. 5 is located in the direction of travel behind the monoblock joint -arrow- |
| 4 - | 60 Nm |
| q | 3 pieces |
| q | M10 x 45 |
| q | Assignment → Fig. |
| 5 - | Intermediate bearing |
| q | align free of stress |
| q | replace propshaft if damaged |
| 6 - | Heat shield |
| 7 - | 25 Nm |
| 8 - | Rear final drive |
|
|
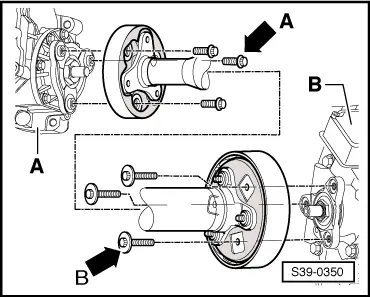
| Collar screw with | Fitting location |
| small collar -arrow A- (M10 x 30) | Propshaft on front final drive -A- |
| large collar -arrow B- (M10 x 45) | Propshaft on rear final drive -B- |