skoda Workshop Repair Guides

Skoda Workshop Service and Repair Manuals

Hose connections > < Charge air cooling - Summary of components
Removing and installing charge air cooler
(Octavia II, Yeti)
Removing
–  Remove coolant radiator → Chapter.
For the vehicles Octavia II
–  Remove front bumper → Body Work; Rep. gr.63.
For the vehicles Yeti
–  Remove headlights → Electrical System; Rep. gr.94.
For all vehicles
–  Remove the charge air hoses on the left and right from the charge air cooler.
On vehicles with air conditioning
  WARNING
Do not open the refrigerant circuit of the air conditioning system.
  Caution
In order to avoid damage to the condenser as well as to the refrigerant lines and hoses, ensure that the lines and hoses are not over-tensioned, kinked or bent.
   
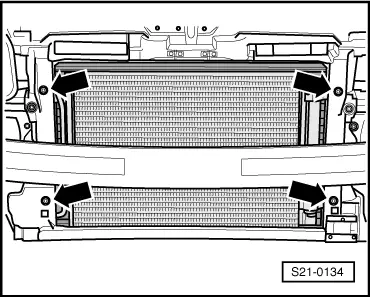
–  Release the securing bolts -arrows- of the condenser.
For all vehicles
–  Unscrew fixing screws for charge air cooler on right and left side:
t  Octavia II Pos. 1 → Chapter.
t  Yeti Pos. 16 → Chapter.
On vehicles with air conditioning
  S21-0134
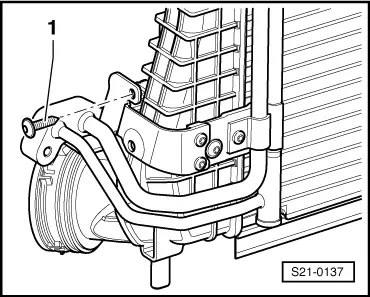
–  Press off the charge air cooler from the lock carrier with the assistance of a 2nd mechanic so that the screw -1- for attaching the pipes of the air conditioning system to the radiator is accessible.
–  Remove screw -1-.
For all vehicles
–  Carefully remove charge air cooler downwards.
Install
Installation is performed in the reverse order, pay attention to the following points:
  Note
t  Replace O-rings.
t  Observe the assembly instruction for hose connections with push-fit couplings → Chapter.
  S21-0137

Hose connections > < Charge air cooling - Summary of components