|
Crankshaft, Remove and Install
 Remove Remove
|
Remove engine – see operation "Engine, Remove and
Install".
Mount engine on Installation Stand KM-412 with Adapters KM-412-9
and KM-412-12 – remove attaching parts as necessary.
Remove transmission from cylinder block.
Remove lower part of oil pan – see operation "Oil Pan,
Lower Part, Remove and Install".
Remove upper part of oil pan – see operation "Oil Pan
– Upper Part, Remove and Install".
Remove oil pump – see operation "Oil Pump, Remove and
Install".
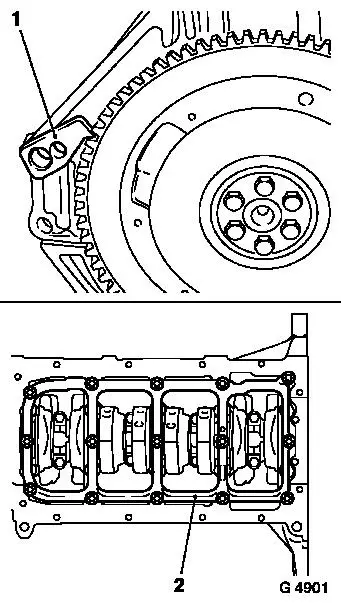
Counterhold flywheel with KM-652 (1) and remove from
crankshaft.
Remove crankshaft bearing bridge (2) from cylinder block and
crankshaft bearing caps – note installation position.
|
|
|
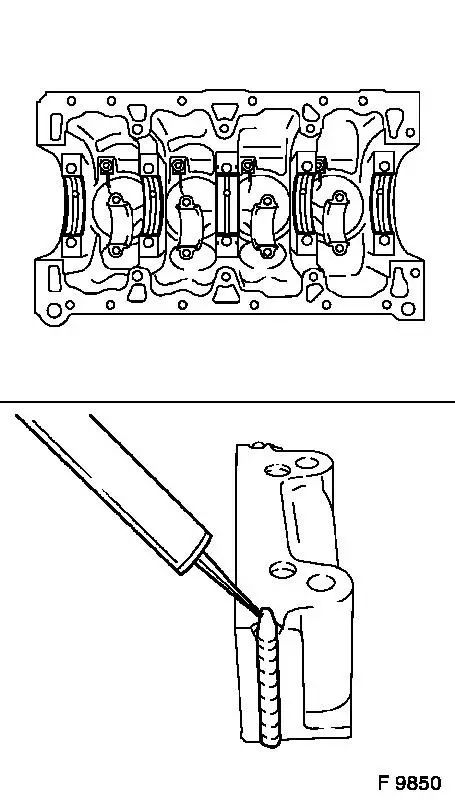
Mark order of crankshaft bearing caps (1) and order of con-rod
bearing caps (2) – bead (3) on con-rod bearing cap faces
transmission side.
Remove con-rod bearing cap from con-rod.
Remove crankshaft bearing caps from cylinder block.
Remove crankshaft from cylinder block.
|

|
 Clean Clean
Clean all parts and remove gasket residue.
 Inspect
Check all parts for wear and replace if necessary.
Check crankshaft – see operation "Crankshaft, Check".
 Install
|
Coat crankshaft bearing shells with engine oil and insert in
cylinder block and crankshaft bearing caps.
Insert crankshaft into cylinder block – the seating of the
crankshaft can be corrected by lightly tapping on the crankshaft
webs with a rubber hammer.
Apply bead of adhesive sealing compound (black) to rear grooves
of the crankshaft.
|
|
|
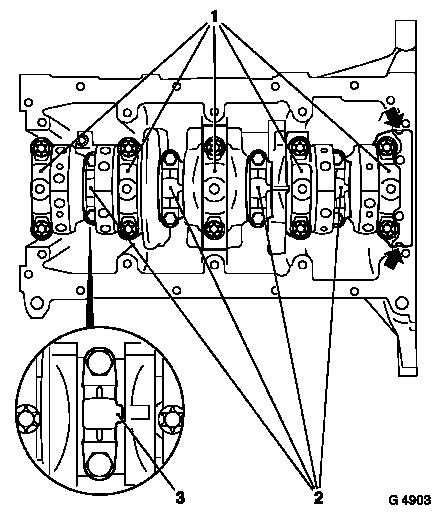
Attach crankshaft bearing cap (1) with new bolts to cylinder
block – note identification code – tightening torque 50
Nm / 37 lbf. ft. + 45° + 15°.
After assembly of rear crankshaft bearing cap, again press in
adhesive sealing compound (black) from above (arrows) until it
emerges at the joints.
Insert new con-rod bearing shells with engine oil and insert in
con-rod and con-rod bearing cap.
Note order of con-rod bearing caps (2) – observe mark.
Attach con-rod bearing caps to con-rods with new bolts –
bead (3) on con-rod bearing cap faces transmission side –
tightening torque – 35 Nm / 26 lbf. ft. + 45° +
15°.
|
|
Install crankshaft rear seal ring – see operation "Rear
Seal Ring, Crankshaft, Replace".
Attach crankshaft bearing bridge. to cylinder block and
crankshaft bearing caps – note installation position –
tightening torque – 20 Nm / 15 lbf. ft. + 45°.
Attach flywheel to crankshaft – lock with KM-652 –
tightening torque – 65 Nm / 48 lbf. ft. + 30° +
15°.
Install oil pump – see operation "Oil Pump, Remove and
Install".
Install upper part of oil pan – see operation "Oil Pan
– Upper Part, Remove and Install".
Install lower part of oil pan – see operation "Lower Part
of Oil Pan, Remove and Install".
Attach transmission to cylinder block.
Remove engine from Installation Stand KM-412. Remove Adapters
KM-412-9 and KM-412-12 from engine – install attaching parts
as necessary.
Install engine – see operation "Engine, Remove and
Install".
|
