|
Intercooler, Replace (Z 20 LEL, Z 20 LER)
 Remove Remove
| 2. |
Disconnect battery
| • |
Detach ground connection from ground terminal
|
|
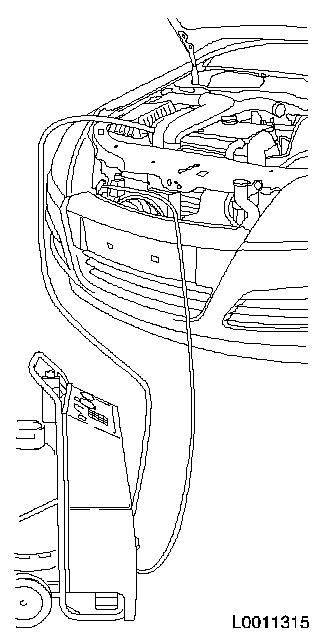
| 3. |
Empty climate control system
| • |
Connect service station
|
| • |
Blue hose to low pressure service connection (1) with small
diameter
|
| • |
Red hose to high pressure service connection (2) with large
diameter
Note: Read Service
Station operating instructions carefully
|
| • |
Determine quantity of condenser extracted at the oil separator
of the Service Station
|
|
|
|
| 4. |
Remove radiator grille (2)
| • |
Remove 4x body-bound rivets (1)
|
| • |
Unclip from front panelling from above
|
|
|
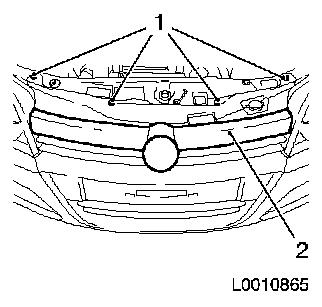
|
| 5. |
Raise vehicle by its full height
|
| 6. |
Place collecting basin underneath.
|
| 7. |
Drain coolant
| • |
Open drain bolt on radiator (1)
|
|
|
|
| 8. |
Place collecting basin underneath.
|
| 9. |
Detach front panelling (3)
| • |
Remove 5x body-bound rivets (2)
|
|
|
|
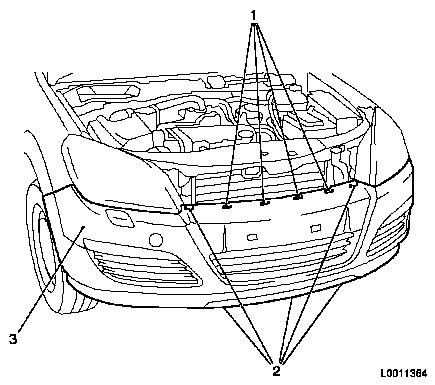
| 10. |
Place collecting basin underneath.
|
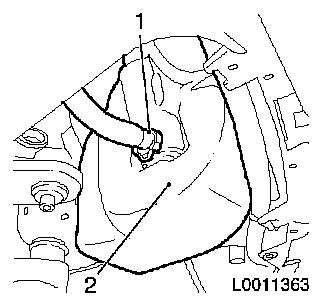
| 11. |
Detach high-pressure headlamp cleaning system hose from
reservoir (2)
| • |
Undo quick-release fitting (1)
Note: Escaping
fluid
|
|
|
|
| 12. |
Lower vehicle by half its height
|
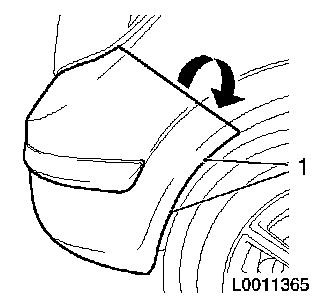
| 13. |
Remove front panelling
| • |
Second man
Note: Push front
panelling upwards at side and pull out of bracket in direction of
arrow
|
| • |
Detach front panelling from bracket
|
| • |
Unclip outside temperature sensor
|
|
|
|
| 14. |
Lower vehicle by half its height
|
| 15. |
Detach upper radiator hose from radiator
|
|
|
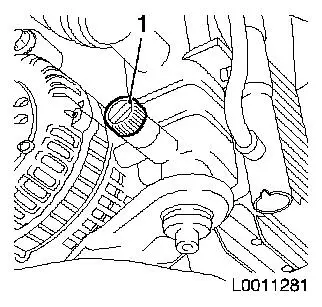
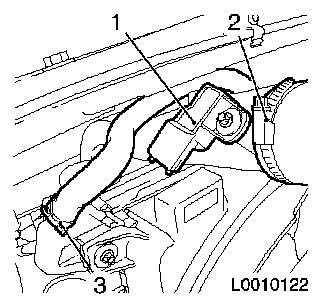
| 16. |
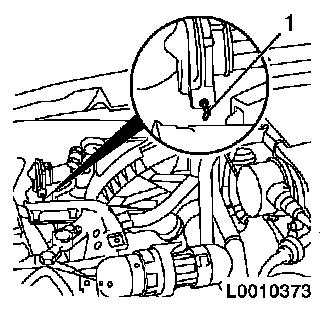
Disconnect charge pressure sensor wiring harness plug (1)
|
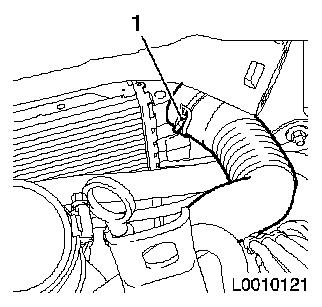
| 17. |
Detach charge air hose from intercooler
|
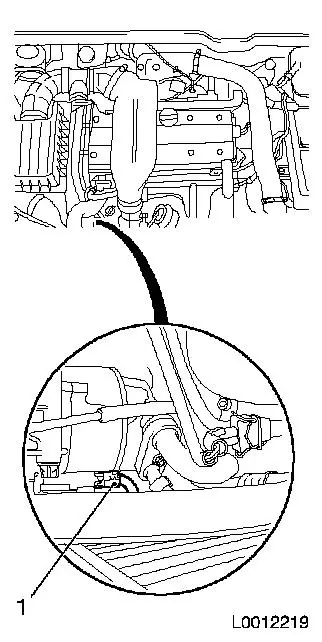
| 18. |
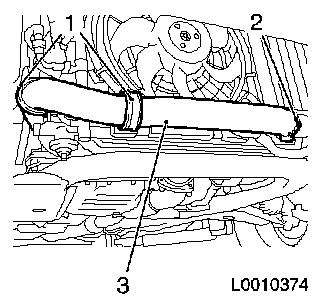
Detach coolant return hose between turbocharger and
radiator
|
|
|
| 19. |
Secure radiator at right and left using suitable wire bars
(1)
| • |
Insert 2x wire bars (1)
|
|
|
|
| 20. |
Raise vehicle by half its height
|
| 21. |
Detach charge air hose (3), turbocharger to intercooler
|
|
|
| 22. |
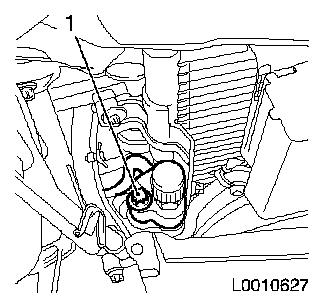
Detach refrigerant line (low pressure side)
|
|
|
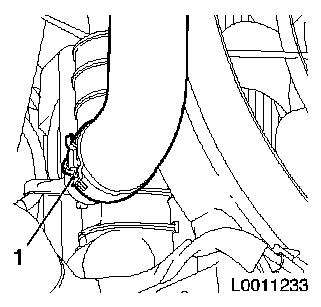
| 23. |
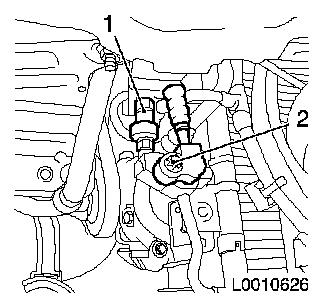
Disconnect pressure switch wiring harness plug (1), air
conditioning system
|
| 24. |
Detach refrigerant line (high pressure side) from condenser
|
|
|
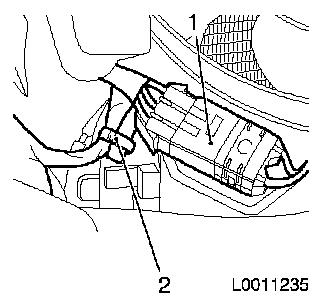
| 25. |
Disconnect compressor wiring harness plug (1)
| • |
Unclip compressor wiring harness from refrigerant line
|
|
|
|
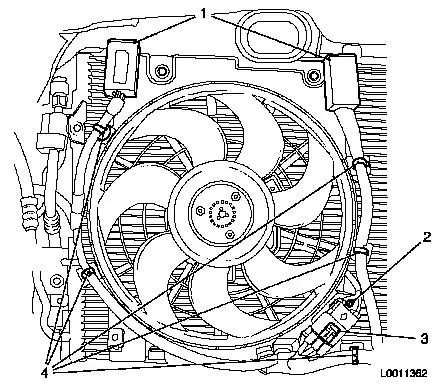
| 26. |
Detach air conditioning wiring harness from cooling module
| • |
Unfasten 10x cable ties (4)
|
| • |
Unclip 2x relays (1) from auxiliary fan housing
|
| • |
Disconnect auxiliary fan wiring harness plug (3)
|
|
|
|
| 27. |
Raise vehicle by half its height
|
| 28. |
Detach lower radiator hose from radiator
|
|
|
| 29. |
Detach fan wiring harness
| • |
Disconnect wiring harness plug (1)
|
|
|
|
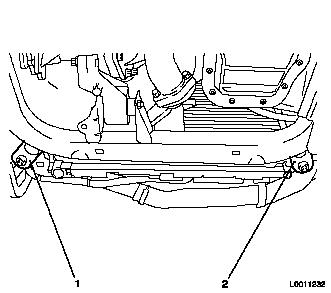
| 30. |
Remove bracket, right side of radiator (2)
|
| 31. |
Remove bracket, left side of radiator (1)
|
|
|
| 32. |
Lower vehicle by half its height
|
| 33. |
Remove cooling module
Note: Second man
| • |
Remove 2x fuses from bracket
|
|
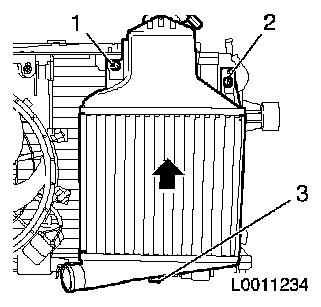
| 34. |
Detach intercooler from cooling module
| • |
Unscrew bolt (2) and nut (1)
|
| • |
Remove intercooler in direction of arrow
|
|
|
|
 Install
| 35. |
Attach intercooler to cooling module
Important: Insert bolt nut with
screw locking compound
|
| • |
Tighten bolt, nut 5 Nm
|
|
| 36. |
Insert cooling module
Note: Second man
| • |
Insert 2x fuses in bracket
|
|
| 37. |
Raise vehicle by half its height
|
| 38. |
Install left radiator bracket
| • |
Screw in 2x bolts 20 Nm
|
|
| 39. |
Install right radiator bracket
| • |
Screw in 2x bolts 20 Nm
|
|
| 40. |
Attach lower radiator hose to radiator
|
| 41. |
Attach fan wiring harness
| • |
Fix wiring harness plug
|
|
| 42. |
Lower vehicle by half its height
|
| 43. |
Attach air conditioning wiring harness to cooling module
| • |
Clip 2x relays to auxiliary fan housing
|
| • |
Connect auxiliary fan wiring harness plug
|
|
| 44. |
Connect compressor wiring harness plug
| • |
Clip compressor wiring harness to refrigerant line
|
|
| 45. |
Connect air conditioning system pressure switch wiring harness
plug
|
| 46. |
Attach refrigerant line (high pressure side)
|
| 47. |
Attach refrigerant line (low pressure side)
|
| 48. |
Attach charge air hose between turbocharger and intercooler
|
| 49. |
Insert front panelling
| • |
Second man
Note: Slide side front
panelling into bracket
|
| • |
Attach front panelling to bracket
|
| • |
Attach outside temperature sensor
|
|
| 50. |
Fit front panelling
| • |
Install 5x body-bound rivets
|
|
| 51. |
Attach high-pressure headlamp cleaning hose to reservoir
| • |
Attach 1 quick-release fitting to windscreen washing system
reservoir
|
|
| 52. |
Lower vehicle by half its height
|
| 53. |
Remove radiator retainer from bracket
|
| 54. |
Attach coolant return hose from turbocharger to radiator
|
| 55. |
Attach charge air hose to intercooler
|
| 56. |
Connect charge pressure sensor wiring harness plug
|
| 57. |
Attach upper radiator hose to radiator
|
| 58. |
Fill with coolant and correct coolant level
|
| 59. |
Top up climate control system
| • |
Connect service station
|
| • |
Blue hose to low-pressure service connection with small
diameter
|
| • |
Red hose to high-pressure service connection with large
diameter
Note: ! Read service
station operating instructions carefully
|
| • |
Use the Service Station to insert the quantity of new
compressor lubricant into the climate control system that was
extracted when it was emptied.
| – |
Fill air conditioning system with R 134a refrigerant
|
| – |
Refrigerant quantity 700g
|
|
|
| 60. |
Connect battery
| • |
Attach ground connection to ground terminal
|
|
| 61. |
Programme transient memory
|
|
