|
All Pistons with Con-rod, Remove and Install
 Remove Remove
| 2. |
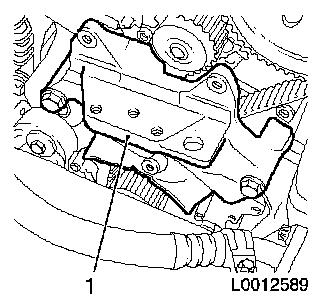
Install support (1) for engine damping block
| • |
Tighten 4x bolt (M10) 50 Nm
Note: Note different
bolts
|
| • |
Tighten bolt (M8) 25 Nm
|
|
|
|
| 3. |
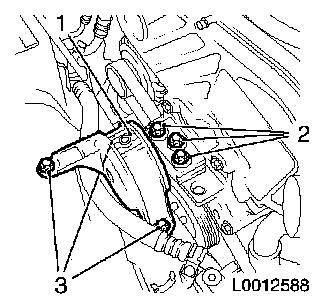
Install right engine damping block (1)
| • |
Attach to engine damping block support
| – |
Tighten 3x bolt (2) 55 Nm
|
|
| • |
to side member
| – |
Tighten 3x bolt (3) 35 Nm
|
|
|
|
|
| 5. |
Install front axle body
Note: The old bolts can
be used again for installation
|
| 7. |
Set cylinder 1 to TDC of combustion stroke
|
| 8. |
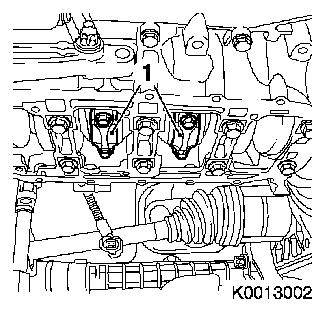
Remove 2x con-rod bearing cap (1)
Note: Note cylinder
sequence.
| • |
Mark con-rod with con-rod bearing cover
|
Important: The shear surfaces of
the con-rod and the con-rod bearing cover form a unique fit and
must not be swapped or damaged. Do not lay down on the shear
surfaces
|
| • |
Unscrew 4x bolts
|
| • |
Push 2x piston with con-rod upwards
|
|
|
|
| 9. |
Lower vehicle by its full height
|
| 11. |
Raise vehicle by its full height
|
| 12. |
Turn crankshaft
| • |
180° in direction of engine rotation
|
|
| 13. |
Remove 2x con-rod bearing cap
Note: Note cylinder
sequence
| • |
Mark con-rod with con-rod bearing cover
|
Important: The shear surfaces of
the con-rod and the con-rod bearing cover form a unique fit and
must not be swapped or damaged. Do not lay down on the shear
surfaces
|
| • |
Unscrew 4x bolts
|
| • |
Push 2x piston with con-rod upwards
|
|
| 14. |
Lower vehicle by its full height
|
| 16. |
Take off 8x con-rod bearing shell
Note: Mark con-rod
bearing shells. Note sequence
|
 Install
| 17. |
Visually check components
|
| 18. |
Insert 8x con-rod bearing shell
| • |
In con-rod, con-rod bearing cap
Note: Note markings
|
|
| 19. |
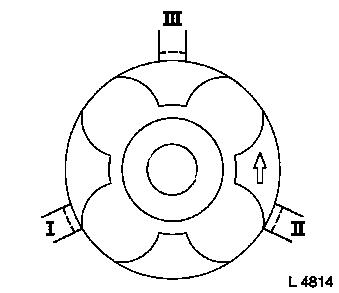
Set piston ring gap
| • |
Adjust 3x piston ring
| – |
Arrange joints offset by 120° (I - III)
|
|
|
|
|
| 20. |
Install 2x piston
Important: Arrow on piston head
points to engine timing side
|
| • |
Coat pistons and cylinder bores with engine oil
|
| • |
Push piston rings together with piston tightening strap
|
|
| 21. |
Raise vehicle by its full height
|
| 22. |
Attach 2x con-rod bearing cap
| • |
Wet 2x con-rod bearing journal with engine oil
|
Important: Observe correct
allocation and installation position
|
| • |
Tighten 4x new bolt 25 Nm +
60°
|
|
| 23. |
Turn crankshaft
| • |
180° in direction of engine rotation
|
|
| 24. |
Lower vehicle by its full height
|
| 25. |
Install 2x piston
Important: Arrow on piston head
points to engine timing side
|
| • |
Coat pistons and cylinder bores with engine oil
|
| • |
Push piston rings together with piston tightening strap
|
|
| 26. |
Raise vehicle by its full height
|
| 27. |
Attach 2x con-rod bearing cap
| • |
Wet 2x con-rod bearing journal with engine oil
|
Important: Observe correct
allocation and installation position
|
| • |
Tighten 4x new bolt 25 Nm +
60°
|
|
| 28. |
Install cylinder head
|
| 29. |
Remove front axle body
|
| 31. |
Remove engine damping block support
| • |
Unscrew bolt (M8)
Note: Note different
bolts
|
|
| 32. |
Remove engine damping block, right hand side
| • |
Detach from engine damping block support
|
|
|
