|
Con-rod Bearing Play, Check (with Plastigage)
 Remove Remove
| 1. |
Remove con-rod bearing
|
| 2. |
Visually check components
| • |
Con-rod bearing journal, con-rod bearing cap, bearing
shells
|
|
Important: Do not rotate
crankshaft
|
| 3. |
Lay on Plastigage
| • |
Degrease con-rod bearing journal
|
| • |
Place Plastigage (1) (deformable plastic thread) in position
axially over the entire width of the con-rod bearing journal
(2)
Note: Plastigage is
available via the "Opel/Vauxhall Workshop Equipment" catalogue
|
|
|
|
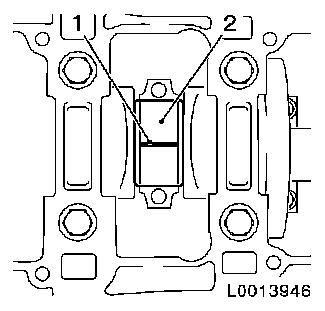
Important: Note allocation and
installation position. Marking on con-rod and con-rod cap point
towards intake side. Align con-rod bearing shell centrally in
con-rod bearing cap
|
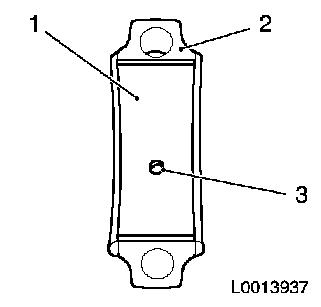
| 4. |
Insert con-rod bearing shell (1) in con-rod bearing cap (2)
Note: Oil con-rod
bearing shell lightly. Insert con-rod bearing shell with oil bore
(3) in con-rod bearing cap.
| • |
Degrease con-rod bearing journal
|
| • |
Tighten 2x bolt 20 Nm + 40°
Note: When undertaking
the measurement it is not necessary to replace the bolts.
|
|
|
|
| 5. |
Remove con-rod bearing cap
Note: Note marking on
con-rod and con-rod bearing cap on the intake side.
Important: The mating surfaces of
the con-rod and the con-rod bearing cap form a unique fit and must
not be swapped or damaged. Do not lay down on the mating
surfaces!
|
| • |
Unscrew 2x bolts
|
|
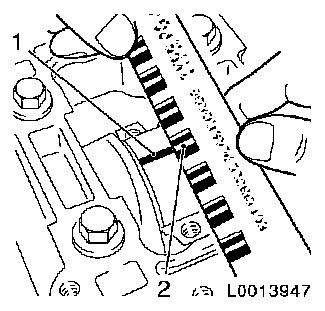
| 6. |
Measure con-rod bearing play
| • |
Compare width of flattened plastic thread (1) to measuring
scale (2)
Note: Do not confuse
millimetre and inch information on measuring scale when reading off
value.
|
| • |
Permissible con-rod bearing clearance: 0.030 - 0.062 mm
|
|
|
|
 Install
| 7. |
Install con-rod bearing cap 
|
|
