|
Toothed Belt Tension, Adjust
 Remove Remove
| 2. |
Disconnect battery
| • |
Detach earth connection from earth terminal
|
|
| 3. |
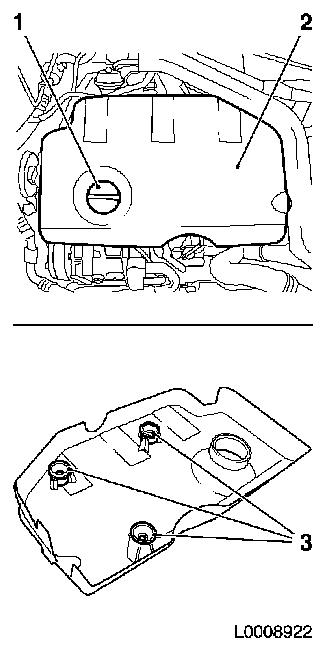
Remove engine cover (2)
| • |
Detach oil filler port closure cap (1)
|
| • |
Pull off engine cover
Note: Rubber retainers
(3) must remain on engine cover
|
| • |
Attach oil filler port closure cap
|
|
|
|
| 4. |
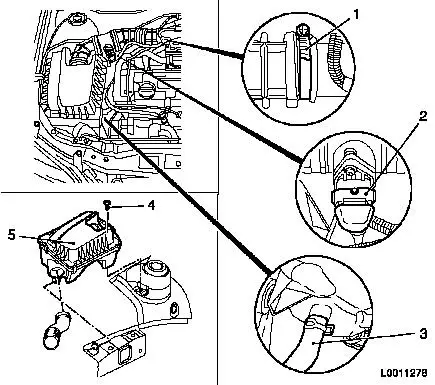
Remove air cleaner housing (5) with air intake hose
| • |
Detach wiring harness plug (2) from hot film mass air flow
meter
|
| • |
Detach air intake hose from air intake pipe
|
| • |
Detach air cleaner housing from wheel housing
|
| • |
Detach water drain hose (3) from air cleaner housing
|
|
|
|
| 5. |
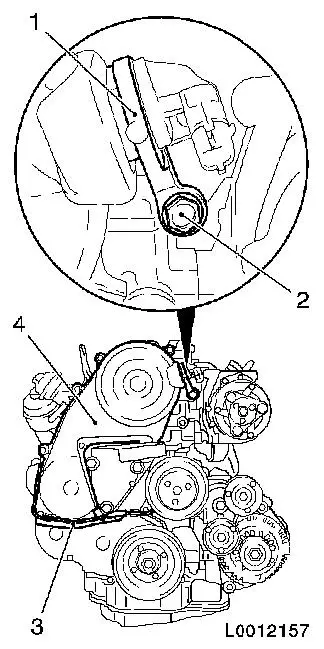
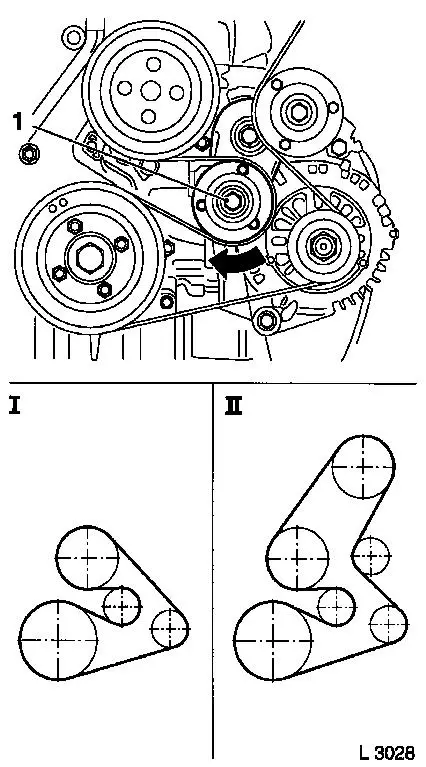
Remove ribbed V-belt
| • |
Mark direction of rotation
|
| • |
Apply tension to ribbed V-belt tensioner via bolt (1) in the
direction of the arrow
|
| • |
Fix ribbed V-belt tensioner to bore (2)
|
|
|

|
| 6. |
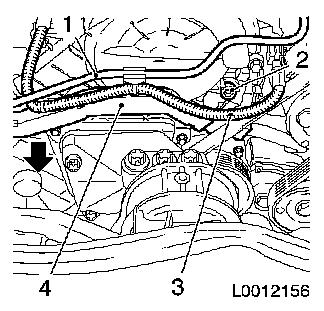
Detach wiring trough (4) from front toothed belt cover
(top)
| • |
Detach wiring harness (3)
| – |
Disconnect camshaft sensor wiring harness plug
|
|
| • |
Unclip wiring trough in direction of arrow
|
|
|
|
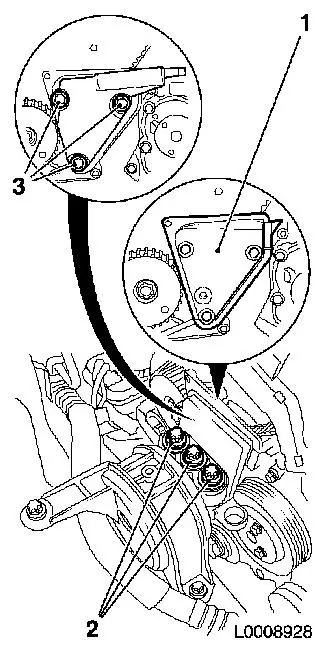
| 7. |
Detach front toothed belt cover (top) (4)
| • |
Unscrew 8x bolts
Note: Note different
bolt lengths
|
| • |
Remove camshaft sensor bracket (1)
|
|
|
|
| 8. |
Raise vehicle by its full height
|
| 9. |
Detach the lower engine cover and right engine splash guard
|
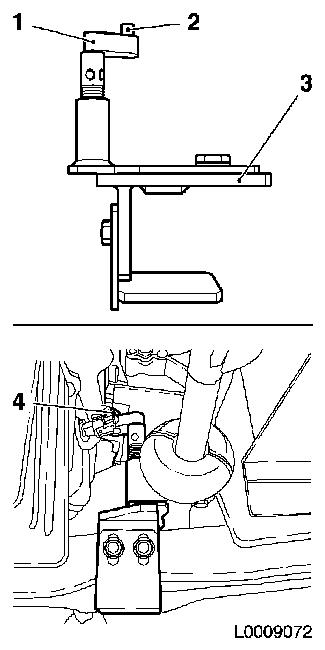
| 10. |
Insert KM-6173 (3)
| • |
Align support bearing (1)
|
| • |
Raise support bearing until journal (2) sits flush in mount
(4)
|
|
|
|
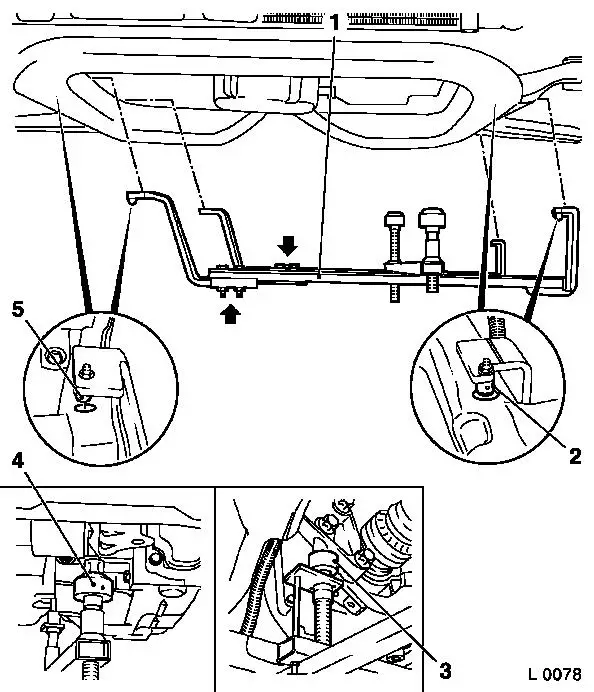
| 11. |
Attach KM-6001-A (1)
Note: Attaching
KM-6001-A guarantees perfect alignment of the drive unit with the
front axle body
| • |
Slacken 4x bolts (arrows) in adjusting rails
|
| • |
Insert KM-6001-A
| – |
Insert journals (2) and (5) in guide holes in front axle
body
|
|
| • |
Tighten 4x bolts in adjusting rails
|
| • |
Adjust support bearings, front (4) and rear (3)
| – |
Raise support bearings up to the stop on the guide journals
Note: The guide
journals must be seated free from play in the support bearings
|
|
|
|
|
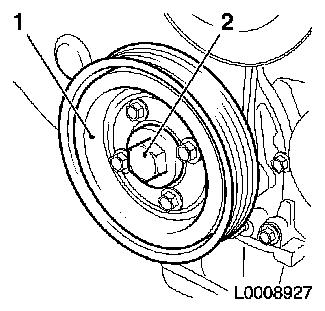
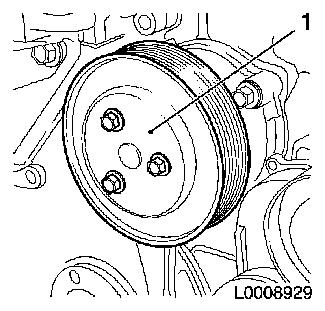
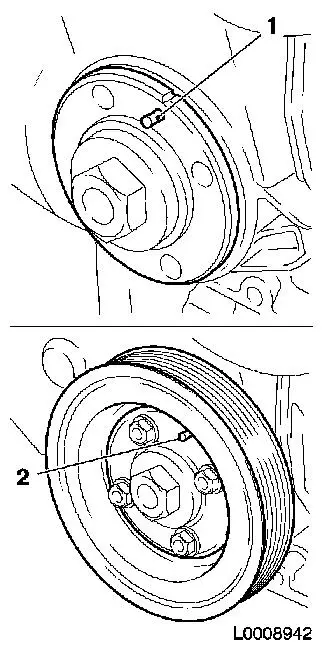
| 12. |
Detach torsional vibration damper (1)
| • |
Unscrew 4x bolts
Note: Counterhold at
bolt (2)
|
|
|
|
| 13. |
Lower vehicle by its full height
|
| 14. |
Remove engine damping block support
| • |
Detach from engine damping block bracket
|
| • |
Detach from cylinder block
|
| • |
Remove engine damping block adapter (1)
|
|
|
|
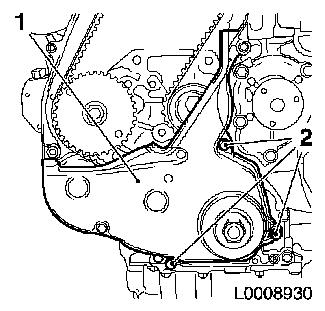
| 15. |
Remove coolant pump drive gear (1)
|
|
|
| 16. |
Remove front toothed belt cover (lower) (1)
|
|
|
| 17. |
Slacken the toothed belt tension roller
|
|
|
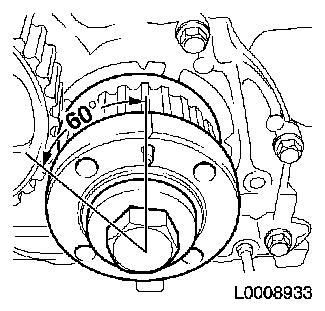
| 18. |
Turn crankshaft 60° against the direction of engine
rotation
|
|
|
 Install
| 19. |
Fasten toothed belt tension roller
|
| 20. |
Install front toothed belt cover (lower)
|
| 21. |
Install coolant pump drive gear
| • |
Tighten 3x bolt 12.3 Nm
|
|
| 22. |
Install engine damping block bracket
| • |
Insert engine damping block adapter
|
| • |
Attach engine damping block support to cylinder block
|
| • |
Engine damping block support to engine damping block
bracket
|
|
| 23. |
Raise vehicle by its full height
|
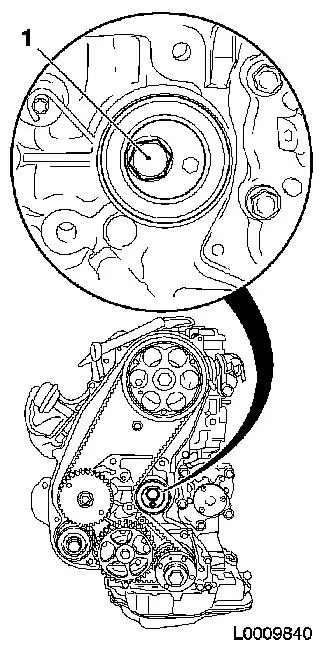
Important: Journal (1) of toothed
belt drive gear must engage in the bore (2) of the torsional
vibration damper
|
| 24. |
Install torsional vibration damper
| • |
Tighten 4x bolt 19.6 Nm
Note: Counterhold
against bolt, toothed belt drive gear
|
|
|
|
| 25. |
Remove engine mount KM-6173
|
| 26. |
Remove engine mount KM-6001-A
|
| 27. |
Install lower engine cover and right engine splash guard
|
| 28. |
Lower vehicle by its full height
|
| 29. |
Install front toothed belt cover (top)
| • |
Tighten 8x bolt 9.8 Nm
Note: Note different
bolt lengths
|
| • |
Install camshaft sensor bracket
|
| • |
Attach vacuum line to toothed belt cover
|
|
| 30. |
Attach wiring trough to front toothed belt cover (top)
| • |
Attach wiring harness
| – |
Connect camshaft sensor wiring harness plug
|
|
|
| 31. |
Insert ribbed V-belt
Note: Note running
direction of ribbed V-belt
| • |
Position ribbed V-belt
| – |
I. Ribbed V-belt without air conditioning
|
| – |
II. Ribbed V-belt with air conditioning
|
|
| • |
Apply tension to ribbed V-belt tensioner via bolt (1) in the
direction of the arrow
|
| • |
Release ribbed V-belt tensioner
|
|
|
|
| 32. |
Install air cleaner housing with air intake hose
| • |
Attach water drain hose to air cleaner housing
|
| • |
Attach air intake hose to air intake pipe
|
| • |
Connect wiring harness plug to air mass flow meter
|
|
| 33. |
Install engine cover
| • |
Detach oil filler port closure cap
|
| • |
Attach oil filler port closure cap
|
|
| 34. |
Connect battery
| • |
Attach earth connection to earth terminal
|
|
| 35. |
Program volatile memories
|
|
