|
End Shield Gasket, Replace (F13/F13+/F13
MTA/F17+/F17+ MTA)
Note: Transmission
remains installed.
 Remove Remove
| 1. |
Remove battery support
|
| 2. |
Detach upper engine cover
Note: If present.
|
| 3. |
Remove gearbox cover
Note: F13/F17+ only
|
| 4. |
Remove gearshift module
|
| 5. |
Unscrew reversing lamps switch (1)
Note: F13/F17+ only
| • |
Disconnect wiring harness plug, reversing lamp switch
|
|
|

|
| 6. |
Detach lower engine cover
Note: If present.
|
|
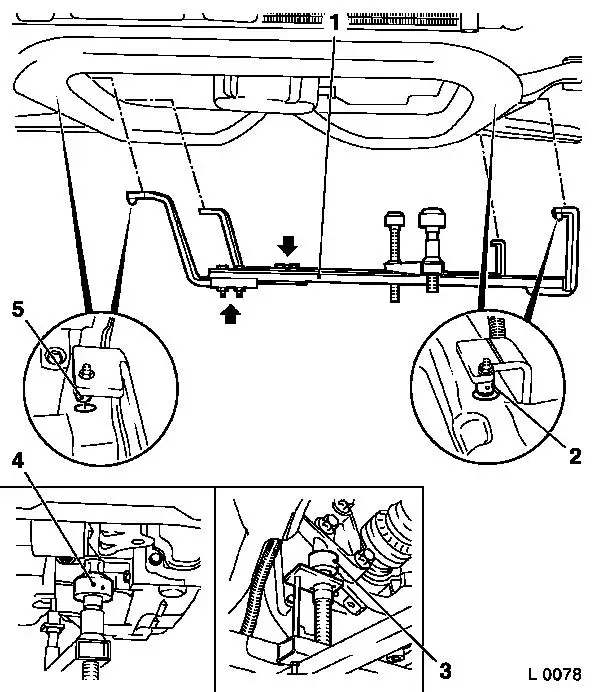
| 7. |
Attach KM-6001-B to front axle
body
Note: The guide pins
must sit in the support bearing with no play.
| • |
Release 2x bolt (arrows) for adjustment rails on KM-6001-B (1)
|
| • |
Insert KM-6001-B as shown
Note: 2x journals (2)
and (5) must sit flush in the guide holes of the front axle
body.
|
| • |
Tighten 2x bolt for adjustment rails
|
| • |
Twist up front support bearing (4)
| – |
until the guide pin is in contact with the front of the engine
damping block
|
|
| • |
Twist up rear support bearing (3)
| – |
until the guide pin is in contact with the rear of the engine
damping block
|
|
|
|
| 8. |
Remove front axle body
|
| 9. |
Detach left engine damping block
| • |
Detach from left engine damping block bracket
|
|
|
|
Important: Do not damage wiring
harnesses and attaching parts
|
| 10. |
Lower engine and transmission with MKM-883-1-A approx. 5 cm
|
| 11. |
Remove front left wheel
|
| 12. |
Remove end shield cover
|
|
Important: When dismantling the
end shield it is essential to use KM-6155
(2) as otherwise the shaft seal ring of the central release will be
damaged.
|
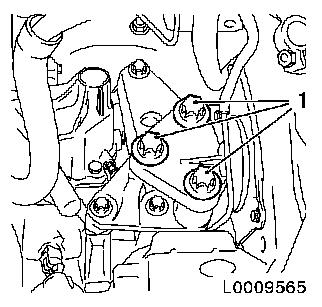
| 13. |
Screw KM-6155 into threaded bores
|
Important: Be careful of guide
sleeves, magnet (3) and spacer washer (4) for axle reverse idler
gear
|
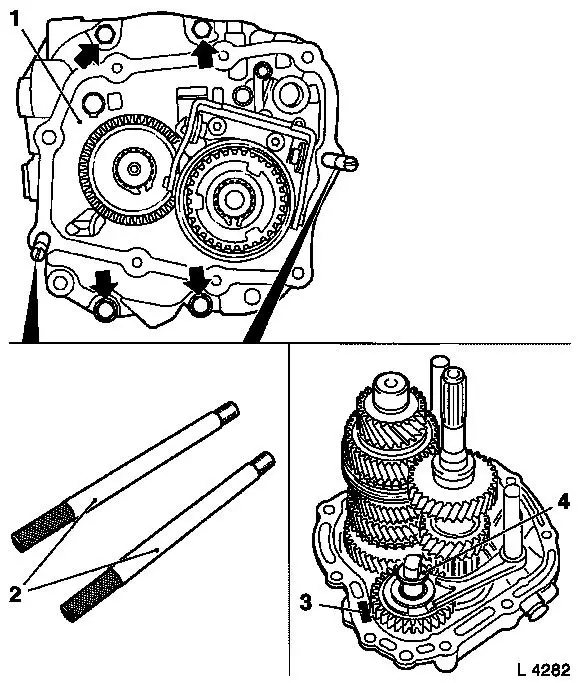
| 14. |
Detach end shield
| • |
Unscrew 4x bolt (arrows)
|
|
|
| 15. |
Check all parts for damage
Note: Replace damaged
components.
|
| 16. |
Clean sealing surfaces
|
 Install
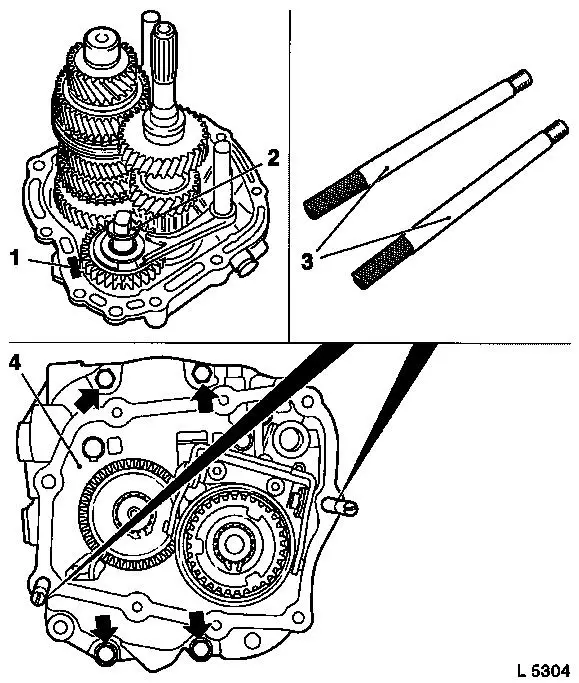
| 17. |
Stick new end shield gasket to transmission with roller bearing
grease
|
|
Important: Check that magnet (1)
and friction washer (2) are correctly seated.
|
| 18. |
Install end shield (4)
| • |
Carefully insert end shield into transmission housing
|
| • |
Tighten 4x bolt (arrows) 22 Nm
Note: Use new
bolts.
|
|
|
| 20. |
Attach end shield cover
|
| 21. |
Fit left front wheel 110 Nm
|
| 22. |
Lift engine and transmission with MKM-883-1-A
|
| 23. |
Install left engine damping block
| • |
Attach to left support for engine damping block
|
| • |
Tighten 3x bolt (1) 55 Nm
|
|
|
|
| 24. |
Install front axle body
|
| 25. |
Detach KM-6001-B from front axle
body
|
| 26. |
Tighten reversing lamp switch (1) 20
Nm
Note: F13/F17+ only
| • |
Connect wiring harness plug for reversing lamp switch
|
|
|
|
| 27. |
Attach gearbox cover to transmission 
Note: F13/F17+ only
|
| 28. |
Install gearshift module
|
| 29. |
Install upper engine cover 7 Nm
Note: If present.
|
| 30. |
Install battery support
|
| 31. |
Check transmission fluid level
|
| 32. |
Attach lower engine cover
Note: If present.
|
| 33. |
Program volatile memories
|
| 34. |
Set transmission parameters
Note: F13 MTA/F17+ MTA
only
|
| 35. |
Comply with the start-up routines required
|
|
