Cylinder Head Installation
Special Tools
| • |
EN-301
Measuring Bridge |
| • |
EN-470-B
Torque Angle Sensor |
| • |
EN-46778
Fixing Tool Crankshaft |
For equivalent regional tools, refer to
Special Tools .
|
Note: Ensure that the
cylinder head and the cylinder block sealing surfaces are clear of
oil, grease and old gasket material.
|
| 1. |
Clean the sealing
surfaces |
| 2. |
Inspect the flatness of
cylinder head and cylinder block sealing surfaces |
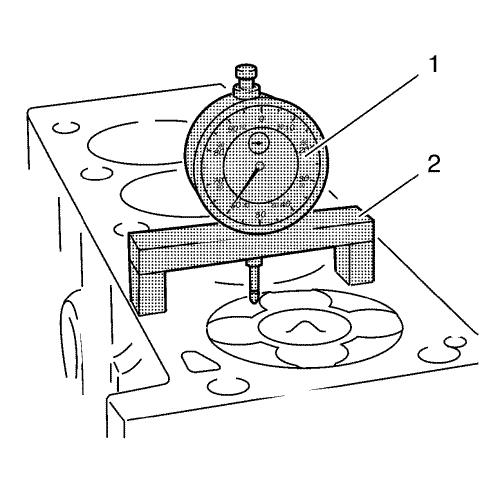
| 3. |
Install the EN-301
bridge (2) in compound with the GE-571-B
gauge (1). |
|
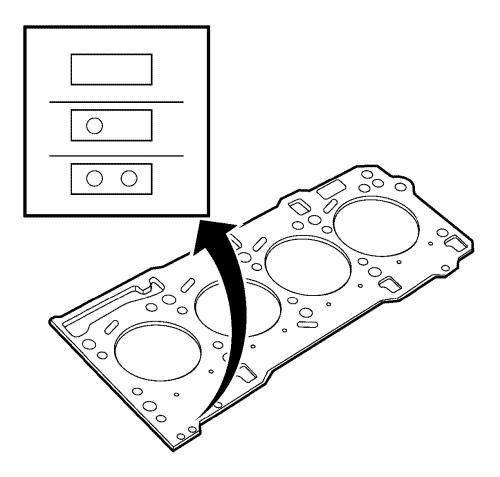
Note: The largest
piston projection is decisive for the selection of the cylinder
head gasket with the corresponding marking.
|
| 4. |
Measure the piston projection
dimensions at all pistons. |
| 5. |
Select the cylinder head
gasket with the correct identification marks: |
| |
5.1 |
Piston projection
0.028 - 0.127 mm (0.0011 - 0.005) , choose the
cylinder head gasket with identification mark - without
holes. |
| |
5.2 |
Piston projection
0.128 - 0.227 mm (0.005 - 0.00894) , choose the
cylinder head gasket with identification mark - 1 hole.
|
| |
5.3 |
Piston projection
0.228 - 0.327 mm (0.00898- 0.01287) , choose the
cylinder head gasket with identification mark - 2 holes.
|
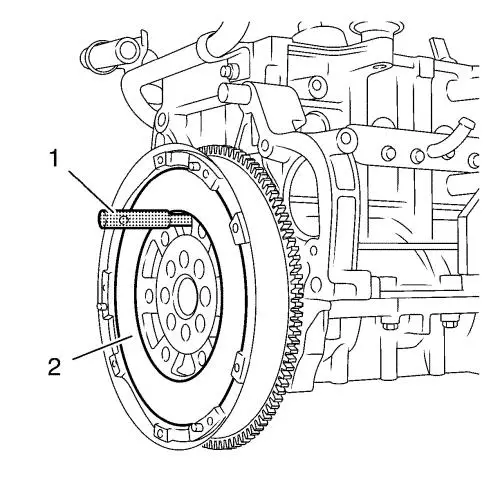
| 6. |
Turn the crankshaft in the
engine direction of rotation until the EN-46778
fixing tool (1) to engage with the drilling at flywheel (2) and
cylinder block. |

| 7. |
Install the cylinder head
gasket (3). |
| 8. |
Install the cylinder head
(2). |
| 9. |
Loosely install 10 NEW
cylinder head bolts (1). |
|
Note: Use a rubber
mallet to adjust the cylinder head. The overhang of the timing side
should be under 0.1 mm (0.00394 in) .
|
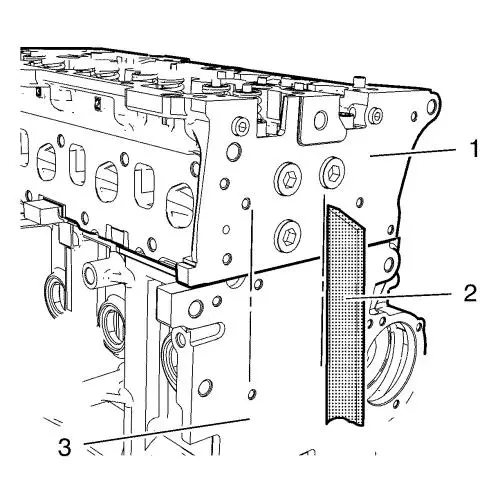
| 10. |
Align the cylinder head (1) to
the engine block (3) with a straightedge (2). |
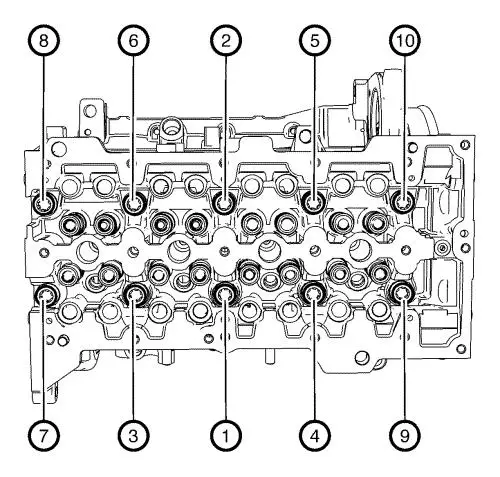
| 11. |
Tighten the 10 cylinder head
bolts in sequence as shown and in the following order: |
| |
• |
Tighten the bolts in sequence
as shown to 40N·m (30 lb ft) . |
| |
• |
Tighten in sequence as shown
to an additional 90° . Use EN-470-B
anglemeter . |
| |
• |
Tighten in sequence as shown
to an additional 90° . Use EN-470-B
anglemeter . |
|
