vauxhall Workshop Repair Guides

Vauxhall Workshop Service and Repair Manuals

Fan Motor Thermoswitch, Remove and Install (X 20 DTH) > < Intercooler, Remove and Install (X 20 DTH without Air Conditioning) conditioning)


Intercooler, Remove and Install (X 20 DTH with Air Conditioning)  

Object Number: 616191  Size: DEFAULT  Remove, Disconnect   

Remove thermal insulation jacket (1) from battery.  

Detach front relay frame (2) from battery retaining plate.  

Unbolt battery retaining plate and remove battery.  

Unclip coolant hose (3) and remove positive distribution unit (4) from battery support (5).  

Remove fastening bolts (arrows) and remove battery support (5) from front frame.  

Object Number: 2399956  Size: DEFAULT


Object Number: 616191  Size: DEFAULT  Remove, Disconnect   

Unbolt both brackets (1) for radiator on air deflector panel.  

Disconnect wiring harness (2) from fan motor thermoswitch and place to one side together with front relay frame.  

Disconnect wiring harness plug (3) for auxiliary fan and multiplug (5) (twist lock).  

Unbolt ground cable (4) from body.  

Object Number: 2399970  Size: DEFAULT


Object Number: 616191  Size: DEFAULT  Remove, Disconnect   

Release hose clamps (arrows) and remove upper charge air hose (1).  

Unbolt power steering pump fluid reservoir (2) from air cleaner housing and place to one side.  

Remove lower engine compartment cover.  

Remove radiator grille and front panelling - see operation "Front Panelling, Remove and Install" in group "A".  

Disconnect wiring harness plug (3) from both air conditioning pressure switches.  

Disconnect wiring harness plug (4) from compressor.  

Object Number: 2399971  Size: DEFAULT


Object Number: 616191  Size: DEFAULT  Remove, Disconnect   

Remove fastening bolts (1) from fan housing.  

Carefully push radiator forwards into the nose of the vehicle and remove fan housing upwards together with fan motor.  

Release hose clamp (arrow) and detach lower charge air hose (2) from intercooler.  

Object Number: 2399974  Size: DEFAULT


Object Number: 616191  Size: DEFAULT  Remove, Disconnect   

Unclip power steering cooling coil (1) from brackets (2) on auxiliary fan housing.  

Release fastening bolts (arrows) and remove receiver-dryer (3) from radiator.  

Object Number: 2399977  Size: DEFAULT


Object Number: 616191  Size: DEFAULT  Remove, Disconnect   

Remove fastening bolts (arrows) and carefully remove auxiliary fan housing downwards.  

Attach condenser to front member.  

Object Number: 616201  Size: DEFAULT  Important!   

Do not bend refrigerant line (1).  

Object Number: 2399959  Size: DEFAULT


Object Number: 616191  Size: DEFAULT  Remove, Disconnect   

Lift radiator out of lower fastening.  

Unscrew fastening bolts (1) from intercooler. Fold intercooler away to the side and push to the rear out of lower guide on radiator (see enlargement). Carefully remove intercooler upwards.  

Object Number: 2399982  Size: DEFAULT


Object Number: 616192  Size: DEFAULT  Install, Connect   

Attach intercooler to radiator.  

Carefully insert radiator complete with intercooler into lower fastenings.  

Carefully insert auxiliary fan housing from below and attach to radiator together with condenser.  

Bolt receiver-dryer onto radiator.  

Clip power steering coolant coil in auxiliary fan housing bracket.  

Notice: 

Before assembling components of the intake system (hoses, connections, etc.), they must be cleaned of any possible contamination (grease, oil, etc.). When tightening the hose clamps, be sure to observe exactly the tightening torque of 3.5 Nm / 2.6 lbf. ft.  

Object Number: 616201  Size: DEFAULT  Important!   

It is only ensured that the intake system is free of leaks, thus ensuring operational safety of the engine, if the hose clamps are tightened correctly to the prescribed tightening torque.  


Object Number: 616192  Size: DEFAULT  Install, Connect   

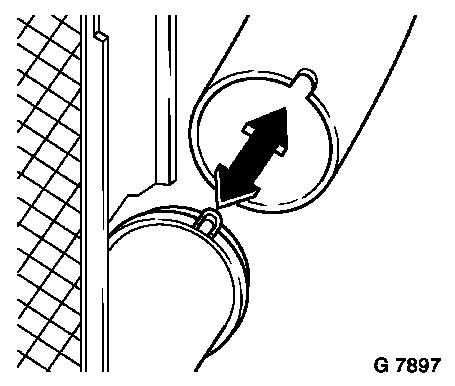
Attach lower charge air hose to intercooler - groove in lower charge air hose and lug on connector must align.  

Carefully insert air cleaner housing from above and fasten radiator.  

Connect wiring harness plug to compressor.  

Connect wiring harness plugs to both air conditioning pressure switches.  

Attach radiator grille and front panelling - see operation "Front Panelling, Remove and Install" in group "A".  

Install lower engine compartment cover.  

Install power steering pump fluid reservoir to fan housing.  


Object Number: 616192  Size: DEFAULT  Install, Connect   

Install upper charge air hose - groove in upper charge air hose and lug on connector must align (see illus.).  

Bolt ground cable to body.  

Connect wiring harness plug for auxiliary fan and multiplug with twist lock.  

Fasten radiator with both brackets to air deflector plate.  

Fasten battery support to front frame.  

Clip on coolant hose and connect positive distribution unit to battery support.  

Install battery retaining plate and battery.  

Attach front relay frame to battery retaining plate.  

Attach thermal insulation jacket to battery.  

Object Number: 2399950  Size: DEFAULT


Related Literature Units
-
-

Fan Motor Thermoswitch, Remove and Install (X 20 DTH) > < Intercooler, Remove and Install (X 20 DTH without Air Conditioning) conditioning)