Radiator, Remove and Install (X 20 DTH)
 Remove, Disconnect Remove, Disconnect Remove thermal insulation jacket (1) from battery. Detach front relay frame (2) from battery retaining plate. Unbolt battery retaining plate and remove battery. Unclip coolant hose (3) and remove positive distribution unit (4) from battery support (5). Remove fastening bolts (arrows) and remove battery support from front frame. | 
|
Remove, Disconnect Unbolt bracket (1) for radiator from air deflector plate. Disconnect wiring harness (2) from fan motor thermoswitch and place to one side together with front relay frame. Disconnect wiring harness plug (3) for auxiliary fan and multiplug (twist lock) (5). Unbolt ground cable (4) from body. | 
|
Remove, Disconnect Release hose clamps (arrows) and remove upper charge air hose (1). Unbolt power steering pump fluid reservoir (2) from air cleaner housing and place to one side. Remove lower engine compartment cover. Remove radiator grille and front panelling - see operation "Front Panelling, Remove and Install" in group "A". For vehicles with air conditioning: Disconnect wiring harness plugs (3) from both AC pressure switches. Disconnect wiring harness plug (4) from compressor. | 
|
Remove, Disconnect Remove fastening bolts (1), carefully push radiator slightly forwards into the nose of the vehicle and remove fan housing together with fan motor upwards. Release hose clamp (arrow) and detach lower charge air hose (2) from intercooler. | 
|
Remove, Disconnect Unclip power steering cooling coil (1) from brackets (2) on auxiliary fan housing. For vehicles with air conditioning: Release fastening bolts (arrows) and remove receiver-dryer (3) from radiator. | 
|
Remove, Disconnect Remove fastening bolts (arrows) and carefully remove auxiliary fan housing downwards. For vehicles with air conditioning: Attach condenser to body.
 Important! Important! Do not bend refrigerant lines (1). | 
|
Remove, Disconnect Remove upper coolant hose (1), compensation tank coolant hose (2) and lower coolant hose (3) from radiator - collect escaping coolant. Pull radiator carefully out of lower attachments and remove upwards together with intercooler. | 
|
Remove, Disconnect Remove fastening bolts (2). Fold intercooler away to the side, push to the rear out of lower guide on radiator (see enlargement) and remove. Remove fan motor thermoswitch (1) from radiator.
 Install, Connect Install, Connect Install fan motor thermoswitch with new seal ring in radiator. Slide intercooler into lower guide and secure on radiator with both fastening bolts. | 
|
Install, Connect Carefully insert radiator (complete with intercooler) into lower fastenings from above. Attach upper coolant hose, compensation tank coolant hose and lower coolant hose to radiator. Insert auxiliary fan housing from below and attach to radiator together with condenser (if fitted). Clip power steering coolant coil in auxiliary fan housing bracket. For vehicles with air conditioning: Attach receiver-dryer to radiator. Notice: Before assembling components of the intake system (hoses, connections, etc.), they must be cleaned of any possible contamination (grease, oil, etc.). When tightening the hose clamps, be sure to observe exactly the tightening torque of 3.5 Nm / 2.6 lbf. ft.
Important! It is only ensured that the intake system is free of leaks, thus ensuring operational safety of the engine, if the hose clamps are tightened correctly to the prescribed tightening torque.
Install, Connect Attach lower charge air hose to intercooler - groove in lower charge air hose and lug on connectors must align (see G 7897). Carefully insert air cleaner housing from above and fasten radiator. For vehicles with air conditioning: Attach wiring harness plug to compressor. Connect wiring harness plugs to both air conditioning pressure switches. Attach radiator grille and front panelling - see operation "Front Panelling, Remove and Install" in group "A". Install lower engine compartment cover. Install power steering pump fluid reservoir to fan housing. Attach upper charge air hose to intercooler - groove in upper charge air hose and lug on connection port must be aligned (see G 7897). Bolt ground cable to body. | 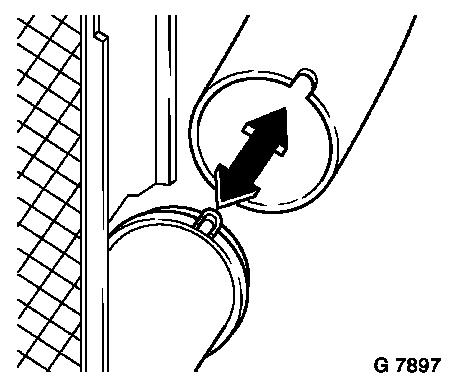
|
Install, Connect Connect wiring harness plug for auxiliary fan and multiplug (twist lock). Connect wiring harness plug to fan motor thermoswitch. Fasten radiator to air deflector plate with both retaining brackets. Fasten battery support to front frame. Clip in coolant hose and attach positive distribution unit to battery support. Install battery retaining plate and battery. Attach front relay frame to battery retaining plate. Attach thermal insulation jacket to battery. Top up cooling system - see operations "Cooling System, Top up and Bleed" and "Cooling System, Check for Leaks".
|
