volkswagen Workshop Repair Guides

Volkswagen Workshop Service and Repair Manuals

Allocation of coil springs > < Repairing front suspension
Running gear
Repairing rear axle, all models except caddy
 
U42-0001

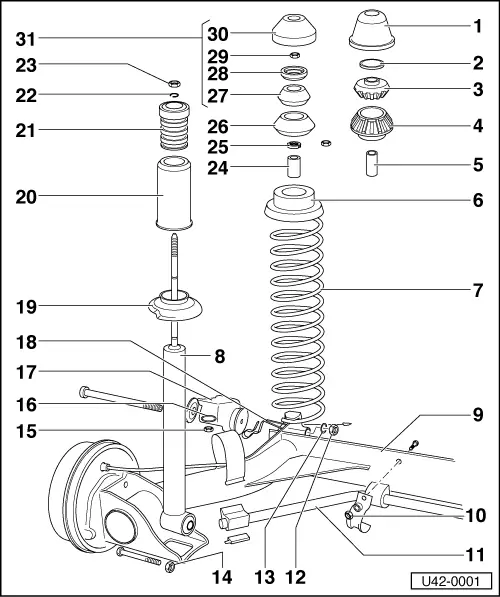
Jetta rear axle

Caddy rear axle

=> page 42-13

Note:

Welding and straightening operations on axle beam and stub axles are not permitted.

  • Cap
    • ◆ New from 8.77
  • Washer
    • ◆ New from 8.77 see note

Note:

The new shock absorber mountings from 8.77 can be installed in vehicles built before 8.77 together with new shock absorber.

 
U42-0001
  • Rubber bush, upper
    • ◆ New from 8.77 => page 42-1, note of number 2
  • Rubber bush, lower
    • ◆ New from 8.77 => page 42-1, note of number 2
  • Spacer
    • ◆ 42 mm long
    • ◆ New from August 77 => page 42-1, note of number 2
  • Spring seat, Golf GTI-Special model
  • Coil spring
    • ◆ If noisy, (spring clatters), fit damping hose on top and bottom of coils.
    • ◆ Check springs for paint damage, for allocation => page 42-10
 
U42-0001
  • Shock absorber
    • ◆ Under normal driving conditions, defective shock absorbers make rumbling noises and are to be replaced
    • ◆ Shock absorbers are maintenance-free.If slight traces of oil appear on the shock absorbers, it is not necessary to change them. If an excessive amount of oil is lost, the piston rod in the shock absorber moves jerkily when pulled out or pushed in. Shock absorber oil cannot be replenished.
      Mod: From August 77 - long thread, can be installed in vehicles built prior to 8.77 together with new cap
  • Rear axle
    • ◆ Check for bending =>Fig. 4
    • ◆ Remove complete =>Fig. 5
  • 30 Nm
  • Anti-roll bar
    • ◆ Only for vehicles with 81 kW engine
 
U42-0001
  • 70 Nm
  • Washer (small)
  • 45 Nm
  • 45 Nm
    • ◆ Note =>Fig. 3
  • Washer (large)
  • Mounting with bonded rubber bush
    • ◆ If worn replace complete (with rear axle installed)
    • ◆ Note installation position =>Fig. 2

Note:

For the Jetta, do not mix up this.

  • Handbrake cable clip
    • ◆ Install before fitting mounting
  • Spring seat, lower
  • Protective tube
    • ◆ Install if not fitted (Standard as of Chassis No. 17 A 0 004 320)
 
U42-0001
  • Buffer
    • ◆ There are different versions
    • ◆ Use same type when renewing
  • Circlip
  • Ring
    • ◆ Shoulder on inside diameter must grip circlip
  • Spacer
    • ◆ 36 mm long
  • Slotted nut 20 Nm
    • ◆ Loosening and tightening =>Fig. 1
  • Rubber bush, lower
  • Rubber bush, upper
  • Washer
  • 35 Nm
  • Cap
  • R + I from inside
    • ◆ Luggage compartment
    • ◆ Use special tool 3079 to counter => page 42-8
 
U42-0002

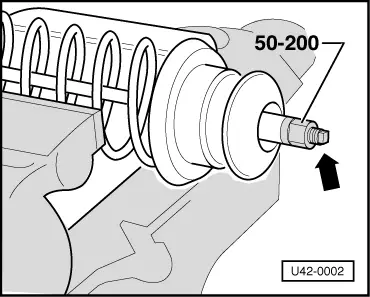
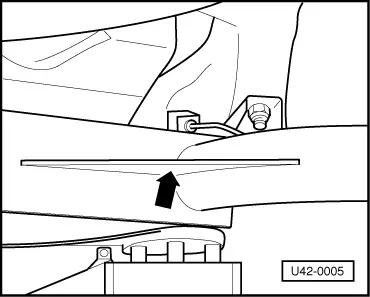
→ Fig.1    Removing slotted nut

  • ‒ Counter by holding on the flats (-arrow-).
 
U42-0003

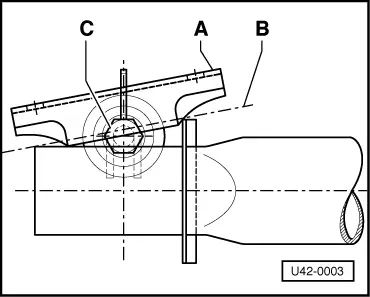
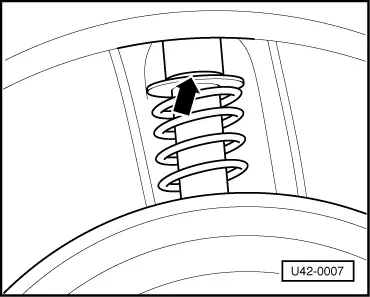
→ Fig.2    Adjusting the position of mounting

  • ‒ The mounting is to be positioned so that the upper edge "A" is approximately parallel to line "B". When in this position, tighten nut "C".
 
U42-0004

→ Fig.3    Drilling out studs

If a stud shears when removing the nuts securing rear axle to body, the stud must be drilled out and the hole tapped with an M 10 thread -arrow- .

  •     1 -    Drill through using 8.0 mm diameter drill.
  •     2 -    Tap M 10 thread.
  •     3 -    Secure rear axle to body with M 10 x 40 bolts (tensile class 10.9).
 
U42-0005

→ Fig.4    Checking axle beam

  • ‒ Visually check the axle beam gusset plate (-arrow-) for kinking. If kinked renew. When in doubt check toe and camber.

Nominal values => page 44-15.

 
U42-0006

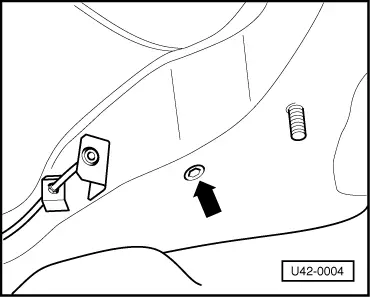
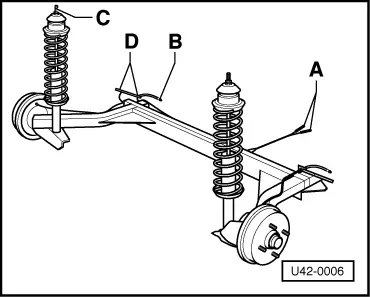
→ Fig.5    Removing rear axle complete

  •     1 -    Detach handbrake cable from handbrake lever -A-.
  •     2 -    Detach brake hose at the location shown -B-.
  •     3 -    Detach suspension strut from body -C-.
    Use special tool 3079 and ring spanner box end wrench insert with 17 mm opening.
  •     4 -    Detach rear axle from body -D-.

After installing, bleed brakes => page 47-57.

 
W00-0010

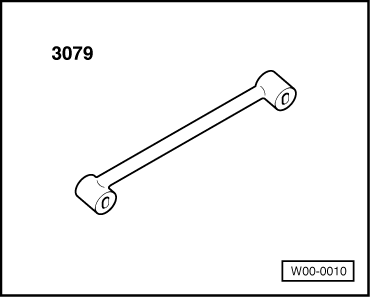
Fig.6    Special tool 3079 to counter when removing shock absorber.

Spring seat for Golf GTI-Special model

 
U42-0007
  • ‒ → To ensure that the tyres on the rear axle have adequate clearance in all conditions the edge of the upper spring seat has been partially removed (-arrow-).
  • ‒ When repairing, ensure that the cut off part of the seat is parallel to the wheel. The lower spring seat should be turned if necessary.
  • ‒ The coil spring is unchanged.

Jetta rear axle

All Jetta vehicles are fitted with an anti-roll bar
18 mm dia. for vehicles with 1.3 and 1.5 l engines.
20.5 mm dia. for vehicles with 1.6 l engines (GLI).

The bonded rubber bushes in the brackets for the rear axle suspension have a greater shore hardness compared to the brackets for the Golf/Scirocco. To avoid noise, the brackets must not be interchanged.

Allocation of coil springs > < Repairing front suspension