volkswagen Workshop Repair Guides

Volkswagen Workshop Service and Repair Manuals

Checking function of viscous coupling > < Removing and installing propshaft
5-Speed manual gearbox 02C four wheel drive
Servicing propshaft
Servicing propshaft
 
N39-0399

Notes:

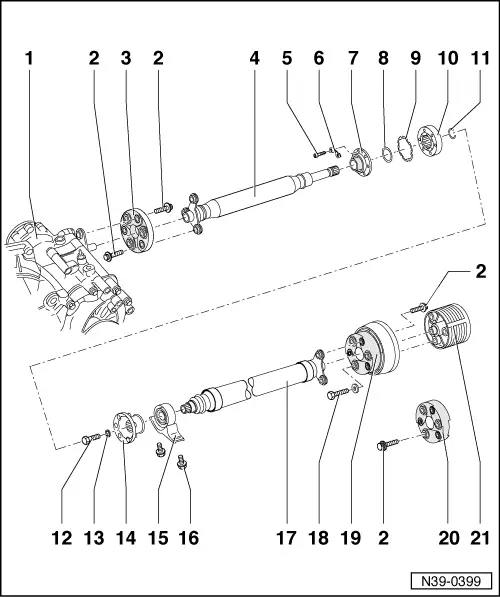
  • ◆ To obtain the quietest possible running, the entire propshaft is balance during manufacture. It is not possible to balance the entire propshaft or the individual propshaft sections using workshop equipment, therefore if a front or rear propshaft section is damaged then the complete propshaft must be renewed.
  • ◆ Keep propshaft straight, only store and transport fully extended.
  • ◆ Before removing, mark the positions of all parts in relation to each other. Reinstall in the same position otherwise imbalance will be excessive, creating rumbling noises and possibly damaging mountings.
 
N39-0399
  • Gearbox with bevel box
  • 12 point collared bolt, 45 Nm
    • ◆ Bolt length 42 mm

Do not use hexagon bolts.

  • Flexible coupling/heat shield
    • ◆ Renewing:
    • ‒ Separate exhaust system at joint between front exhaust pipe and catalyst, remove heat shield above catalyst

=> Repair group 26; Removing and installing parts of exhaust system

    • ‒ Remove flexible coupling/heat shield from front propshaft and bevel box output flange
 
N39-0399
  • Front propshaft
    • ◆ Do not damage centralizing sleeve and flange centre seal when removing and installing =>Page 39-85
  • Socket head bolt, 40 Nm
  • Lock plate
  • Constant velocity joint boot
    • ◆ Drive off with a drift before pressing CV joint off
    • ◆ Check for damage
  • Dished washer
    • ◆ Inner diameter serrated
    • ◆ Installation position: Large diameter lies against CV joint
 
N39-0399
  • Gasket
    • ◆ Renewing. Pull off protective foil and stick onto joint.
  • Constant velocity joint
    • ◆ Pressing off => Fig. 1
    • ◆ Pressing on => Fig. 2
    • ◆ Greasing:
      Press 25 g of G-6.3 grease into joint from each side (50 g in total), when renewing boot re-grease joint if necessary
  • Circlip
    • ◆ Renew
    • ◆ Remove and install with circlip pliers VW 161 a
  • Hexagon bolt, 45 Nm
  • Washer
    • ◆ Always renew
 
N39-0399
  • Flange
    • ◆ Pulling off => Fig.3
    • ◆ Pulling on => Fig.4
  • Intermediate bearing
    • ◆ Pulling off => Fig. 5
    • ◆ Driving on => Fig.6
  • Bolt, 25 Nm
  • Rear propshaft
    • ◆ Do not damage centralizing sleeve and flange centre seal when removing and installing =>Page 39-85
  • Hexagon bolt with washer, 60 Nm
    • ◆ For securing flexible coupling with balance weight to viscous coupling (item 21 )
 
N39-0399
  • Flexible coupling with balance weight
    • ◆ Three projecting sleeves in each case engage in the mounting holes of the viscous coupling and propshaft
  • Flexible coupling
    • ◆ Three projecting sleeves in each case engage in the mounting holes of the viscous coupling and propshaft
  • Viscous coupling
 
V39-1045

→ Fig.1     Pressing constant velocity joint off

 
V39-1046

→ Fig.2     Pressing constant velocity joint on

  • ‒ Press on carefully.
  • ‒ Tighten tensioner 40 - 204 securely, the propshaft must not be pushed down within the tensioner, otherwise paintwork damage will occur.
  • ‒ Repair paintwork damage as follows if necessary:
    Remove grease remains with Nitro thinner L 001 600.
    Apply 2-component acrylic paint (ALN 769 041 with hardener ALZ 009 001).
 
V39-1041

→ Fig.3     Pulling flange off

 
V39-1044

→ Fig.4     Pulling flange on

 
V39-1042

→ Fig.5     Pulling intermediate bearing off

A -

Separating tool 12...75 mm e.g. Kukko 17/1

B -

Puller, e.g. Kukko 18/0

Note:

When using a two-arm puller, first cut the rubber guide and then remove the metal cover.

 
V39-1043

→ Fig.6     Driving intermediate bearing on

  • ‒ Drive intermediate bearing onto stop.

Checking function of viscous coupling > < Removing and installing propshaft