Golf Mk3
|

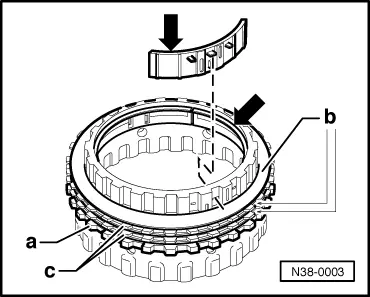
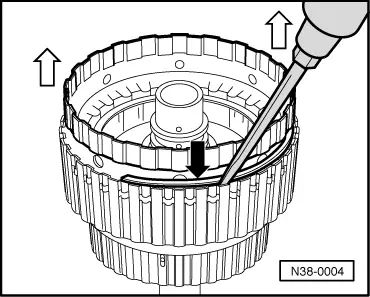
| 1 - | Support ring |
| q | 4-piece, unclip from inner plate carrier |
| q | Installing → Fig. |
| 2 - | Inner plate carrier |
| q | Installing → Fig. |
| q | Assembling → Fig. |
| 3 - | Retaining ring |
| q | Different thicknesses |
| q | Mark after removing and insert at same point |
| 4 - | Pressure plate |
| q | Smooth side faces inner plate |
| q | Insert together with inner plate carrier → Fig. |
| 5 - | Inner plate |
| q | Quantity → Chapter |
| q | Installing → Fig. |
| 6 - | Outer plate |
| q | Quantity → Chapter |
| q | Installing → Fig. |
| q | Always 1.5 mm thick |
| 7 - | Outer plate |
| q | Always 2.0 mm thick |
| q | Installing → Fig. |
| 8 - | Corrugated washer |
| 9 - | Retaining ring |
| q | Removing and installing → Fig. |
| 10 - | Piston cap |
| q | Sealing lips are vulcanised to cap |
| q | Moisten lips of seals with ATF before installing |
| q | Turn cap slightly when installing |
| 11 - | Intermediate spring ring |
| q | With spring support shell and compression springs |
| 12 - | Piston |
| q | Sealing lips are vulcanised to piston |
| q | Moisten lips of seals with ATF before installing |
| q | Turn piston slightly when installing |
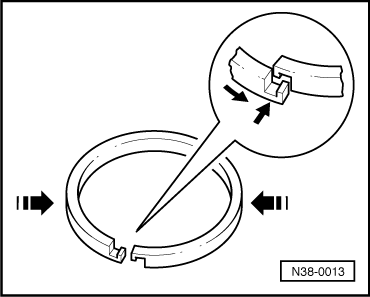
| 13 - | Piston ring (smaller Ø) |
| q | Check for proper seating → Fig. |
| q | Fitting → Fig. |
| 14 - | Piston ring |
| q | Check for proper seating → Fig. |
| q | Fitting → Fig. |
| 15 - | Clutch housing with turbine shaft |
| q | Inspect mounting bushes If mounting bushes are damaged, renew clutch housing |
| q | Before inserting inner plate carrier, place corrugated spring ( → Item) and inner and outer plates in clutch housing → Fig. |
| 16 - | Piston ring |
| q | Check for proper seating → Fig. |
| q | Fitting → Fig. |
|
|
 Note
Note
|
|
|
|
|
|
|

|