
Golf Mk3
| I - Assembly overview - rear axle assembly |
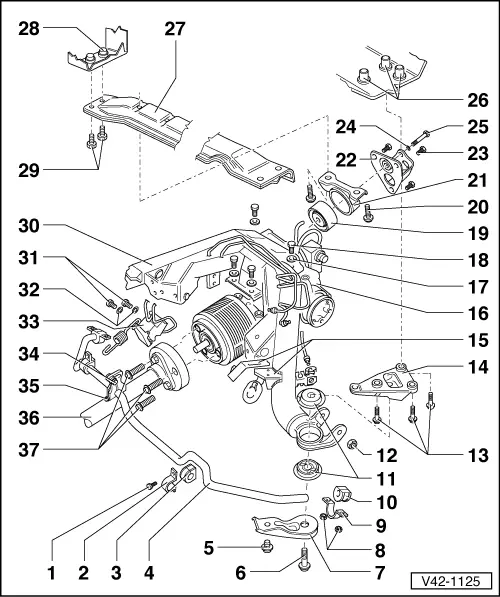
| 1 - | Hexagon bolt, 25 Nm |
| 2 - | Inner clamp |
| 3 - | Inner rubber bush |
| 4 - | Anti-roll bar |
| q | If necessary, repair paint damage and apply corrosion protection coating |
| 5 - | Hexagon bolt, 60 Nm |
| 6 - | Hexagon bolt, 130 Nm |
| 7 - | Support |
| 8 - | Self-locking hexagon nut, 25 Nm |
| 9 - | Outer clamp |
| 10 - | Outer rubber bush |
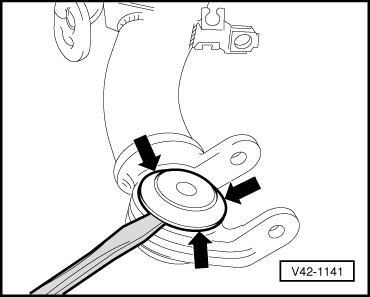
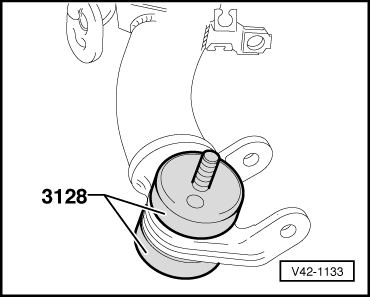
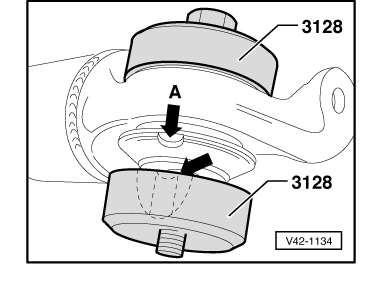
| 11 - | Bonded rubber bush |
| q | Removing → Fig. |
| q | Installing → Fig. |
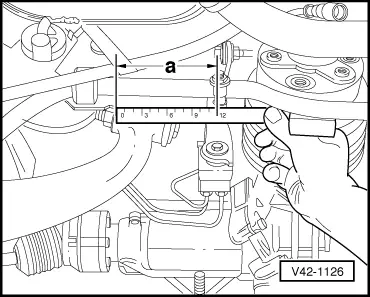
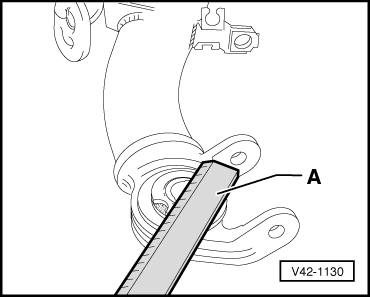
| q | Determining installation position → Fig.. |
| q | Premature wear is to be anticipated in the event of non-observance. |
| 12 - | Self-locking hexagon nut, 120 Nm |
| 13 - | Hexagon bolt, 85 Nm |
| q | 12-point hexagon socket head bolt as of vehicle ID No. 1H-SW 320 001 1H-SB 080 001. |
| 14 - | Mounting bracket |
| q | Do not loosen to remove rear axle. |
| q | During assembly work, e.g. following accident repairs, contact surfaces must be free of wax and underbody sealant. |
| 15 - | Retainer for handbrake cable |
| 16 - | Final drive |
| q | Removing and installing, repairing → 5-speed manual gearbox 02C; Rep. Gr.39. |
| 17 - | Washer |
| 18 - | Hexagon bolt, 45 Nm |
| 19 - | Bonded rubber bush |
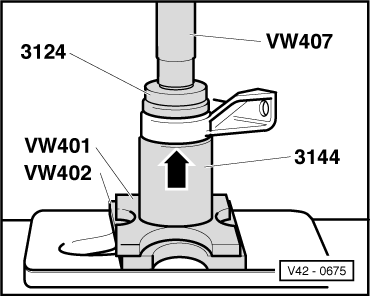
| q | Pressing out and in → Fig.. |
| 20 - | Hexagon bolt, 75 Nm |
| 21 - | Gearbox mounting |
| q | Lower rear axle assembly to remove. |
| 22 - | Mounting bracket |
| 23 - | Hexagon bolt, 45 Nm |
| 24 - | Spring washer |
| q | Renew |
| 25 - | Hexagon bolt, 65 Nm |
| 26 - | Cap nut in longitudinal member for mounting bracket |
| q | Reworking → Chapter. |
| 27 - | Cross member |
| q | Remove fuel tank to remove → Rep. Gr.20. |
| 28 - | Cap nut in longitudinal member for mounting bracket |
| q | Reworking → Chapter. |
| 29 - | Hexagon bolt, 65 Nm |
| 30 - | Axle beam |
| 31 - | Hexagon bolt, 25 Nm |
| 32 - | Spring washer |
| q | Renew |
| 33 - | Brake pressure regulator |
| q | Adjusting and setting values → Chapter. |
| 34 - | Hexagon nut, 25 Nm |
| 35 - | Retainer for brake pressure regulator |
| q | Installation position → Fig.. |
| 36 - | Propshaft |
| q | Removing and installing → 5-speed manual gearbox 02C; Rep. Gr.39. |
| 37 - | Twelve point bolt, 60 Nm |
|
|
|
|
|
|
|
|
 Note
Note
|
|