volkswagen Workshop Repair Guides

Volkswagen Workshop Service and Repair Manuals

Adjusting assembly mounting (Golf, Passat, Touran) > < Removing and installing engine mountings
Removing and installing engine support (Golf, Golf Cabrio, Passat)
Special tools and workshop equipment required
t  Special tools, testers, measuring instruments and auxiliary items required → Chapter
»Carry out the following work sequence«
Removing
–  Remove engine cover panel → Chapter.
–  Intake line between air mass meter -G70- and turbocharger.
–  Lay fuel filter to one side → Fuel supply; Rep. gr.20.
   
–  To do this, open push-on couplings -A- and -B- of fuel lines.
The procedure for this is explained in → Fuel supply system; Rep. gr.20
  N20-10436
–  Unscrew bolt -arrow-, and lay filler neck for windscreen waster system reservoir aside.
  N10-10284
–  Remove bolts -arrows-.
–  Disconnect electrical connector -1- for coolant shortage indicator switch -F66- and push coolant expansion tank to side.
–  Set up support bracket -10 - 222 A- with necessary adapters and support engine in installation position.
t  Installing support bracket (Golf, Passat) → Chapter.
  Note
t  The assembly mounting may only be removed if the engine is supported with support bracket 10-222A!
t  The engine support must only be loosened when the assembly mounting has been removed.
  A21-10035
–  Unscrew bolts -1- and -2- and remove connecting bracket.
–  Unscrew bolts -3 … 6- and remove engine mounting.
  A13-0647
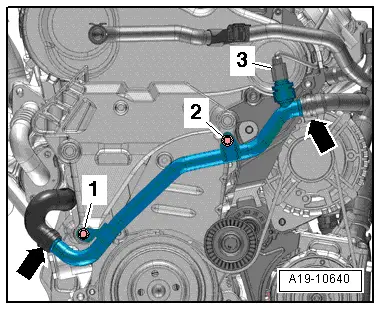
–  Disconnect electrical connector -3- on radiator outlet coolant temperature sender -G83-.
–  Remove nut -1- and bolt -2-, free coolant pipe.
–  Remove front right wheel housing liner.
  WARNING
When raising and lowering engine using support bracket -10-222A-, ensure that no components/hoses are damaged, overstretched or torn off.
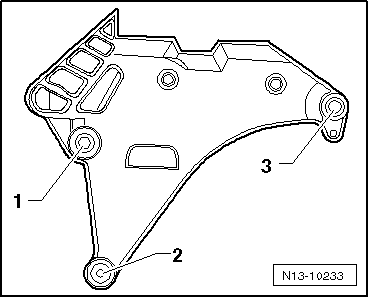
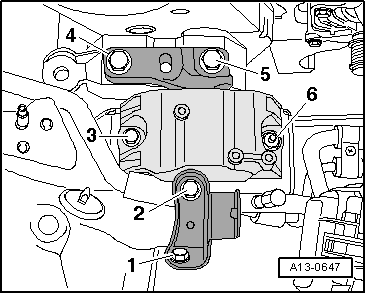
  Note
The securing bolt -1- is accessible through an aperture in the wheel housing. If necessary, raise and lower engine using spindle of support bracket -10 - 222 A- to remove or start bolts -2- and -3-.
  A19-10640
–  Remove securing bolts from engine support in sequence -3…1-.
–  Remove engine support upwards.
Installing
Install in reverse order. In the process, note the following:
  Caution
The tightening sequence and specified torques for the engine support securing bolts must always be followed. Otherwise the engine support can be stressed and it can break.
–  Insert engine support from above.
  Note
The securing bolt -1- is accessible through an aperture in the wheel housing. If necessary, raise and lower engine using spindle of support bracket -10 - 222 A- to remove or start bolts -2- and -3-.
–  First tighten new securing bolts hand-tight in sequence -1…3-.
  N13-10233
Engine support tightening sequence
–  Retighten securing bolts in tightening sequence to prescribed specified torque → Chapter.
  N13-10233
–  Position engine assembly mounting and first tighten bolts -3- and -6-, then tighten bolts -1- and -2-. Specified torque
–  Bring engine support into contact with assembly mounting using spindle.
–  Insert bolts -4- and -5- and then tighten. Specified torque → Chapter
Further assembly is basically the reverse of the dismantling sequence. In the process, note the following:
t  Ensure that fuel hose connections are tight.
t  Do not interchange supply line and return line (return line blue or with blue marking, supply line black).
  A13-0647

Adjusting assembly mounting (Golf, Passat, Touran) > < Removing and installing engine mountings