volkswagen Workshop Repair Guides

Volkswagen Workshop Service and Repair Manuals

Servicing air conditioning and heating - engine compartment > < Air conditioner with manual controls
Heating, air conditioner
Air conditioner with manual controls
Servicing air conditioning and heating - Passenger compartment

Note:

Parts marked with an * can only be serviced by specially-equipped service workshops, since refrigerant circuit must be evacuated beforehand with extraction station V.A.G 1770 or V.A.G 1771.

  • Gasket*
    • ◆ Renew
 
N87-0159
  • Heat exchanger*
    • ◆ Gaskets must be bonded gap-free all around.
    • ◆ If retaining lugs do not engage when fitting, secure heat exchanger with screws.
    • ◆ After removal replace complete coolant.
  • Connecting piece
    • ◆ With gasket
    • ◆ Renewing - remove dash panel beforehand
  • Evaporator housing*
    • ◆ With evaporator
  • Air intake*
    • ◆ With fresh and recirculating air flap
  • Series resistance -N24-
    • ◆ Renewing => Fig.2
 
N87-0159
  • Vacuum unit for fresh and recirculating air flap*
    • ◆ Ventilated: Fresh air operation
  • Fresh air blower switch -E9-
  • Air conditioner switch -E35-
    • ◆ With switch for fresh/recirculating air flap -E159-
    • ◆ With control lamp for lighting - Air conditioner switch -L43-
    • ◆ Removing => Fig.1
  • Vacuum pipe*
    • ◆ Vacuum hose connection diagram
  • Fresh air blower -V2-
    • ◆ Removing and installation => Fig.3
 
N87-0159
  • Evaporator housing cover
    • ◆ Renewing: First remove dash panel and footwell outlets -32 -
  • Retaining strap
    • ◆ Renewing: First remove dash panel and footwell outlets -32 -
  • Air duct right
  • Air distributor
    • ◆ Renewing: Remove centre console, dash panel bracket, central vent -13-, heating and fresh air controls -30-, remove shelf on passenger side; loosen dash panel -26- and lift
  • Right vent
 
N87-0159
  • Grille
    • ◆ For right vent
  • Central vent
  • Control panel trim
  • Grilles
    • ◆ For central vent
  • Instrument panel trim
    • ◆ Removing => Page 80-8 , Fig. 4
  • Grille
    • ◆ For right vent
  • Air vent left
    • ◆ Removing => Page 80-9 , Fig.6
 
N87-0159
  • Rear heater duct
    • ◆ Renewing: First remove central console, dash panel bracket, pedal cluster cover -34 -, footwell outlet -32 -, seats and carpet
  • Gasket
  • Dash panel
    • ◆ Removing and installing

=> General body repairs; Repair Group 70; Removing and installing dash panel

  • Air duct left
  • Air conditioner switch-off relay
    -J365-
    • ◆ Only on vehicles with code letters AAA, ABV, AEK, ADY and AGG
    • ◆ Behind the central console
    • ◆ Control number 147
 
N87-0159
  • Air conditioner shut-off control unit -J314-
    • ◆ Only on vehicles with code letters AAZ and manual gearbox
    • ◆ Behind the centre console
    • ◆ Control number 129
  • Air conditioner magnetic coupling cut-out relay -J246-
    • ◆ Only on vehicles with Diesel engine and automatic gearbox
    • ◆ Behind the central console
    • ◆ Control number 135
  • Warm and fresh air controls
    • ◆ With air conditioner switch -E35-
    • ◆ Installing and adjusting cables
      => Page 87-30
    • ◆ Removing and installing
      => Page 80-8 , Fig. 3
    • ◆ Dismantling and assembling => Page 80-20
 
N87-0159
  • Footwell outlet
    • ◆ Renewing: Remove shelf on drivers' side and passenger side, centre console, dash panel bracket and pedal cluster cover -33-
  • Cables
    • ◆ Renewing: First remove pedal cluster cover -34 - and footwell outlet -32 -
    • ◆ Installing and adjusting => Page 87-30
  • Pedal cluster cover
  • Distributor housing*
    • ◆ With temperature flap
    • ◆ With central flap
    • ◆ With footwell/defrost flap
    • ◆ Do not dismantle further
  • Vacuum pipe connection*
 
V87-0967

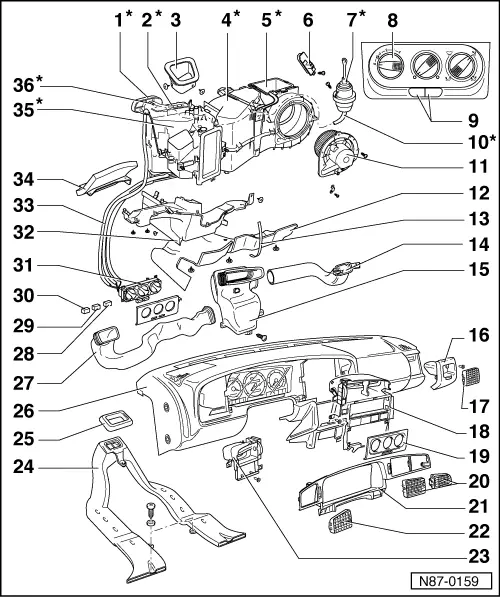
→ Fig.1     Removing air conditioner switch -E35-

Press the switch unit (at the four locating points) against the controls and at the same time towards the buttons.

 
N87-0044

→ Fig.2     Renewing series resistance -N24-

  • ‒ Remove shelf on passenger side
  • ‒ Remove glove box.
  • ‒ Pull off connector -2- and remove screws -3-.
  • ‒ Seal surface between series resistance -1- and air duct before installing with AMV 176 000 05.
 
V87-1573

→ Fig.3     Removing and installing fresh air blower -V2-

  • ‒ Remove shelf on passenger side
  • ‒ Remove glove box.
  • ‒ Pull off connector -1-.
  • ‒ Remove clamp -3-.
  • ‒ Unscrew Qty. 5 screws -arrows- and remove fresh air blower -2- downwards.

Servicing air conditioning and heating - engine compartment > < Air conditioner with manual controls