volkswagen Workshop Repair Guides

Volkswagen Workshop Service and Repair Manuals

Servicing Climatronic - engine compartment > < Control and function of the control and display unit
Heating, air conditioner
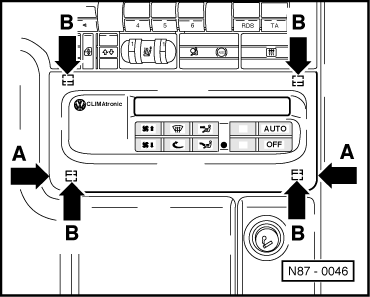
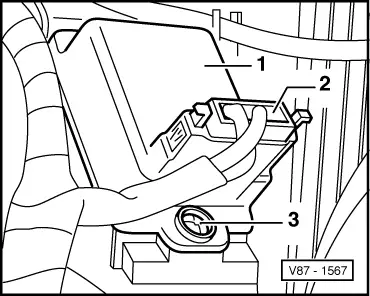
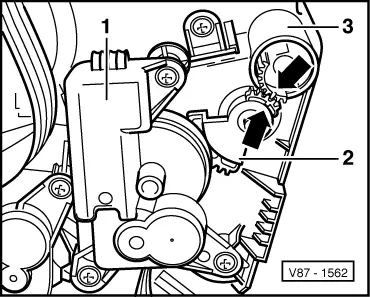
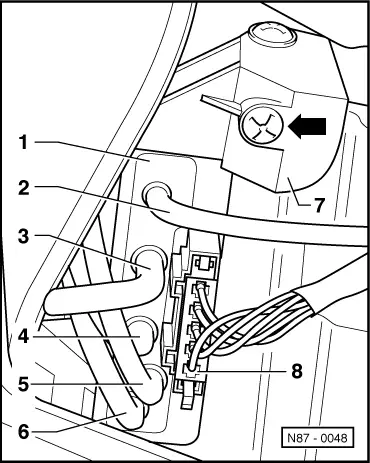
Climatronic - air conditioner with automatic regulation
Servicing Climatronic - passenger compartment
 
N87-0160

Notes:

  • ◆ Parts marked * can only be serviced in specially equipped Service workshops, as the refrigerant must be evacuated with Service station V.A.G 1770 or V.A.G 1771.
  • ◆ Removing and installing components without item numbers
  • Climatronic relay -J254-
  • Heating and air conditioning fuse -S23-
    • ◆ Only installed in vehicles up to 07.95
 
N87-0160
  • Sunlight penetration photo sensor -G107-
    • ◆ Tasks: controls temperature flap and fresh air blower depending on light intensity
    • ◆ In event of failure: control unit -J255- assumes fixed value
    • ◆ Checking: self diagnosis using V.A.G 1551
  • Double vacuum unit - foot well/defrost flap
    • ◆ Vacuum hose connection diagram
    • ◆ Removing and installing => Fig.6
  • Air intake*
    • ◆ With fresh air and recirculating air flap and air flow flap
 
N87-0160
  • Fresh air intake duct temperature sender -G89-*
    • ◆ Task: temperature sensor controls temperature flap and fresh air blower depending on temperature
    • ◆ In event of failure: ambient temperature sensor -G17- takes over task. If both sensors are defective, operation continues assuming value of +10°C. Air recirculation is not possible. Control and display unit -E87- reads: "--"
    • ◆ Checking: self diagnosis using V.A.G 1551
    • ◆ Removing: first remove air flow flap positioning motor -7 -.
 
N87-0160
  • Air flow flap positioning motor -V71-*
    • ◆ Checking: Self diagnosis using V.A.G 1551
    • ◆ Removing: first remove dash panel and complete air conditioner
  • Valve block bracket
  • Valve strip -N53-
    • ◆ If no current is flowing in the valve strip, no vacuum is created
    • ◆ Removing and installing=> Fig.5
    • ◆ Vacuum hose connection diagram => Page 87-71
  • Blower control unit -J126-
    • ◆ Task: precisely controls fresh air blower speed depending on voltage
    • ◆ Checking: self diagnosis using V.A.G 1551
    • ◆ Removing => Fig.2
 
N87-0160
  • Vacuum unit for fresh and recirculating air flap*
    • ◆ Removing: first remove dash panel and complete air conditioner
    • ◆ Vacuum hose connection diagram => Page 87-71
  • Fresh air blower -V2-
    • ◆ Checking: self diagnosis using V.A.G 1551
    • ◆ Removing=> Page 87-19 , Fig. 3
  • Central vent
  • Climatronic control unit -J255-
    • ◆ Checking: self diagnosis using V.A.G 1551
    • ◆ Removing => Fig.1
 
N87-0160
  • Control and display unit -E87-
    • ◆ Operation and function => Page 87-47
    • ◆ Checking: self diagnosis using V.A.G 1551
    • ◆ Removing => Fig.1
  • Dash panel temperature sensor trim
  • Dash panel temperature sensor -G56- with temperature sensor fan -V42-
    • ◆ Task: Temperature sensor controls temperature flap and fresh air blower in dependence on temperature
    • ◆ In event of -G56- failure: continued operation assuming value of +24°C
    • ◆ Checking: self diagnosis using V.A.G 1551
    • ◆ Removing => Fig. 3
 
N87-0160
  • Air distributor
  • Air conditioner switch-off relay -J365-
    • ◆ Only on vehicles with ADY and AEK engines up to 07.95
    • ◆ Behind the central console
    • ◆ Control number 147
  • Central vent vacuum unit
    • ◆ Removing: Remove dash panel insert, rotate, pull out
    • ◆ Vacuum hose connection diagram => Page 87-71
 
N87-0160
  • Central flap positioning motor -V70-
    • ◆ Checking: self diagnosis using V.A.G 1551
    • ◆ Removing and installing => Fig.4
  • Temperature flap positioning motor -V68-
    • ◆ Checking: self diagnosis using V.A.G 1551
    • ◆ Checking and adjusting end position of installed positioning motor
    • ◆ Removing: first remove central console and footwell vent (removing footwell vent) , item 32 )
 
N87-0160
  • Front vent temperature sender -G152-
    • ◆ Only installed in vehicles from 08.95
    • ◆ Function: Controls the air distribution defrost/footwell and the fresh air blower speed dependent upon the vent temperature.
    • ◆ Emergency running in event of front vent temperature sender-G152- failure: Continued operation assuming value of +80°C
    • ◆ Checking: self diagnosis using V.A.G 1551
    • ◆ Removing and installing=> Fig.7
  • Distributor and evaporator housing*
    • ◆ With heat exchanger
    • ◆ with evaporator
  • Vacuum pipe
    • ◆ Vacuum hose connection diagram => Page 87-71
 
N87-0046

→ Fig.1     Removing Climatronic control unit -J255- and control and display unit -E87-

  • ‒ Lever out control and display unit from below with screwdriver (arrows -A-)

Note:

Control and display unit cannot be levered out from above as this could damage the display.

  • ‒ Release connectors and pull off.
  • ‒ Press control unit clips (arrows -B-) together.
  • ‒ Remove control unit.
 
V87-1567

→ Fig.2     Renewing blower control unit -J126-

  • ‒ Remove shelf on passenger side
  • ‒ Remove glove compartment.
  • ‒ Pull off connector -2- and remove screw -3-.
  • ‒ Seal area between series resistor -1- and air duct with AMV 176 000 05 before fitting.
 
N87-0047

→ Fig.3     Removing dash panel temperature sensor -G56- and temperature sensor blower -V42-

Remove through the radio aperture in the Climatronic instrument panel

  • ‒ Remove radio.
  • ‒ Remove temperature sender trim.
  • ‒ Release temperature sensor -G56- and blower -V42- with a screwdriver (arrows) and take out through radio aperture.
 
V87-1562

→ Fig.4     Removing and installing central flap positioning motor -V70-

  •      1 -     Central flap positioning motor
  •      2 -     Intermediate gear
  •      3 -     Central flap bearing

Removing:

  • ‒ First remove central console and footwell vent.

Installing:

For correct setting of central flap markings (arrows) must be aligned.

 
N87-0048

→ Fig.5     Removing and installing valve strip -N53-

  •      1 -     Valve strip
  •      2 -     Vacuum hose, white
  •      3 -     Vacuum hose, red
  •      4 -     Vacuum hose, green
  •      5 -     Vacuum hose, black
  •      6 -     Vacuum hose, yellow
  •      7 -     Valve block bracket
  •      8 -     Connector

Removing:

  • ‒ Remove shelf on passenger side
  • ‒ Remove glove compartment.
  • ‒ Pull off vacuum hoses and connections.
  • ‒ Unscrew valve block -arrow-.

Installing:

  • ‒ Use valve block 357 907 533 as replacement part.
  • ‒ Connect up vacuum hose according to colour coding on connection pipes.
 
V87-1564

→ Fig.6     Removing and installing double vacuum unit

  •      1 -     Vacuum hose, green
  •      2 -     Vacuum hose, yellow
  •      3 -     Double vacuum unit
  •      4 -     Retainer
  •      5 -     Lever for footwell/defrost flap

Removing:

  • ‒ First remove dash panel and heating and air conditioning unit
 
N87-0161

→ Fig.7     Removing and installing front vent temperature sender -G152-

  • ‒ Remove front left footwell trim
  • ‒ Pull connector -1- off front vent temperature sender -G152- -2-
  • ‒ Turn front vent temperature sender -G152- -2- by 90° and remove

Servicing Climatronic - engine compartment > < Control and function of the control and display unit