volkswagen Workshop Repair Guides

Volkswagen Workshop Service and Repair Manuals

Dismantling and assembling heater > < Erasing fault memory, ending output
Heating, air conditioner
Servicing heating system
 
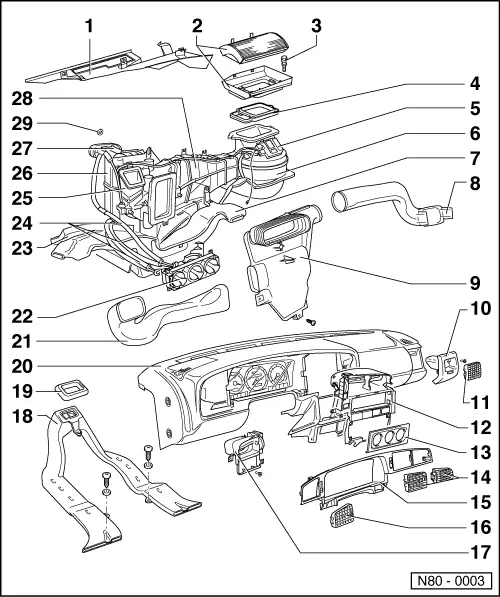
N80-0003
Warning!
Always disconnect the battery earth strap before working on the electrical system.

Note:

Before disconnecting battery, obtain radio code for radios with anti-theft coding.

  • Plenum chamber cover
  • Dust and pollen filter
    • ◆ Removing => Fig.5
  • Hexagon screw with shank M6x22
    • ◆ 5 Nm
  • Gasket
 
N80-0003
  • Series resistance for fresh air blower with overheating fuse -N24-
    • ◆ Removing and installing => Fig.1
  • Fresh air blower -V2-
    • ◆ Removing => Fig.2
  • Footwell vent
    • ◆ Renewing: Remove shelf on drivers' and passenger side, centre console, dash panel bracket and pedal cluster cover -23 -
  • Air ducting right
  • Air distributor
    • ◆ Renewing: Remove centre console, dash panel bracket, central vent -12-, heating and fresh air controls -22-, remove shelf on passenger side; Loosen dash panel -20- and lift
 
N80-0003
  • Right vent
    • ◆ Removing => Fig. 8
  • Grille
    • ◆ For right vent
  • Central vent
    • ◆ Removing => Fig. 7
  • Control panel trim
  • Grilles
    • ◆ For central vent
  • Instrument panel trim
    • ◆ Removing => Fig. 4
  • Grille
    • ◆ For left vent
  • Air vent left
    • ◆ Removing => Fig. 6
 
N80-0003
  • Rear ducting
    • ◆ Renewing: Remove central console, dash panel bracket, pedal cluster cover -23 -, footwell outlet -7 -
  • Rear ducting seal
    • ◆ Renewing: Remove central console, dash panel bracket, pedal cluster cover -23 -, footwell outlet -7 -
  • Dash panel
    • ◆ Removing and installing

=> General body repairs; Repair Group 70; Removing and installing dash panel

  • Air ducting left
  • Fresh air and heated air controls
    • ◆ Removing and installing => Fig.3
    • ◆ Dismantling and assembling
    • ◆ Installing and adjusting cables => Page 80-14
 
N80-0003
  • Pedal cluster cover
  • Cables
    • ◆ Renewing: First remove pedal cluster cover -23 - and foot well outlet -7 -
    • ◆ Removing and installing => Page 80-14
  • Intermediate piece
    • ◆ With gasket
    • ◆ Renewing - remove dash panel beforehand
  • Air distribution housing
    • ◆ With temperature flap
    • ◆ With central flap
    • ◆ With footwell/defrost flap
    • ◆ Do not dismantle further
    • ◆ Renewing: Remove dash panel and heating items -22- to 28- =>Fig. 9 ; Removing and installing heater
    • ◆ Installing: => Page 80-12 dismantling and assembling heater
 
N80-0003
  • Heat exchanger
    • ◆ Renewing: Remove dash panel and heating items -22- to 28- =>Fig. 9 ; Removing and installing heater
    • ◆ Installing: => Page 80-12 dismantling and assembling heater
    • ◆ After removal renew complete coolant
  • Air ducting with main shut-off flap
    • ◆ Renewing: Remove dash panel and heating items -22- to 28- =>Fig. 9 ; Removing and installing heater
    • ◆ Installing: ; dismantling and assembling heater
  • Hexagon nut M6
    • ◆ 5 Nm
 
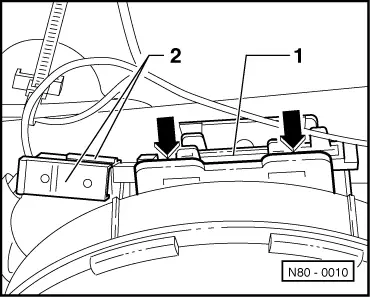
N80-0010

→ Fig.1     Removing and installing fresh air blower series resistance with overheating fuse -N24-

Removing:

  • ‒ Remove shelf on passenger side
  • ‒ Pull off connections -2-
  • ‒ Press retainer -arrow- down and remove series resistance -1-

Installing:

  • ‒ Seal surface between series resistance -1- and air duct before installing with AMV 176 000 05.
 
N80-0011

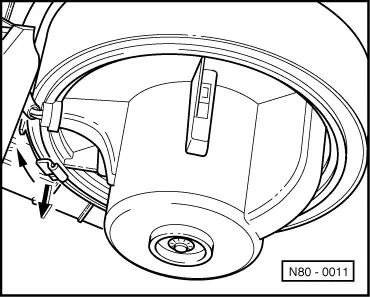
→ Fig.2     Removing fresh air blower -V2-

  • ‒ Remove shelf on passenger side
  • ‒ Fold air duct cover to side.
  • ‒ Push retaining clips down with a screwdriver, turn fresh air blower clockwise and remove.
 
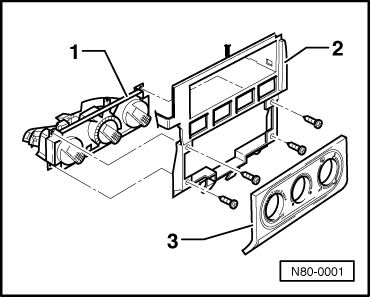
N80-0001

→ Fig.3     Removing and installing fresh and heated air control unit

Removing:

  • ‒ Pull off heating control trim panel -3-.
  • ‒ Remove central vent -2- => Fig. 7 .
  • ‒ Pull controls -1- with cables attached out of dash panel.

Installing:

  • ‒ Secure cables to removed controls.
 
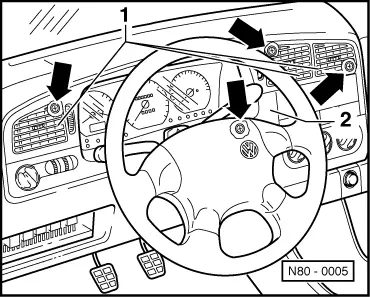
N80-0005

→ Fig.4     Removing instrument panel trim

  • ‒ Carefully lever out adjustable grilles -1- with long nose pliers.
  • ‒ Remove trim -2-.
  • ‒ Remove 4 screws -arrows- and take out instrument panel trim housing.
 
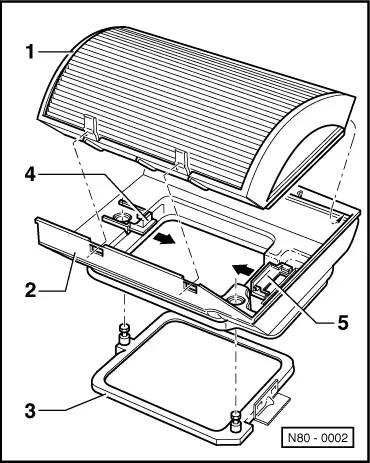
N80-0002

→ Fig.5     Removing dust and pollen filter

  •      1 -     Filter element
  •      2 -     Filter housing
  •      3 -     Gasket
  •      4 -     Clip
  •      5 -     Clip
  • ‒ Remove filter element.
  • ‒ Press clips -4- and -5- in direction of arrow and remove filter housing.
 
N80-0006

→ Fig.6     Removing left vent

  • ‒ Remove instrument panel trim => Fig. 4 .
  • ‒ Remove lighting switch.

=> Electrical system; Repair Group 96

  • ‒ Remove bolt -2-.
  • ‒ Remove vent housing -1-.
 
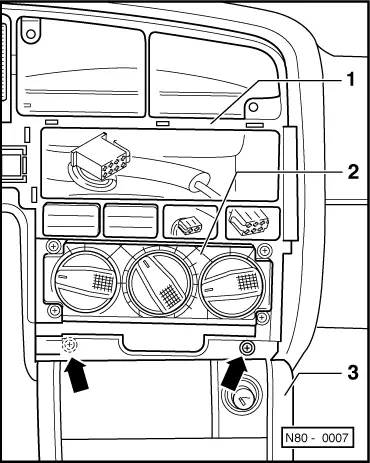
N80-0007

→ Fig.7     Removing central vent

  • ‒ Remove instrument panel trim => Fig. 4 .
  • ‒ Remove radio.
  • ‒ Remove switch.
  • ‒ Unclip control panel trim.
  • ‒ Remove control -2-.
  • ‒ Loosen central console -3-.
  • ‒ Remove 2 screws -arrows- and take out central vent -1-.
 
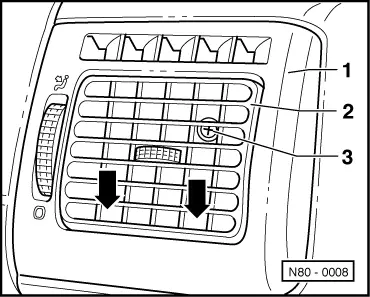
N80-0008

→ Fig.8     Removing left vent

  • ‒ Carefully lever out adjustable grilles -2- with long nose pliers
  • ‒ Remove screw -3- and disengage locating lugs -arrows-.
  • ‒ Remove vent housing -1-.
 
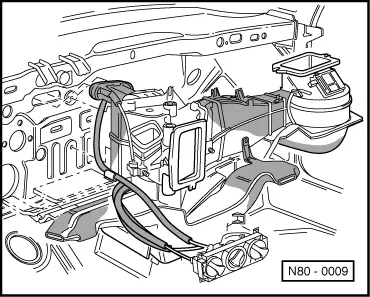
N80-0009

→ Fig.9     Removing and installing heater

Note:

Close evaporator connections to ensure that no coolant enters passenger compartment when removing.

Installing:

  • ‒ Pre-assemble hexagon nuts on engine bulkhead.
  • ‒ Tighten hexagon nut, with shank, in plenum chamber.
  • ‒ Tighten engine bulkhead hexagon nuts.

Dismantling and assembling heater > < Erasing fault memory, ending output