volkswagen Workshop Repair Guides

Volkswagen Workshop Service and Repair Manuals

Dismantling and assembling selector lever (vehicles with ignition key removal lock) > < Dismantling and assembling selector mechanism
Automatic gearbox 01M from January 1995
Servicing shift mechanism
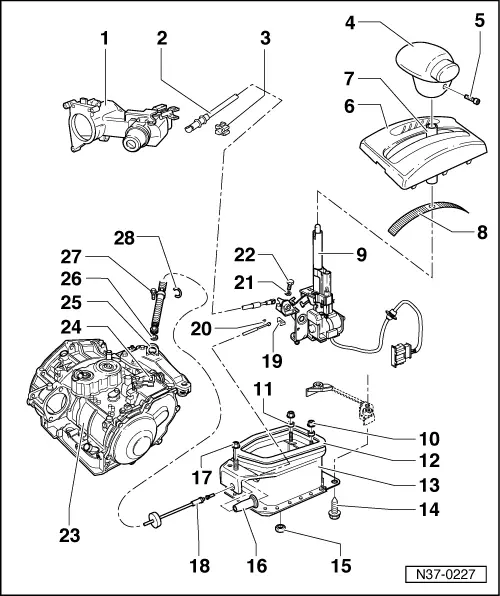
Dismantling and assembling shift mechanism (vehicles with ignition key removal lock)
 
N37-0227
  • Ignition/starter switch
  • Locking cable
    • ◆ Must not be kinked
    • ◆ Adjusting
    • ◆ Removing and installing => Page 37-30
  • Clip
    • ◆ For securing locking cable
    • ◆ Always renew
  • Selector lever handle
  • Set screw, 1.5 Nm
  • Cover
    • ◆ With selector indicator
 
N37-0227
  • Protective sleeve for selector lever
  • Cover strip
    • ◆ Insert in cover -Fig. 6 -
  • Selector lever
    • ◆ Dismantling and assembling => Page 37-23
    • ◆ To remove selector lever, lower protective plate is removed and front protective plate removed and pushed forward.
    • ◆ When installing selector lever, insert locking cable anchorage in notch of selector lever housing.
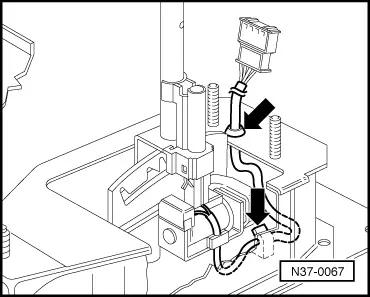
    • ◆ Securing wiring loom to selector lever housing => Fig. 2
 
N37-0227
  • Nuts
    • ◆ To secure central console
  • Distance piece
  • Gasket
    • ◆ Always renew
  • Selector lever housing
    • ◆ Need not be removed to renew selector lever cable or individual parts of shift mechanism
    • ◆ Removing and installing => Fig. 1
  • Screw, 25 Nm
  • Nut, 15 Nm
    • ◆ Always renew
    • ◆ Qty. 3
 
N37-0227
  • Protective sleeve
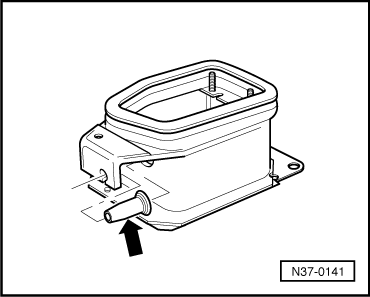
    • ◆ Insert into selector lever housing before attaching selector lever cable =>Fig. 4
  • Hexagon nut, 25 Nm
    • ◆ With shoulder
  • Selector lever cable
    • ◆ Do not bend or kink, lightly grease cable eye and cable ends before installing.
    • ◆ To remove selector lever, lower protective plate is removed, exhaust system is separated in front of catalyst (catalyst is removed on 6-Cyl. engines) and front protective plate removed.
    • ◆ Tighten selector lever cable on cable anchorage/selector lever housing to 20 Nm
 
N37-0227
    • ◆ Check guide tube for tight fit
    • ◆ Check protective sleeve between console and lever/gearshift shaft for proper seating and secure selector lever cable with corrugated locking element
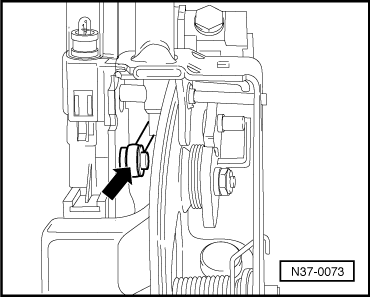
    • ◆ Attach selector lever cable to selector lever => Fig. 5
    • ◆ Adjusting => Page 37-3
  • Seal
    • ◆ Bonded to cable anchorage
    • ◆ Renew if damaged
  • Circlip
    • ◆ Install after fitting selector lever cable => Fig. 5
  • Washer
  • Bolt, 6 Nm
 
N37-0227
  • Gearbox
  • Lever
    • ◆ For selector shaft
  • Console
    • ◆ With cable anchorage for selector lever cable
  • Washer
  • Combi-bolt, 25 Nm
  • Corrugated locking element
    • ◆ For selector lever cable
    • ◆ Always renew
 
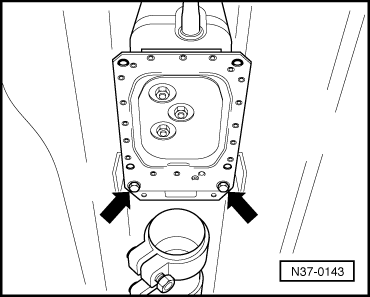
N37-0143

→ Fig.1     Removing and installing selector lever housing

  • ‒ Remove rear central console.
  • ‒ Remove hexagon nut with shoulder.
  • ‒ Remove lower protective plate.
  • ‒ Disconnect Lambda probe connector, separate exhaust system in front of catalyst (remove catalyst on vehicles with 6-Cyl. engine).
  • ‒ Remove front protective plate and rear bolts (arrows).
 
N37-0067

→ Fig.2     Securing wiring loom to selector lever housing

  • ‒ Press wiring loom into clips and into selector lever housing (arrows).
 
N37-0073

→ Fig.3     Attaching selector lever cable to selector lever

  • ‒ Fit selector lever cable eye (arrow) on selector lever and secure with circlip.
 
N37-0141

→ Fig.4     Insert boot in selector lever housing

  • ‒ Before installing the selector lever cable insert boot (arrow).

Dismantling and assembling selector lever (vehicles with ignition key removal lock) > < Dismantling and assembling selector mechanism