volkswagen Workshop Repair Guides

Volkswagen Workshop Service and Repair Manuals

Checking outer constant velocity joint > < Dismantling and assembling triple roller joint
Assembling
Assembling
–  Slide small clamp for joint protective bellows onto shaft.
–  Slide boot onto shaft.
–  Push joint body onto shaft.
Assembling triple roller star
The chamfer -arrow- on star faces towards shaft and aids in assembly.
   
–  Fit triple roller spider onto shaft according to markings and drive home onto stop.
–  Insert retaining ring, ensuring that it is seated correctly.
–  Fit rollers onto triple roller star according to markings.
–  Slide joint body over rollers and hold.
–  Now take drive shaft out of vice and clamp joint body in position in vice.
  N40-0187
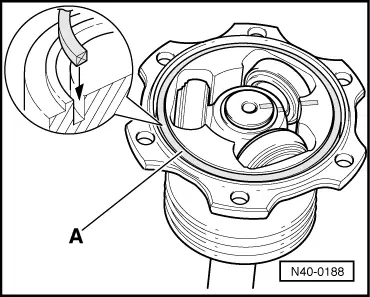
–  Insert rectangular section seal -arrow- from repair set into groove.
The rectangular profile of the seal seals the triple roller joint and joint flange directly.
Therefore a cover is no longer required!
–  Press 90 grammes of drive shaft grease from repair set into triple roller joint.
–  Press 90 grammes of joint grease, from repair set, into the reverse side of the triple roller joint.
–  Install joint boot.
  N40-0188
–  Fit hose clip.
  N40-0119
–  Tighten small clamp using hose clip pliers -V.A.G 1275-.
Caution when installing!
  N40-0181
To prevent the triple roller joint from being pushed back unintentionally when installing the drive shaft, secure triple roller joint with adhesive tape.
Remove adhesive tape just before bolting to drive flange.
  N40-0189

Checking outer constant velocity joint > < Dismantling and assembling triple roller joint