audi Workshop Repair Guides

Audi Workshop Service and Repair Manuals

Checking compressions > < Removing cylinder head
4-Cylinder engine (5-valve), Mechanics
Removing and installing cylinder head
Installing cylinder head

Notes:

  • ◆ Always renew cylinder head bolts when assembling.
  • ◆ When performing repairs, renew self-locking nuts and bolts.
  • ◆ Renew self-locking nuts and bolts which have a specified tightening angle as well as seals and gaskets.
  • ◆ Secure all hose connections with the correct hose clips (same as original equipment)

=> Parts catalogue

  • ◆ If repairing, carefully remove any remains of gasket material from the cylinder head and cylinder block. Make sure that no long scores or scratches are made on the surfaces.
  • ◆ Carefully remove any remaining emery and abrasive material.
  • ◆ Remove new cylinder head gasket from packaging, just before installation.
  • ◆ Handle gasket extremely carefully. Damaging the silicone layer or the indented area will lead to leaks.
  • ◆ No oil or coolant must be allowed to remain in the blind holes for the cylinder head bolts in the cylinder block.
 
A13-0377
  • ‒ → Align marking on camshaft sprocket with marking on cylinder head cover -arrows-.

 
A13-0045
  • ‒ Check again whether the crankshaft is positioned at TDC for cylinder 1:
    • ‒ → Vehicles with manual gearbox
 
A13-0043
    • ‒ → Vehicles with automatic gearbox

 
A15-0135
  • ‒ → Place cylinder head gasket in position.
    • ‒ Note position of centralizing pins in cylinder block -arrows-.
    • ‒ Check installation position of cylinder head gasket. The part No. faces towards cylinder head and should be legible from inlet side.
  • ‒ Place cylinder head on.
 
A15-0023
  • ‒ Insert cylinder head bolts and tighten by hand.
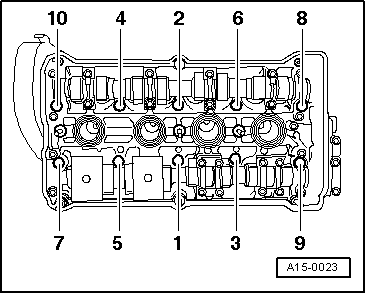
  • ‒ → Tighten cylinder head bolts in two stages in the sequence shown as follows:
  • ‒ Tighten using torque wrench:
    • ‒ 1st stage: 40 Nm
  • ‒ Tighten with normal fixed wrench:
    • ‒ 2nd stage: turn an additional 180° (1/2 turn)
      (alternatively 2 x 90° is possible)

Note:

It is not necessary to re-tighten cylinder head bolts later after repairs have been performed.

  • ‒ Install cylinder head cover .
  • ‒ Install toothed belt (adjust valve timing)
  • ‒ Install upper section of intake manifold => Page 15-15.
  • ‒ Check oil level => Page 17-22.

Note:

Change engine oil if dirty:

=> Maintenance booklet

  • ‒ Install support for exhaust manifold.
  • ‒ Install front exhaust pipe => Page 26-17.
  • ‒ Aligning exhaust system free of stress =>
    Page 26-18.
  • ‒ Fill up with coolant=> Page 19-7.

Notes:

  • ◆ When the battery is reconnected, re-activate electrical equipment (radio, combined radio/navigation system, clock, electric windows) as described in the Owner's Manual.
  • ◆ De-activate service mode in telematics control unit.

=> Radio, telephone and navigation system; Repair group 91

  • ◆ Further procedures after reconnecting the voltage supply:

=> Motronic injection and ignition system; Repair group 24

Tightening torques

Component

Nm

Combination valve for secondary air system to cylinder head


10

Coolant pipe flange to cylinder head

10

Support for

cylinder block

25

exhaust manifold to

exhaust
manifold


25

Checking compressions > < Removing cylinder head