Audi Workshop Service and Repair Manuals
HOME
FEATURES
MENU
INDEX
ABOUT US
Renewing grooved ball bearing for Haldex coupling, final drive "02D/0AV" >
< Removing and installing oil filter for Haldex coupling, final drive "02D/0AV"
A3 Mk2
Power transmission
Rear final drive 02D, 0AV, 0BR, 0BS and 0BY
Final drive, differential, differential lock
Exploded view - dismantling and assembling Haldex coupling (generation "Haldex II"), rear final drive "02D/0AV&qu
Removing and installing Haldex coupling pumpV181, final drive "02D/0AV"
Removing and installing Haldex coupling pumpV181, final drive „02D/0AV“
Removing and installing Haldex coupling pump -V181-, final drive „02D/0AV“
Special tools and workshop equipment required
t
Torque wrench -V.A.G 1331-
t
Drip tray for workshop hoist -VAS 6208-
Removing
–
Switch off ignition.
–
Place drip tray underneath.
–
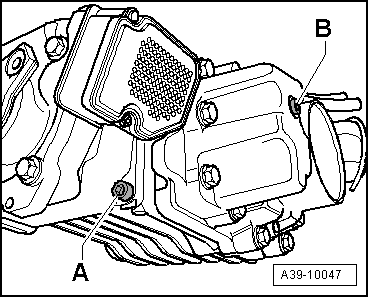
Remove drain plug
-A -
and drain high performance oil for Haldex coupling completely.
–
Fit drain plug
-A-
with new seal.
Tightening torque for plug
-A-
: 30 Nm
–
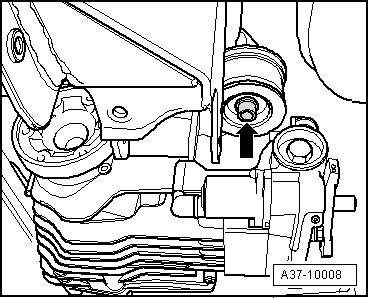
Loosen securing bolt
-arrow-
at front mounting bracket for final drive approx. 7 turns and lower final drive slightly.
–
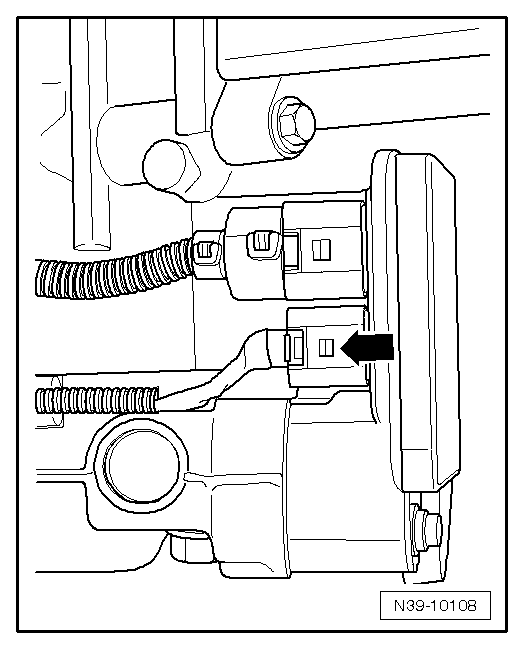
Unplug connector
-arrow-
for pump from control unit.
–
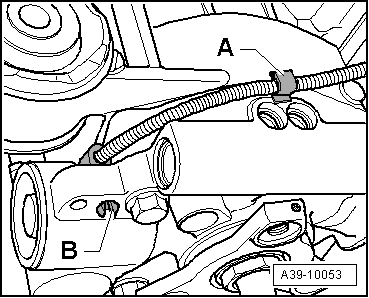
Detach wiring harness together with retainer
-A-
from housing and move clear.
–
Press retainer tabs
-B-
together and push into hole in housing as far as possible.
–
Re-tighten securing bolt
-arrow-
finger-tight.
–
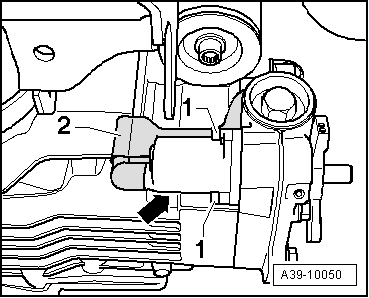
Position drip tray under final drive.
–
Unscrew securing bolts for pump
-1-
.
–
Pull out pump
-arrow-
together with the wiring protection
-2-
from Haldex coupling housing.
Installing
Installation is carried out in the reverse order; note the following:
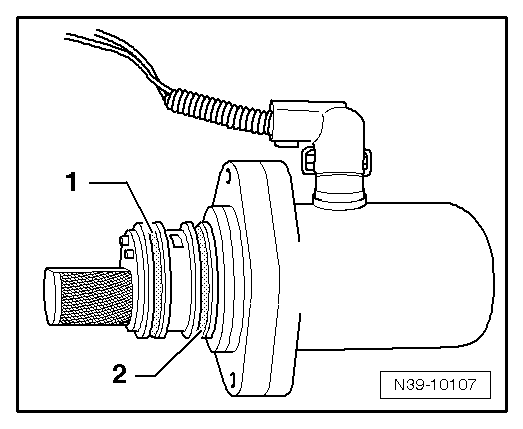
–
Renew O-rings
-1-
and
-2-
.
–
Lightly lubricate O-rings
-1-
and
-2-
with high-performance oil for Haldex coupling.
–
Press pump
-arrow-
in until limit stop. Make sure that the wiring protection
-2-
is properly seated.
–
Tighten bolts
-1-
. Tightening torque
→ Item
–
Unscrew securing bolt
-arrow-
from front mounting bracket.
–
Clip wiring harness onto top of Haldex coupling and fit connector
-arrow-
to control unit.
–
Secure rear final drive with a new bolt
-arrow-
to subframe. Tightening torque
→ Item
–
Fill up with high-performance oil for Haldex coupling and check oil level in Haldex coupling
→ Chapter
.
Power transmission
Rear final drive 02D, 0AV, 0BR, 0BS and 0BY
Final drive, differential, differential lock
Exploded view - dismantling and assembling Haldex coupling (generation "Haldex II"), rear final drive "02D/0AV&qu
Removing and installing Haldex coupling pumpV181, final drive "02D/0AV"
Renewing grooved ball bearing for Haldex coupling, final drive "02D/0AV" >
< Removing and installing oil filter for Haldex coupling, final drive "02D/0AV"