| Removal and Installation Hot air gun Sharp knife Scraper Protective gloves Roller Materials Name Specification Degreaser Primer
3M 4297 Removal | | -
Remove the convertible top assembly. For additional information, refer to Section 501-17 . | | | -
Place the convertible top assembly on a suitable clean surface (interior surface facing upwards). | | | -
Release the tension of the convertible top assembly. | | | -
Using a suitable thin bladed screwdriver, remove and discard the rear window glass zip retaining clips. | | | -
Using a suitable thin blade screwdriver, release the rear window glass zip. | | | -
Turn the convertible top assembly over (interior surface facing downwards). | | | -
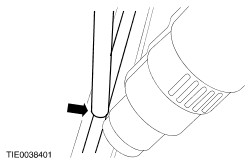
Using a suitable sharp knife, cut the adhesive strip between the rear window glass and the overlapping convertible top fabric. | | | -
Remove the rear window glass. | Installation | | -
WARNING:Wear protective gloves to prevent heat burns. Failure to follow this instruction may result in personal injury. CAUTION:Use a suitable strip of heat resistant material to prevent heat damage to the rear window glass zip. With the aid of another technician, pull back the overlapping convertible top fabric from the rear window glass opening. Using a hot air gun, apply warm air (45°C) from a distance of approximately 150 mm and using a suitable scraper remove the adhesive strip. | | | -
Using a suitable degreaser, remove the remaining adhesive from the overlapping convertible top fabric from the rear window glass opening. | | | -
Turn the convertible top assembly over (interior surface facing upwards). | | | -
Position the rear window glass in the convertible top assembly opening. | | | -
NOTE:The zip slider should be not be removed at this stage. NOTE:Do not install the new zip retaining clips at this stage. Install the rear window glass. - Align the zip ends and insert the zip slider provided.
- Install the rear window glass.
| | | -
Tension the convertible top assembly to stretch the fabric. | | | -
NOTE:This step is only required if the rear window glass is creased. Remove the rear window glass. | | | -
NOTE:This step is only required if the rear window glass is creased. Turn the convertible top assembly over (interior surface facing downwards). | | | -
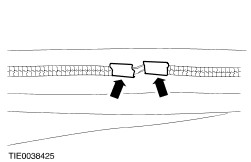
CAUTION:To prevent the convertible top assembly fabric from overheating continually move the hot air gun from side to side. NOTE:This step is only required if the rear window glass is creased. With the aid of another technician, stretch the convertible top assembly fabric in the directions shown. - Using a hot air gun, apply warm air (45°C) from a distance of approximately 150 mm to the convertible top assembly rear window glass opening.
| | | -
NOTE:This step is only required if the rear window glass is creased. Turn the convertible top assembly over (interior surface facing upwards). | | | -
NOTE:This step is only required if the rear window glass is creased. Install the rear window glass. | | | -
Using a suitable pair of pliers, install new zip retaining clips. | | | -
Turn the convertible top assembly over (interior surface facing downwards). | | | -
Apply primer to the inside of the rear window glass opening overlapping convertible top fabric. | | | -
Install the adhesive tape. - Raise the overlapping convertible top fabric.
- Remove the adhesive tape protection film and lower the overlapping convertible top fabric onto the adhesive tape.
| | | -
CAUTION:To prevent the convertible top assembly fabric from overheating continually move the hot air gun from side to side. With the aid of another technician, secure the overlapping convertible top fabric to the rear window glass. - Using a hot air gun, apply warm air (45°C) from a distance of approximately 150 mm to the overlapping convertible top fabric.
- Using a suitable roller, apply pressure to the overlapping convertible top fabric.
| | | -
Allow the adhesive to cure. For additional information refer to the manufacturer's instructions. | | | -
Install the convertible top assembly. For additional information, refer to Section 501-17 . | | | -
CAUTION:To prevent the convertible top assembly fabric from overheating continually move the hot air gun from side to side. If the rear window glass is creased, with the aid of another technician stretch the convertible top assembly fabric in the directions shown. - Using a hot air gun, apply warm air (45°C) from a distance of approximately 150 mm to the convertible top assembly rear window glass opening.
| | | -
Check the rear window glass opening for water leaks. | | | -
CAUTION:To prevent the convertible top assembly fabric from overheating continually move the hot air gun from side to side. If the rear window glass leaks, apply warm air (45°C) from a distance of approximately 150 mm and apply pressure to the effected area. | | |