|
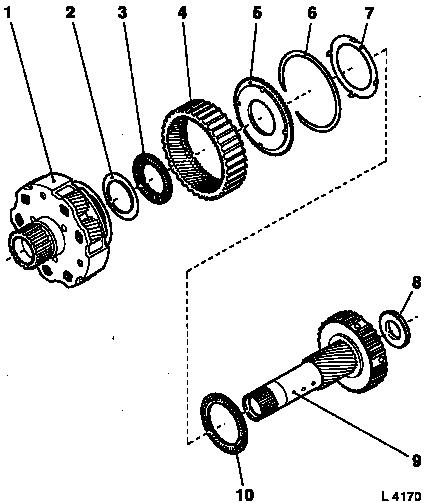
Planetary Gear Set P1, Disassemble and Reassemble
(AF 20)
Survey
|
1
|
Planetary carrier assembly
|
|
2
|
Thrust washer
|
|
3
|
Thrust bearing
|
|
4
|
Rear ring gear
|
|
5
|
Flange
|
|
6
|
Retaining ring
|
|
7
|
Race
|
|
8
|
Thrust bearing
|
|
9
|
Sun gear
|
|
10
|
Thrust bearing
|
|
|
 Remove Remove
Remove transmission – see operation "Transmission, Remove
and Install (AF 20)". Secure converter against falling out.
|
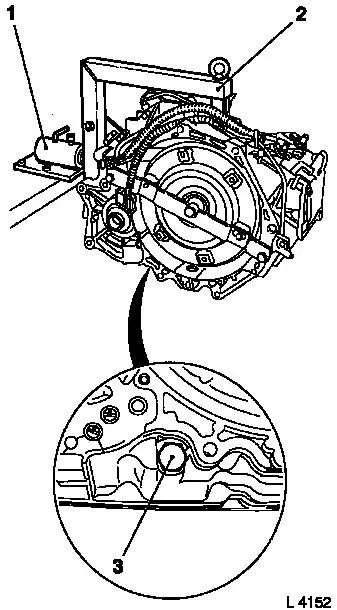
Attach transmission to KM-694-A (2). Attach assembly to KM-113-2
(1).
Remove fluid drain bolt (3), drain transmission fluid and
collect for damage diagnosis – see operation "Transmission
Fluid Condition, Check (AF 13-II/AF 17/AF 20/AF 22)".
Remove converter – see operation "Converter and/or Fluid
Pump Seal Ring, Replace (AF 13-II/AF 17/AF 20/AF 22)".
|
|
|
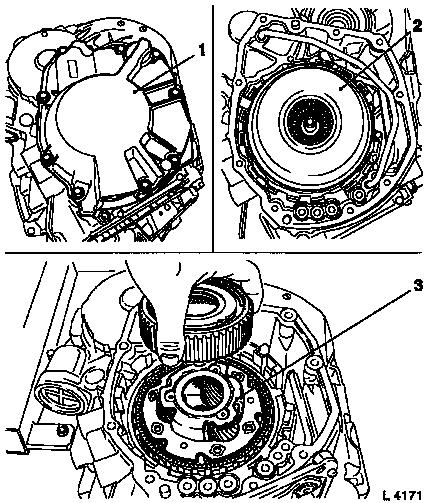
Remove rear cover (1) – see operation "Rear Cover with
Piston C1, Remove and Install (AF 20)".
Remove drive shaft assembly (2) with multi-plate clutch C1 and
C2 – see operation "Drive Shaft Assembly with Multi-plate
Clutch C1 and C2, Remove and Install (AF 20)".
Remove planetary gear set P1 (3) – see operation
"Planetary Gear Set P1, Remove and Install (AF 20)".
|
|
|
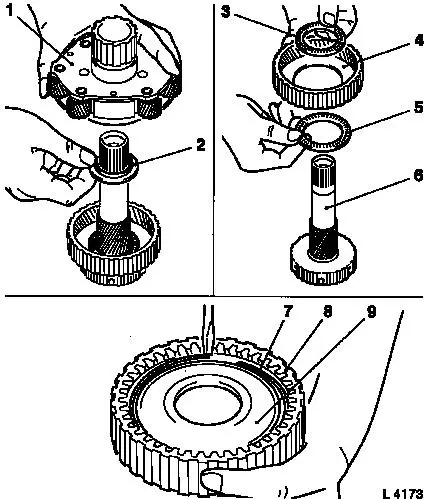
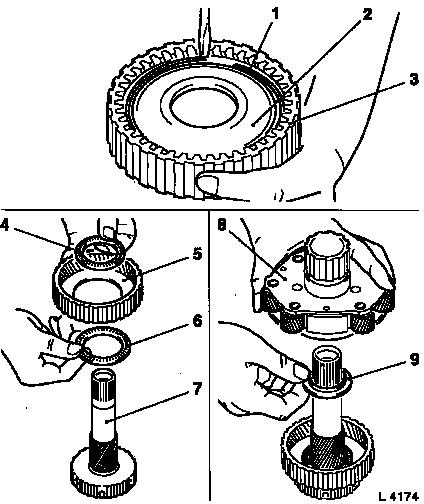
Remove planetary carrier (1) with thrust washer (2). Remove
thrust bearing (3) – note installation position.
Remove rear internal gear (4) with thrust bearing (5) from sun
gear (6) – note installation position of thrust bearing.
Prise out retaining ring (7) with screwdriver. Remove flange (9)
from rear internal gear (8).
|
|
 Measure
|
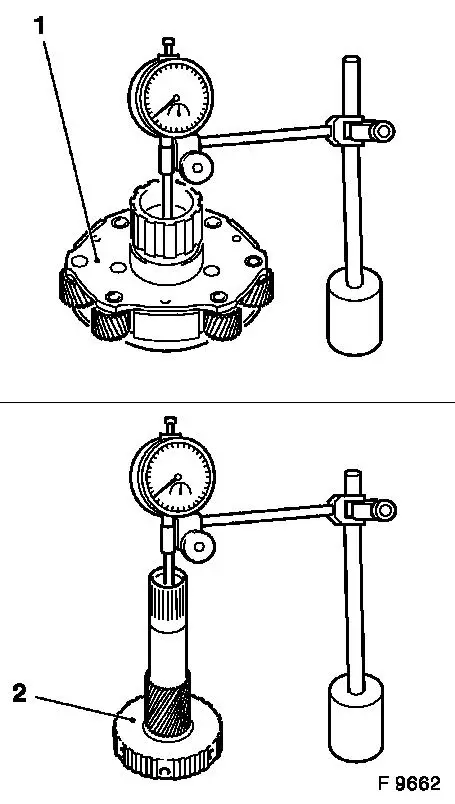
Measure inner diameter of planetary carrier bushing: Carry out
several measurements using Dial Gauge MKM-571-B and probe for inner
diameter and determine average. Measurement value 30.0 to 30.03 mm
– if necessary, replace planetary carrier assembly (1).
Measure inner diameter of sun gear bushing: Carry out several
measurements using Dial Gauge MKM-571-B and probe for inner
diameter and determine average. Measurement value: 21.50 to 21.53
mm – if necessary, replace sun gear (2).
|
|
 Install
|
Insert flange (2) into rear internal gear (3) and secure with
new retaining ring (1).
Place rear internal gear (5) with thrust bearing (6) on sun gear
(7) – note installation position of thrust ring.
Place thrust bearing (4) onto rear internal gear – note
installation position. Insert planetary carrier (8) with thrust
washer (9).
|
|
Install
|
Install planetary gear set P1 (1) – see operation
"Planetary Gear Set P1, Remove and Install (AF 20)".
Install drive shaft assembly (2) with multi-plate clutch C1 and
C2 – see operation "Drive Shaft Assembly with Multi-plate
Clutch C1 and C2, Remove and Install (AF 20)".
Install rear cover (3) – see operation "Rear Cover with
Piston C1, Remove and Install (AF 20)".
|

|
Install converter – see operation "Converter and/or Fluid
Pump Seal Ring, Replace (AF 13-II/AF 17/AF 20/AF 22)". Secure
converter against falling out.
|
Attach fluid drain bolt (3) with new seal ring to transmission
– tightening torque 40 Nm / 29.5 lbf. ft.
Remove transmission assembly from KM-113-2 (1) with KM-694-A.
Remove transmission from KM-694-A (2).
Install transmission – see operation "Transmission, Remove
and Install (AF 20)". Fill up transmission fluid
 Inspect
Check and correct level of transmission fluid – see
operation "Transmission Fluid Level, Check and Correct (AF 13-II/AF
17/AF 20/AF 22)".
|
|
|
