|
Rear Cover with Piston C1, Remove and Install (AF
20)
 Remove Remove
Remove transmission – see operation "Transmission, Remove
and Install (AF 20)". Secure converter against falling out.
|
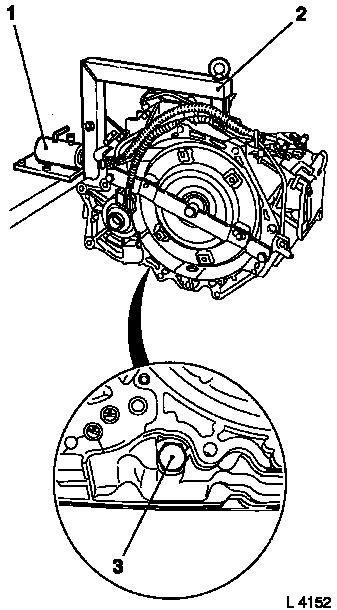
Attach transmission to KM-694-A (2). Attach assembly to KM-113-2
(1).
Remove fluid drain bolt (3), drain transmission fluid and
collect for damage diagnosis – see operation "Transmission
Fluid Condition, Check (AF 13-II/AF 17/AF 20/AF 22)".
Remove converter – see operation "Converter and/or Fluid
Pump Seal Ring, Replace (AF 13-II/AF 17/AF 20/AF 22)".
|
|
|
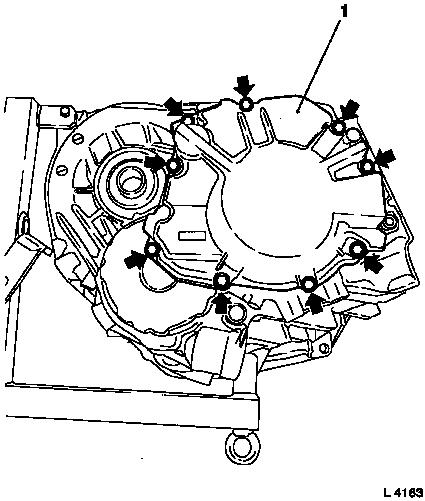
Remove 9 fastening bolts (arrows) for rear cover (1) from
transmission housing.
Carefully remove rear cover, carefully release from transmission
housing with rubber hammer, if necessary.
 Clean Clean
Clean sealing surfaces and remove sealant residues.
|
|
 Install
Clean thread for fastening bolts.
|
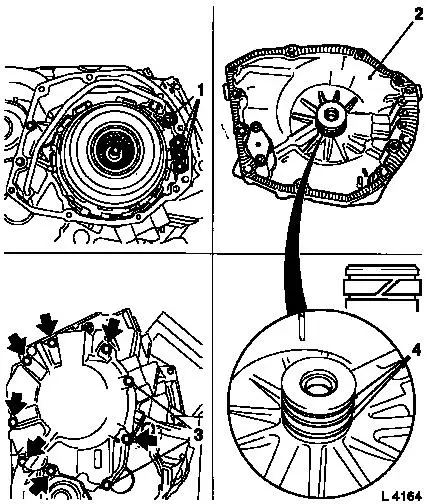
Replace 4 seal rings (1) for fluid circuit regulator. Insert new
seal rings with grease into bore holes.
Replace cut seal rings (4).
Coat sealing surface (2) of rear cover
with sealing compound.
|
Insert fastening bolts with locking compound. Attach rear cover
to transmission – tightening torque:
|
|
M8
|
(arrows)
|
25 Nm / 18 lbf. ft.
|
|
M6
|
(3)
|
10 Nm / 7 lbf. ft.
|
|
|
Install converter – see operation "Converter and/or Fluid
Pump Seal Ring, Replace (AF 13-II/AF 17/AF 20/AF 22)". Secure
converter against falling out.
|
Attach fluid drain bolt (3) with new seal ring to transmission
– tightening torque 40 Nm / 29.5 lbf. ft.
Remove transmission assembly from KM-113-2 (1) with KM-694-A
(2). Remove transmission from KM-694-A.
Install transmission – see operation "Transmission, Remove
and Install (AF 20)". Fill up transmission fluid
 Inspect
Check and correct level of transmission fluid – see
operation "Transmission Fluid Level, Check and Correct (AF 13-II/AF
17/AF 20/AF 22)".
|
|
|
