
8.1.01.1 Compressor Removal/Renewal
- Make
- Aston Martin
- Model
- DB7 Factory Workshop Manual Volume 2: Electrics, Body and Air Conditioning
- Year
- 1994–1998
- Section
- Repair procedures › 8.1.01.1 Compressor Removal/Renewal
Air conditioning8.1.01.1 Compressor Removal/Renewal
8.1.01.1 Compressor Removal/Renewal
Procedure
- Open the bonnet and fit a wing cover.
- Depressurise the air conditioning system.
- Disconnect the low and high pressure hoses from the rear of the compressor. Plug the hose ends to prevent the ingress of dirt.
- Remove the compressor pivot bolt securing nut.
- Carefully separate the muffler from the compressor and remove and discard the ‘O’ ring seal.
- Fit a blanking plug to the muffler and a blanking plate to the compressor, fit and tighten the bolt that secures blanking plate.
- Raise the vehicle to working height on a ramp.
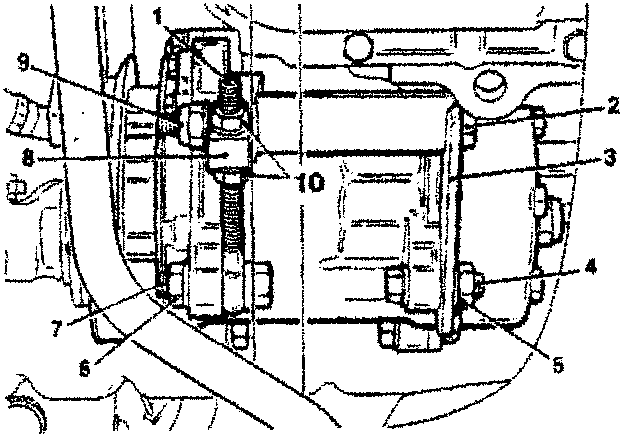
- Slacken the compressor drive belt adjuster rod and adjuster plate securing nuts and bolts (Fig. 1-4, 5, 6 and 7).
- Slacken adjuster nut (Fig. 1-10).
- Remove the nut and bolt (Fig. 1-4 and 5) from adjuster plate (Fig. 1-3).
- Slacken trunnion nut and bolt (Fig. 1-9 and 2) and remove the adjuster rod (Fig. 1-1).
- Disconnect the compressor multi-plug.
- Remove the compressor drive belt.
- Pivot the compressor away from engine, support the compressor and remove the top pivot bolt and lift the compressor clear of the vehicle.
- Remove the mounting brackets from the compressor.
- Lift the compressor up to the engine and fit the top pivot bolt (Fig. 1-2) from above.
- Attach adjustment rod loosely to the compressor (Fig. 1-1) with nut and bolt (Fig. 1-6 and 7).
- Loosely attach adjustment plate (Fig. 1-3) to the compressor with nut and bolt (Fig. 1-4 and 5).
- Fit bolt (Fig. 1-2) through trunnion (Fig. 1-8) and fit nut (Fig. 1-9) to the bolt.
- Fit the drive belt over the pulley, move the compressor away from the engine to tension the drive belt and lightly tighten the bolts and nuts.
- To obtain the correct tension on the drive belt tighten adjuster nuts (Fig. 1-10). The belt is correctly tensioned when a load of 59-63.6 kg (130-140 lb) applied at the centre deflects the belt 4 mm.
- Ensure that all securing bolts and nuts are fully tightened.
- Lower the vehicle to the ground.
- Remove the blanking plate and the blanking plugs from the compressor.
- Fit new ‘O’ ring seals to the low and high pressure hoses and connect them to the compressor. Fit the retaining plate, fit and tighten the screw.
- Charge the air conditioning system.
- Remove the wing cover and close the bonnet.
Parts & tools for this job For 1994 Aston Martin DB7
- TOOLA/C manifold gauge setSearch: AC manifold gauge set
- TOOLUV leak detection kitSearch: AC UV leak detection kit
- PARTCabin filterSearch: Aston Martin DB7 1994 cabin filter
Links open Amazon search results in a new tab. As an Amazon Associate I earn from qualifying purchases.