
Removal Manifold
- Make
- Aston Martin
- Model
- V8 Vantage Factory Workshop Manual
- Year
- 2005–2010
- Section
- Engine Structure › Removal Manifold
03 EngineRemoval Manifold
Removal Manifold
- 37. Disconnect manifold heating hoses (x2).
- 38. Disconnect throttle body multiplex and harness clip.
- 39. Disconnect breather pipe quickfits (x2) from air cleaner duct.
- 40. Disconnect air cleaner duct (clip x1).
- 41. Disconnect EGR vacuum hose.
- 42. Disconnect EGR pipe union and tie aside.
- 43. Remove manifold bolts (x 10) (see Figure 1).
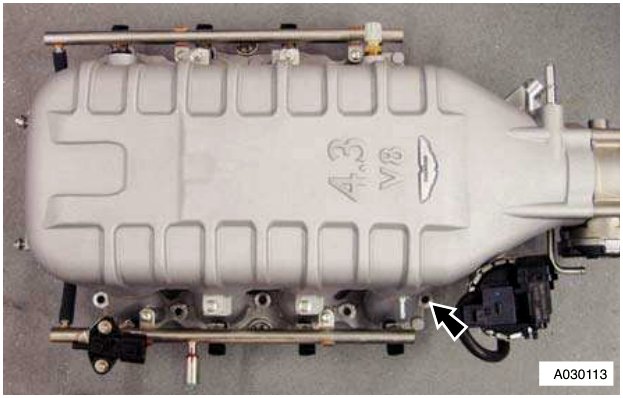
Figure 1
- 44. Remove bolts (x2) bracket to manifold (rear).
- 45. Move manifold (2x people) forward, remove bolt for purge line P-clip, remove manifold.
- 46. Remove gaskets and clean mating faces.
Installation
Manifold to Vehicle
- 1. Install new gaskets to cylinder block (glue in place).
- 2. Install manifold (allowing access to install bolt for purge line P-clip).
- 3. Install manifold bolts (x10) (torque and tightening sequence).
- 4. Install bolts (x2) bracket to manifold (rear).
- 5. Connect EGR pipe union.
- 6. Connect EGR vacuum hose.
- 7. Connect air cleaner duct (clip x1).
- 8. Connect breather pipe quickfits (x2) to air cleaner duct.
- 9. Connect throttle body multiplex and harness clip.
- 10. Connect manifold heating hoses (x2).
Installation RH Side
- 11. Connect EGR vacuum pipe to sensor and manifold.
- 12. Install coolant pipe bracket (bolt x2, nut x2).
- 13. Connect EGR (x1), fuel rail pressure sensor (x1) and injector multiplexes (x4).
- 14. Refit (inj/alt) harness to coolant pipe bracket (fir tree x3).
- 15. Connect heater hose to pipe (quick fit).
- 16. Refit heater hose (clipx2) and EGR vacuum lines (clips x2) to bracket.
- 17. Install fuel feed pipe.
- 18. Install purge pipe P-clip.
- 19. Install harness bracket to engine.
Installation LH Side
- 31. Connect breather hose to manifold (quickfit).
- 32. Connect IAT multiplex.
- 33. Unclip injector harness from cam cover (x2).
- 34. Connect injector multiplexes (x4).
- 35. Install pipe support bracket (nuts x2, bolts x2).
- 36. Install harness support bracket (bolt x1, nut x2) release harness clips (fir tree x3).
- 37. Connect booster hose to manifold and support clip.
- 38. Connect heater hose from pipe (quick fit).
- 39. Install heater hose (x2) and throttle body hose (x2) from support bracket.
- 40. Connect purge line to manifold and into support clip.
- 41. Connect breather hoses (x2) to cam cover.
- 42. Install coil cover.
- 43. Install corner cross brace (torque bolts with vehicle on level ground).
Note: The installation is not handed
- 44. Refill coolant (see Workshop Manual procedure 03.03.AD Coolant - Drain and Refill).
- 45. Install cross brace. (torque bolts with vehicle on level ground).
Upper Intake Manifold Assembly Gasket (RHD) - Renew
| Repair Operation Time (ROT) | |
|---|---|
| Item | Code |
| Upper Intake Manifold Assembly Gasket-Renew | RHD 03.01.BF |
Removal
- 1. Depressurise fuel rail (see Workshop Manual procedure 10.01.EK Fuel System - Depressurise).
- 2. Coolant drain (see Workshop Manual procedure 03.03.AD Coolant - Drain and Refill).
- 3. Remove cross brace (bolts x4).
Removal RH Side
- 4. Remove coil cover.
- 5. Remove corner cross brace.
Removal Manifold
- 20. Feed harness into inner wing area.
- 21. Install fusebox to bracket.
- 22. Install earth lead to fusebox.
- 23. Install battery lead to fusebox (1x nut and rubber cover).
- 24. Install multiplexes to fuse box.
- 25. Install fusebox bracket fixings.
- 26. Refit harness fir tree clips to cylinder head.
- 27. Refit engine breather hose.
- 28. Install VVT solenoid multiplex, position coil and CMP harness (1x edge clip).
- 29. Install ECM (see Workshop Manual procedure 03.13.NC Module - Power Train Control - Renew).
- 30. Install coil cover.
Parts & tools for this job For 2005 Aston Martin V8 Vantage
- PARTEngine gasket setSearch: Aston Martin V8 Vantage 2005 engine gasket set
- TOOLTorque wrenchSearch: 3/8 inch torque wrench
- TOOLFeeler gauge setSearch: feeler gauge set
Links open Amazon search results in a new tab. As an Amazon Associate I earn from qualifying purchases.