Workshop Manuals Factory service & repair Audi
01 Running gear02 Body03 Power unit04 Power transmission05 Vehicle electrics06 Heating, ventilation, air conditioning system
Audi A101 · Running gear
01 · Steering & suspension

Removing and installing handbrake lever

Make
Audi
Model
A1
Section
Brake, brake mechanics › Handbrake › Removing and installing handbrake lever
Running gearRemoving and installing handbrake lever
Removing and installing handbrake lever
Removing
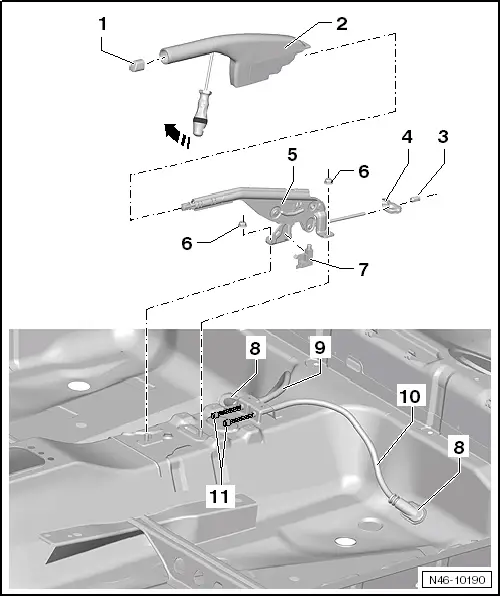
–  Remove centre console → General body repairs, interior; Rep. gr.68.
–  Release handbrake.
–  Unclip handbrake warning switch from bracket.
–  Detach electrical connector for handbrake warning.
   
–  Slacken off adjustment nut -3- until handbrake cables can be disengaged from compensator -4-.
–  Disengage handbrake cables from compensator.
–  Remove nuts -6- on handbrake lever.
–  Remove handbrake lever from vehicle.
Installing
–  Fit handbrake lever on studs.
  N46-10190
–  Screw on and tighten nuts -6-.
–  Attach electrical connector for handbrake warning.
–  Clip handbrake warning switch into bracket.
  Note
Ensure correct installation position
  Note
Make sure that switch works properly before continuing installation.
  N46-10190
–  Hook handbrake cables into compensator -3-.
  Note
Make sure that rubber grommets -8- are still fitted.
–  Pre-tension handbrake cables using adjustment nut.
  Note
Pull up the handbrake lever several times to seat the handbrake cables in the correct position in the compensator.
–  Adjust handbrake → Chapter.
–  Install centre console → General body repairs, interior; Rep. gr.68.
  Caution
Make sure that the brakes work properly before the vehicle is driven on the road.
  N46-10190

Parts & tools for this job For Audi A1

Links open Amazon search results in a new tab. As an Amazon Associate I earn from qualifying purchases.