audi Workshop Repair Guides

Audi Workshop Service and Repair Manuals

Removing and installing flexible shaft (for air distribution) > < Removing and installing heater controls / air conditioner controls
Removing and installing base plate for heater controls / air conditioner controls
  Note
   
t  There is a different base plate -C- for vehicles with no air conditioner (with an actuator for the Bowden cable to the temperature flap -E-) and with manually controlled air conditioner (no Bowden cable actuator -E-, the temperature flap is moved by way of a control motor) → Electronic parts catalogue.
t  The base plate -C- is fitted with a gear mechanism for actuation of the flexible shaft -H- (for air distribution). Due to the gear mechanism at the heater / air conditioning unit and at the base plate of the heater / air conditioner controls -C-, one turn of the switch produces two turns of the flexible shaft -H- → Chapter.
Removing
  A80-0245
–  Move the rotary temperature setting control -A- to the „cold stop“ position (vehicles with no air conditioner only).
–  Remove the glove compartment: → General body repairs, interior; Rep. gr.68
–  Remove the „passenger side“ footwell vent.
–  Remove the heater control unit -J65- (air conditioning system control unit -J301-) → Chapter.
  A80-0239
–  Screw out the bolts -A-.
–  Remove the frame -B-.
–  Reach into the centre console and release the fastener of the flexible shaft -H-.
–  Reach into the centre console, release the fastener -D- of the Bowden cable sheath -E- and take the Bowden cable sheath out of the mount (vehicles with no air conditioner only).
  A80-0245
–  Reach into the centre console and release the ball at the Bowden cable -F- from the control lever -G- (vehicles with no air conditioner only).
–  Remove the base plate from the centre console -C-.
Installing
  Note
  A80-0245
t  A gear mechanism is fitted in the base plate of the heater/air conditioner controls -C- and in the heater/air conditioning unit. One turn of the rotary air distribution knob causes the flexible shaft -H- to turn twice.
t  As the position of the flaps cannot be seen with the dash panel installed, pay attention to the position of the air distributor flaps on connecting the flexible shaft -H- to the base plate.
–  Connect the Bowden cable for the temperature flap to the base plate -A- (vehicles with no air conditioner only).
  A80-0245
–  Assemble the base plate -D- and the heater control unit -J65- (air conditioning system control unit -J301-) -C- → Chapter.
  A80-0244
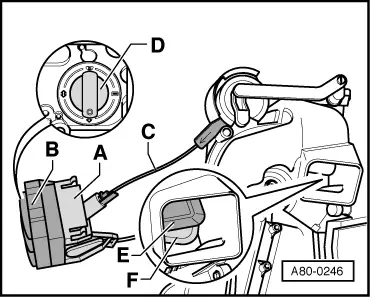
–  Move the rotary control -D- to the position in which the flexible shaft -C- can be inserted in the mount of the base plate -A-.
–  Insert the flexible shaft -C- in the base plate -A-.
–  Move the rotary control -D- to the „air to footwell“ position (as shown in illustration).
–  Check the position of the right footwell flap -E-, the air duct -F- must be completely open.
–  If the air duct -F- is closed:
–  Detach the flexible shaft -C- from the base plate -A-.
–  Move the rotary control -D- to the „air distribution to windscreen“ position (turn through approx. 180°).
–  Insert the flexible shaft -C- in the base plate -A-.
–  Move the rotary control -D- to the „air to footwell“ position (as shown in illustration).
–  Check the position of the right footwell flap -E-, the air duct -F- must be completely open.
Perform further installation in reverse order of removal.
  A80-0246

Removing and installing flexible shaft (for air distribution) > < Removing and installing heater controls / air conditioner controls