| Diagnosis and Testing Preliminary Inspection WARNING:Apply the handbrake and move the selector lever to "P" when - the vehicle is parked;
- any checks or adjustments are carried out in the engine compartment;
- the vehicle is left with the engine running.
Know and Understand the Concern The customer concern must be clearly understood before diagnosing the cause of the fault. Therefore it is important to check the details with the customer. The conditions under which the concern arises must be understood. For example: - Engine cold or at operating temperature
- hot or cold ambient temperature
- vehicle operating conditions
verify customer concern by driving the vehicle NOTE:If noise/vibration is a concern, check for dependency on: rpm, vehicle speed, shift, gear range or temperature. NOTE:Some CD4E automatic transmissions may give rise to concern over the way the engine runs. For example, it can cause the engine to stall if the torque converter lock-up clutch does not disengage. - Engine cold or at operating temperature
- Hot or cold ambient temperature
- Type of road
- Vehicle loaded/unloaded
- City/highway driving
- Upshift
- Downshift
- Coasting
- Shift quality
- Noise/vibration
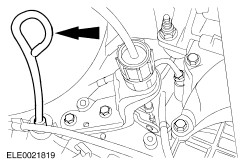
Fluid Level Check NOTE:If the vehicle has been operating for an extended period at high speeds or in city traffic during hot weather or pulling a trailer, the engine should be turned off for about 30 minutes to allow the fluid to cool before checking. The fluid levels should preferably be checked at operating temperature (60-70°C) after a drive of approx. 30 km. If necessary, it is also possible to check the fluid levels without driving 30 km, provided the ambient temperature is above 10°C. With the vehicle on a level surface, start the engine and move the transmission range selector lever through all of the gear ranges, allowing sufficient time for each position to engage. Engage the transmission range selector lever in the PARK position, fully set the parking brake and leave the engine running at idle. Wipe off the fluid level indicator cap, pull the fluid level indicator out and wipe clean. Put the fluid level indicator back into the guide tube and make sure it is seated properly. Pull out the fluid level indicator and read the fluid level. When checking the fluid levels at operating temperature (60-70°C), the fluid level should be in the shaded range on the dipstick. When the vehicle has been driven, and the outside temperature is above 10 °C, the fluid level should be between the hole and the lower edge of the shaded area on the fluid level indicator. Transmission Fluid Indicator Reading 3 - Lower hole mark, DO NOT DRIVE High or Low Fluid Level If the fill level is too high, transmission components may cause the fluid to foam. Foamed oil causes variable operating pressure, with the following consequences: - harsh/delayed shifts or engagements
- damage to the clutch material
- incorrect torque converter operation
- fluid emission from the vent
If fluid level is too high, excess fluid must be removed. Refer to Fluid Change - Drain/Refill in this section for proper procedures. A fluid level that is too low will affect transmission operation, as follows: - slipping
- delayed engagement
- damage to transmission components
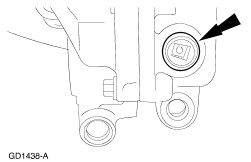
Low levels may also indicate that a leak is present in the fluid system. If the fluid level is too low, fluid must be added. Refer to Add Fluid in this section. Add Fluid CAUTION:Use of any fluid other than that specified could result in transmission malfunction or failure. Before adding any fluid, be sure that the correct type (ESP-M2C166-H) will be used. Add transmission fluid through the filler tube in amounts of 0,25 l, each time checking the fill level on the fluid dipstick. Drain automatic transmission fluid if too much is filled. Fluid Change - Drain/Refill - Place a suitable container under the transmission drain plug.
NOTE:If internal damage to the transmission is suspected, drain the fluid through a paper filter. A small amount of abraded clutch particles is a sign of normal wear. If however a larger amount of particles of abraded clutch or metallic pieces are found, then a transmission repair is necessary. - Remove the transmission drain plug and drain the transmission fluid.
- Install the transmission drain plug.
- Fill the automatic transmission with automatic transmission fluid according to Ford specification ESP-M2C166-H. For further information, refer to the following operation in this section: Specifications
- Apply the handbrake. Start the engine and run it at idle speed for five minutes while shifting through all shift lever positions. Switch off the engine.
- Place a suitable container under the transmission drain plug.
- Remove the transmission drain plug and drain the transmission fluid.
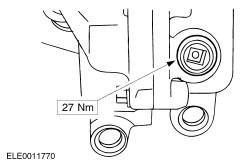
- After the fluid has been drained, clean the drain plug thread and apply a thin coat of Teflon Sealant meeting Ford specification WSK-M2G350-A2.
- Install the transmission drain plug.
- Remove the drain pan, tools and materials and lower the vehicle.
- Fill the automatic transmission with automatic transmission fluid according to Ford specification ESP-M2C166-H.
- Start the engine and move the shift lever through all positions. Check the fluid level and top up if necessary.
Fluid Condition Check NOTE:Evidence of fluid contamination or incorrect fluid can cause poor shift quality. If the transmission fluid condition is suspect, drain the transmission and refill with automatic transmission fluid to Ford specification ESP-M2C166-H . - Make the normal fluid level check as described in Fluid Level Check in this section.
- Observe the color and odor of the fluid. It should be red, not brown or black. If there is an odor, this may indicate overheating or damage to a clutch disc or band.
- Wipe the dipstick with a clean lint-free cloth. Check the resulting mark for signs of solid particles or anti-freeze (sticky residues on the dip-stick).
If particles are present in the fluid or there is evidence of contamination, the transmission drain plug should be removed and a sample of filtered through a paper filter examined. If transmission failure is confirmed by further evidence of coolant or excessive particles in the fluid, the transmission must be completely cleaned and repaired. This includes cleaning and flushing the torque converter and transmission cooling system. During disassembly and assembly, all overhaul checks and adjustments of clearances and end play must be made. After repairing the transmission, all diagnostic tests and adjustments listed in the diagnosis section must be completed to make sure that the problem has been eliminated. Transmission range (TR) sensor Check the adjustment of the TR sensor. Road Test The road test verifies that the shift control system is operating correctly. - Run the engine and automatic transmission up to normal operating temperature.
- Move selector lever to "D".
- Gently depress the accelerator pedal and check the vehicle speed at which the automatic transmission upshifts and the converter lock-up clutch engages.
- If the transmission is in 4th gear (overdrive), actuate the O/D shut-off. The transmission should downshift to 3rd gear. Remove foot from accelerator. Engine braking should occur while coasting.
- Depress the accelerator pedal to the floor. The transmission should downshift into 1st gear or 2nd gear, depending on vehicle speed.
- With the selector lever in position "D", driving at a speed greater than 80 km/h and with the accelerator pedal pressed about 1/3 of the way down, move the selector lever to position "2" and lift the foot from the accelerator pedal. The transmission must immediately change down into 2nd gear.
- With the vehicle in 2nd gear, move the selector lever to range "1". Release the accelerator pedal. The transmission should downshift to 1st gear at speeds below 48 to 56 km/h.
Shift Points in relationship to Vehicle Speed | Gearshift | Max. Speed km/h | Min. Speed km/h | | Min 1-2 | 24 | 15 | | Min 2-3 | 34 | 24 | | Min 3-4 | 56 | 47 | | CT 4-3 | 53 | 44 | | CT 3-2 | 23 | 13 | | CT 3-1 | 23 | 13 | | CT 2-1 | 23 | 13 | | PT 1-2 | 34 | 24 | | PT 2-3 | 60 | 50 | | PT 3-4 | 85 | 72 | | WOT 1-2 | 61 | 50 | | WOT 2-3 | 110 | 100 | | WOT 3-4 | 169 | 159 | Min = accelerator pedal depressed slightly, CT = Closed Throttle, PT = Part Throttle (half way down) WOT = Wide Open Throttle Check shift linkages for proper adjustment. REFER to Section 307-05 Automatic Transmission/Transaxle External Controls. |