| Removal and Installation Special Tool(s) | | Protector, Shaft Seal 412-061 (T89P-19623-CH) | | | Remover, Shaft Seal 412-059 (T89P-19623-BH) | | | Remover, O-Ring 100-010 (T71P-19703-C) | | | Installer, Shaft Seal 412-058 (T89P-19623-AH) | | | Remover, Circlip 412-063 (T89P-19623-DH) | Removal | | -
Remove the A/C compressor. For additional information, refer to Compressor in this section. | | | -
Using the special tool, remove the shaft seal felt from the nose of the A/C compressor. | | | -
Clean the compressor nose area. | | | -
Using the special tool, remove the circlip. | | | -
Position the special tool in the internal diameter of the shaft seal. | | | -
Using the special tool, remove the shaft seal. | Installation CAUTION:Do not allow dirt or other foreign materials to enter the compressor. NOTE:Obtain a new A/C compressor shaft seal kit. Carefully remove the contents of the kit and inspect the plastic shaft seal protector for burrs or other damage. DO NOT USE IF IT IS DAMAGED. | | -
Clean the compressor nose area. | | | -
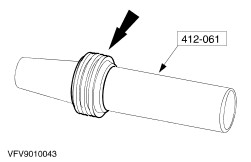
Position the shaft seal on the special tool. | | | -
Lubricate the shaft seal protector and shaft seal. - Use Motorcraft YN-12b Refrigerant Oil F2AZ-19577-AC or equivalent meeting Ford specification WSH-M1C231-B.
| | | -
Install the special tool with the shaft seal positioned. | | | -
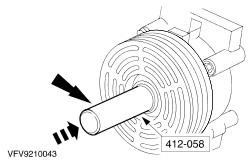
Using the special tool, install the seal. | | | -
Remove the special tools. | | | -
Using the special tool, install a new circlip. | | | -
Install a new shaft seal felt in the compressor nose. | | |